and has 0 comments
I want to let you know about the latest features implemented in Bookmark Explorer.


The version number for the extension is already 2.9.3, quickly approaching the new rewrite I am planning for 3.0.0, yet every time I think I don't have anything else I could add, I find new ideas. It would be great if the users of the extension would give me more feedback about the features they use, don't use or want to have.

Here are some examples of new features:
  • Skip button - moves the current page to the end of the bookmark folder and navigates to the next link. Useful for those long articles that you don't have the energy to read, but you want to.
  • Custom URL comparison scheme. Useful for those sites where pages with different parameters or hash values are considered different and you get duplicate notification warnings for no good reason.
  • Duplicate remover in the Manage page. This is an older feature, but now the button for it only appears where there are duplicates in the folder and with the custom URL scheme it's much more useful.
  • Option to move selected bookmarks to start or end of folder, something that is cumbersome to do in the Chrome Bookmark Manager
  • Automatically cleaning bookmark URLs of marketing parameters. This is in the Advanced settings section and must be enabled manually. So far it removes utm_*, wkey, wemail, _hsenc, _hsmi and hsCtaTracking, but I plan to remove much more, like those horrible hashes from Medium, for example. Please let me know of particular URL patterns you want to clean in your bookmarks and if perhaps you want the cleaning to be done automatically for all open URLs

As always, if you want to install the extension go to its Google Chrome extension page: Siderite's Bookmark Explorer

The first thing that strikes anyone starting to use another IDE than the one they are used to is that all the key bindings are wrong. So they immediately google something like "X key bindings for Y" and they usually get an answer, since developers switching IDEs and preferring one in particular is quite a common situation. Not so with Eclipse. You have to install software, remove settings then still modify stuff. I am going to give you the complete answer here on how to switch Eclipse key bindings to the ones you are used to in Visual Studio.

Step 1
First follow the instructions in this Stack Overflow answer: How to Install Visual Studio Key Bindings in Eclipse (Helios onwards)
Short version: Go to Help → Install New Software, select your version in the Work with box, wait until the list populates, check the box next to Programming Languages → C/C++ Development Tools and install (with restart). After that go to Window → Preferences → General → Keys and change the Scheme in a dropdown to Microsoft Visual Studio.

Step 2
When Eclipse starts it shows you a Welcome screen. Disable the welcome screen by checking the box from the bottom-right corner and restart Eclipse. This is to avoid Ctrl-arrows not working in the editor as explained in this StackOverflow answer.

Step 3
While some stuff does work, others do not. It is time to go to Window → Preferences → General → Keys and start changing key bindings. It is a daunting task at first, since you have to find the command, set the shortcut in the zillion contexts that are available and so on. The strategy I found works best is this:
  • Right click on whatever item you want to affect with the keyboard shortcut
  • Find in the context menu whatever command you want to do
  • Remember the keyboard shortcut
  • Go to the key preferences and replace that shortcut everywhere (the text filter in the key bindings dialog allows searching for keyboard shortcuts)

You might want to share or at least backup your keyboard settings. No, the Export CSV option in the key bindings dialog gives you a file you can't import. The solution, as detailed here is to go to File → Export or Import → General → Preferences and work with .epf files. And if you think it gives you a nice list of key bindings that you can edit with a file editor, think again. The format holds the key binding scheme name, then only the custom changes, in a file that is what .ini and .xml would have if they decided on having children.

Now, the real decent thing would be to not go through Step 1 and instead just start from the default bindings and change them according to Visual Studio (2016, not 2005!!) and then export the .epf file in order for all people to enjoy a simple and efficient method of reaching their goal. I leave this as an exercise for the reader.

A short list of shortcuts that I found missing from the Visual Studio schema: rename variable on F2, go to declaration on F12, Ctrl-Shift-F for search across files, Ctrl-Minus to navigate backward ... and more to come I am sure.

I had this problem with Perforce where I accidentally Reconciled my offline work with all the files in /bin and /obj folders, resulting in a huge 6000+ file changelist. OK, simple one button mistake, surely there must be some one button undoing what I just did. It appears there is not.

In order to fix this I have to follow these steps:
  1. Change the settings of Perforce to show files even in changelists larger than 1000 items (the default value)
  2. Select by hand in the changelist window the files from obj and bin folders and using Revert on them
  3. Revert the few other files that were unwanted in the changelist, like .suo and .user files - note that Revert on added files doesn't delete them, it just unadds them
  4. Create a file with paths to ignore and then use p4 set P4IGNORE=<filename> for future reconcile work

What didn't work was adding a filename or path filter when visualizing the changelist, since that is a changelist filter, not a files filter. It will show you changelists that have files that contain the pattern, but not filter the files inside the changelists themselves.

For reference, the p4ignore file I used looked like this:
p4ignore
bin/Debug
obj/Debug
*.suo
*.user
Note that I also added the p4ignore file itself, although the file was not in any Perforce repository (yet).

"But, Siderite, you should use Git (or whatever source control is the newest fad at the moment)!" Wish that could, my friend, wish that I could.

and has 0 comments
Today the free antivirus Avast reported my BitTorrent installation as infected with Win32:Evo-Gen (Susp). It also promptly removed the executable of the program. I tried to reinstall it, also to have the same happen to the installation program. I've reported a false positive (I hope it is) for BitTorrent Stable (7.9.8 build 42577) and then I added *bittorrent* as an exclusion pattern in Avast. I could then reinstall the program, retaining all of the settings and torrents in the download list.

I am writing this post to rant against subscription popups. I've been on the Internet long enough to remember when this was a thing: a window would open up and ask you to enter your email address. We went from that time, through all the technical, stylistic and cultural changes to the Internet, to this Web 3.0 thing, and the email subscription popups have emerged again. They are not ads, they are simply asking you to allow them into your already cluttered inbox because - even before you've had a chance to read anything - what they have to say is so fucking important. Sometimes they ask you to like them on Facebook or whatever crap like that.

Let me tell you how to get rid of these real quick. Install an ad blocker, like AdBlockPlus or uBlock Origin. I recommend uBlock Origin, since it is faster and I feel works better than the older AdBlock. Now this is something that anyone should do just to get rid of ads. I've personally never browsed the Internet from a tablet or cell phone because they didn't allow ad blockers. I can't go on the web without them.

What you may not know, though, is that there are several lists of filters that you can choose from and that are not enabled by default when you install an ad blocker. One of my favourite lists is Fanboy's Annoyances list. It takes care of popups of all kinds, including subscriptions. But even so, if the default list doesn't contain the web site you are looking at, you have the option to pick elements and block them. A basic knowledge of CSS selectors helps, but here is the gist of it: ###something means the element with the id "something" and ##.something is the elements with the class name "something". Here is an example: <div id="divPopup" class="popup ad annoying"> is a div element that has id "divPopup" and class names "popup", "ad" and "annoying".

One of the reason why subscription popups are not always blocked is because beside the elements that they cover the page with, they also place some constraints on the page. For example they place a big element over the screen (what is called an overlay), then a popup element in the center of the screen and also change the style of the entire page to not scroll down. So if you would remove the overlay and the popup, the page would only show you the upper part and not allow you to scroll down. This can be solved with another browser extension called Stylish, which allows you to save and apply your own style to pages you visit. The CSS rule that solves this very common scenario is html,body { overflow: auto !important; }. That is all. Just add a new style for the page and copy paste this. 19 in 20 chances you will get the scroll back.

To conclude, whenever you see such a stupid, stupid thing appearing on the screen, consider blocking subscription popups rather than pressing on the closing button. Block it once and never see it again. Push the close button and chances are you will have to keep pressing it each time you visit a page.

Now, if I only had a similar option for jump scares in movies...

P.S. Yes, cookie consent popups are included in my rant. Did you know that you can block all cookie nagware from Blogspot within one fell swoop, rather than having to click OK at each blog individually, for example?

Just when I thought I don't have anything else to add, I found new stuff for my Chrome browser extension.

Bookmark Explorer now features:
  • configurable interval for keeping a page open before bookmarking it for Read Later (so that all redirects and icons are loaded correctly)
  • configurable interval after which deleted bookmarks are no longer remembered
  • remembering deleted bookmarks no matter what deletes them
  • more Read Later folders: configure their number and names
  • redesigned options page
  • more notifications on what is going on

The extension most resembles OneTab, in the sense that it is also designed to save you from opening a zillion tabs at the same time, but differs a lot by its ease of use, configurability and the absolute lack of any connection to outside servers: everything is stored in Chrome bookmarks and local storage.

Enjoy!

I have been plagued by this thing for a few weeks: every time I turn on the Wi-Fi, then turn it off, something starts turning the Bluetooth on. Turn it off and it goes back up in a minute. The only solution was to turn off the phone and then back again without turning Wi-fi or Bluetooth on. Strangely enough, there is no way to disable Bluetooth on the phone and no way to know who turned it on last.

As an investigation, I tried something called Event Logger, which logs when Bluetooth is turned on or off, but fails to notify you of what did it. In fact, I am still not sure how I was supposed to determine what software did it and this demonstrates a systemic issue with mobile phones: you have no real control or even knowledge over what happens in it.

Long story short, I've uninstalled a lot of applications just to see if the problem goes away. In the end it was Firechat! After uninstalling it, the problem went away. Apparently I am not the only one experiencing this, although one of the few pages on the Internet regarding Firechat and Bluetooth claims Firechat does not turn it on by itself, although numerous reviews on the app's Google Store page say differently.

Update 17 June 2016: I've changed the focus of the extension to simply change the aspect of stories based on status, so that stories with content are highlighted over simple shares. I am currently working on another extension that is more adaptive, but it will be branded differently.

Update 27 May 2016: I've published the very early draft of the extension because it already does a cool thing: putting original content in the foreground and shrinking the reposts and photo uploads and feeling sharing and all that. You may find and install the extension here.

Have you ever wanted to decrease the spam in your Facebook page but couldn't do it in any way that would not make you miss important posts? I mean, even if you categorize all your contacts into good friends, close friends, relatives, acquaintances, then you unfollow the ones that really spam too much and you hide all posts that you don't like, you have no control over how Facebook decides to order what you see on the page. Worse than that, try to refresh repeatedly your Facebook page and see wildly oscillating results: posts appear, disappear, reorder themselves. It's a mess.

Well, true to this and my word I have started work on a Chrome extension to help me with this. My plan is pretty complicated, so before I publish the extension on the Chrome Webstore, like I did with my previous two efforts, I will publish this on GitHub while I am still working on it. So, depending on where I am, this might be alpha, beta or stable. At the moment of this writing - first commit - alpha is a pretty big word.

Here is the plan for the extension:
  1. Detect the user has opened the Facebook page
  2. Inject jQuery and extension code into the page
  3. Detect any post as it appears on the page
  4. Extract as many features as possible
  5. Allow the user to create categories for posts
  6. Allow the user to drag posts into categories or out of them
  7. Use AI to determine the category a post most likely belongs to
  8. Alternatively, let the user create their own filters, a la Outlook
  9. Show a list of categories (as tabs, perhaps) and hide all posts under the respective categories
This way, one might skip the annoying posts, based on personal preferences, while still enjoying the interesting ones. At the time of this writing, the first draft, the extension only works on https://www.facebook.com, not on any subpages, it extracts the type of the post and sets a CSS class on it. It also injects a CSS which makes posts get dimmer and smaller based on category. Mouse over to get the normal size and opacity.

How to make it work for you:
  1. In Chrome, go to Manage Extensions (chrome://extensions/)
  2. Click on the Developer Mode checkbox
  3. Click on the Load unpacked extension... button
  4. Select a folder where you have downloaded the source of this extension
  5. Open a new tab and load Facebook there
  6. You should see the posts getting smaller and dimmer based on category.
Change statusProcessor.css to select your own preferences (you may hide posts altogether or change the background color, etc).

As usual, please let me know what you think and contribute with code and ideas.

I've written another Chrome extension that I consider in beta, but so far it works. Really ugly makeshift code, but I am not gathering data about the way I will use it, then I am going to refactor it, just as I did with Bookmark Explorer. You may find the code at GitHub and the extension at the Chrome webstore.

This is how it works: Every time you access anything with the browser, the extension will remember the IPs for any given host. It will hold a list of the IPs, in reverse order (last one first), that you can just copy and paste into your hosts file. The hosts file is found in c:/Windows/System32/drivers/etc/hosts and on Linux in /etc/hosts. Once you add a line in the format "IP host" in it, the computer will resolve the host with the provided IP. Every time there is a problem with DNS resolution, the extension will add the latest known IP into the hosts text. Since the extension doesn't have access to your hard drive, you need to edit the file yourself. The icon of DNS resolver will show the number of hosts that it wants to resolve locally or nothing, if everything is OK.

The extension allows manual selection of an IP for a host and forced inclusion or exclusion from the list of IP/host lines. Data can be erased (all at once for now) as well. The extension does not communicate with the outside, but it does store a list of all domains you visit, so it is a slight privacy risk - although if someone has access to the local store of a browser extension, it's already too late. There is also the possibility of the extension to replace the host with IP directly in the browser requests, but this only works for the browser and fails in case the host name is important, as in the case of multiple servers using the same IP, so I don't recommend using it.

There are two scenarios for which this extension is very useful:
  • The DNS server fails for some reason or gives you a wrong IP
  • Someone removed the IP address from DNS servers or replaced it with one of their own, like in the case of governments censorship

I have some ideas for the future:
  • Sharing of working IP/host pairs - have to think of privacy before that, though
  • Installing a local DNS server that can communicate locally with the extension, so no more hosts editing - have to research and create one
  • Upvoting/Downvoting/flagging shared pairs - with all the horrible head-ache this comes with

As usual, let me know what you think here, or open issues on GitHub.

Update 29 August 2017 - Version 3.0.4: The extension has been rewritten in EcmaScript6 and tested on Chrome, Firefox and Opera.

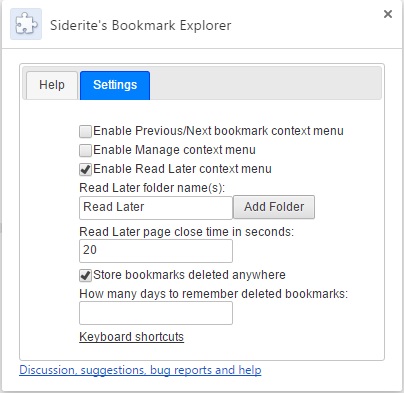
Update 03 March 2017 - Version 2.9.3: added a function to remove marketing URLs from all created bookmarks. Enable it in the Advanced settings section. Please let me know of any particular parameters you need purged. So far it removes utm_*, wkey, wemail, _hsenc, _hsmi and hsCtaTracking.

Update 26 February 2017: Version (2.9.1): added customizing the URL comparison function. People can choose what makes pages different in general or for specific URL patterns
Update 13 June 2016: Stable version (2.5.0): added Settings page, Read Later functionality, undelete bookmarks page and much more.
Update 8 May 2016: Rewritten the extension from scratch, with unit testing.
Update 28 March 2016: The entire source code of the extension is now open sourced at GitHub.

Whenever I read my news, I open a bookmark folder containing my favorite news sites, Twitter, Facebook, etc. I then proceed to open new tabs for each link I find interesting, closing the originating links when I am done. Usually I get a number of 30-60 open tabs. This wreaks havoc on my memory and computer responsiveness. And it's really stupid, because I only need to read them one by one. In the end I've decided to fight my laziness and create my first browser extension to help me out.

The extension is published here: Siderite's Bookmark Explorer and what it does is check if the current page is found in any bookmark folder, then allow you to go forward or backwards inside that folder.

So this is my scenario on using it:
  1. Open the sites that you want to get the links from.
  2. Open new tabs for the articles you want to read or YouTube videos you want to watch,etc.
  3. Bookmark all tabs into a folder.
  4. Close all the tabs.
  5. Navigate to the bookmark folder and open the first link.
  6. Read the link, then press the Bookmark Navigator button and then the right arrow. (now added support for context menu and keyboard shortcuts)
  7. If you went too far by mistake, press the left arrow to go back.

OK, let's talk about how I did it. In order to create your own Chrome browser extension you need to follow these steps:

1. Create the folder


Create a folder and put inside a file called manifest.json. It's possible structure is pretty complex, but let's start with what I used:
{
"manifest_version" : 2,

"name" : "Siderite's Bookmark Explorer",
"description" : "Gives you a nice Next button to go to the next bookmark in the folder",
"version" : "1.0.2",

"permissions" : [
"tabs",
"activeTab",
"bookmarks",
"contextMenus"
],
"browser_action" : {
"default_icon" : "icon.png",
"default_popup" : "popup.html"
},
"background" : {
"scripts" : ["background.js"],
"persistent" : false
},
"commands" : {
"prevBookmark" : {
"suggested_key" : {
"default" : "Ctrl+Shift+K"
},
"description" : "Navigate to previous bookmark in the folder"
},
"nextBookmark" : {
"suggested_key" : {
"default" : "Ctrl+Shift+L"
},
"description" : "Navigate to next bookmark in the folder"
}
}
}

The manifest version must be 2. You need a name, a description and a version number. Start with something small, like 0.0.1, as you will want to increase the value as you make changes. The other thing is that mandatory is the permissions object, which tells the browser what Chrome APIs you intend to use. I've set there activeTab, because I want to know what the active tab is and what is its URL, tabs, because I might want to get the tab by id and then I don't get info like URL if I didn't specify this permission, bookmarks, because I want to access the bookmarks, and contextMenus, because I want to add items in the page context menu. More on permissions here.

Now, we need to know what the extension should behave like.

If you want to click on it and get a popup that does stuff, you need to specify the browser_action object, where you specify the icon that you want to have in the Chrome extensions bar and/or the popup page that you want to open. If you don't specify this, you get a default button that does nothing on click and presents the standard context menu on right click. You may only specify the icon, though. More on browserAction here.

If you want to have an extension that reacts to background events, monitors URL changes on the current page, responds to commands, then you need a background page. Here I specify that the page is a javascript, but you can add HTML and CSS and other stuff as well. More on background here.

Obviously, the files mentioned in the manifest must be created in the same folder.

The last item in the manifest is the commands object. For each command you need to define the id, the keyboard shortcut (only the 0..9 and A..Z are usable unfortunately) and a description. In order to respond to commands you need a background page as shown above.

2. Test the extension


Next you open a Chrome tab and go to chrome://extensions, click on the 'Developer mode' checkbox if it is not checked already and you get a Load unpacked extension button. Click it and point the following dialog to your folder and test that everything works OK.

3. Publish your extension


In order to publish your extension you need to have a Chrome Web Store account. Go to Chrome Web Store Developer Dashboard and create one. You will need to pay a one time 5$ fee to open it. I know, it kind of sucks, but I paid it and was done with it.

Next, you need to Add New Item, where you will be asked for a packed extension, which is nothing but the ZIP archive of all the files in your folder.

That's it.

Let's now discuss actual implementation details.

Adding functionality to popup elements


Getting the popup page elements is easy with vanilla Javascript, because we know we are building for only one browser: Chrome! So getting elements is done via document.getElementById(id), for example, and adding functionality is done via elem.addEventListener(event,handler,false);

One can use the elements as objects directly to set values that are related to those elements. For example my prev/next button functionality takes the URL from the button itself and changes the location of the current tab to that value. Code executed when the popup opens sets the 'url' property on the button object.

Just remember to do it when the popup has finished loading (with document.addEventListener('DOMContentLoaded', function () { /*here*/ }); )

Getting the currently active tab


All the Chrome APIs are asynchronous, so the code is:
chrome.tabs.query({
'active' : true,
'lastFocusedWindow' : true
}, function (tabs) {
var tab = tabs[0];
if (!tab) return;
// do something with tab
});

More on chrome.tabs here.

Changing the URL of a tab


chrome.tabs.update(tab.id, {
url : url
});

Changing the icon in the Chrome extensions bar


if (chrome.browserAction) chrome.browserAction.setIcon({
path : {
'19' : 'anotherIcon.png'
},
tabId : tab.id
});

The icons are 19x19 PNG files. browserAction may not be available, if not declared in the manifest.

Get bookmarks


Remember you need the bookmarks permission in order for this to work.
chrome.bookmarks.getTree(function (tree) {
//do something with bookmarks
});

The tree is an array of items that have title and url or children. The first tree array item is the Bookmarks Bar, for example. More about bookmarks here.

Hooking to Chrome events


chrome.tabs.onUpdated.addListener(refresh);
chrome.tabs.onCreated.addListener(refresh);
chrome.tabs.onActivated.addListener(refresh);
chrome.tabs.onActiveChanged.addListener(refresh);
chrome.contextMenus.onClicked.addListener(function (info, tab) {
navigate(info.menuItemId, tab);
});
chrome.commands.onCommand.addListener(function (command) {
navigate(command, null);
});

In order to get extended info on the tab object received by tabs events, you need the tabs permission. For access to the contextMenus object you need the contextMenus permission.

Warning: if you install your extension from the store and you disable it so you can test your unpacked extension, you will notice that keyboard commands do not work. Seems to be a bug in Chrome. The solution is to remove your extension completely so that the other version can hook into the keyboard shortcuts.

Creating, detecting and removing menu items


To create a menu item is very simple:
chrome.contextMenus.create({
"id" : "menuItemId",
"title" : "Menu item description",
"contexts" : ["page"] //where the menuItem will be available
});
However, there is no way to 'get' a menu item and if you try to blindly remove a menu item with .remove(id) it will throw an exception. My solution was to use an object to store when I created and when I destroyed the menu items so I can safely call .remove().

To hook to the context menu events, use chrome.contextMenus.onClicked.addListener(function (info, tab) { }); where info contains the menuItemId property that is the same as the id used when creating the item.

Again, to access the context menu API, you need the contextMenus permission. More about context menus here.

Commands


You use commands basically to define keyboard shortcuts. You define them in your manifest and then you hook to the event with chrome.commands.onCommand.addListener(function (command) { });, where command is a string containing the key of the command.

Only modifiers, letters and digits can be used. Amazingly, you don't need permissions for using this API, but since commands are defined in the manifest, it would be superfluous, I guess.

That's it for what I wanted to discuss here. Any questions, bug reports, feature requests... use the comments in the post.

In the previous post I was discussing Firebase, used in Javascript, and that covered initialization, basic security, read all and insert. In this post I want to discuss about complex queries: filtering, ordering, limiting, indexing, etc. For that I will get inspiration (read: copy with impunity) from the Firebase documentation on the subject Retrieving Data, but make it quick and dirty... you know, like sex! Thank you, ma'am!

OK, the fluid interface for getting the data looks a lot like C# LInQ and I plan to work on a Linq2Firebase thing, but not yet. Since LInQ itself got its inspiration from SQL, I was planning to structure the post in a similar manner: how to do order by, top/limit, select conditions, indexing and so on, so we can really use Firebase like a database. An interesting concept to explore is joining, since this is an object database, but we still need it, because we want to filter by the results of the join before we return the result, like getting all the transaction of users that have the name 'Adam'. Aggregating is another thing that I feel Firebase needs to support. I don't want a billion records in order to compute the sum of a property.

However, the Firebase API is rather limited at the moment. You get .orderByChild, then stuff like .equalTo, .startAt and .endAt and then .limitToFirst and .limitToLast. No aggregation, no complex filters, no optimized indexing, no joining. As far as I can see, this is by design, so that the server is as dumb as possible, but think about that 1GB for the free plan. It is a lot.

So, let's try a complex query, see were it gets us.
ref.child('user')
.once('value',function(snapshot) {
var users=[];
snapshot.forEach(function(childSnapshot) {
var item=childSnapshot.val();
if (/adam/i.test(item.name)) {
users.push(item.userId);
}
});
getInvoiceTotalForUsers(users,DoSomethingWithSum);
});


function getInvoiceTotalForUsers(users,callback)
{
var sum=0;
var count=0;
for (var i=0; i<users.length; i++) {
var id=users[i];
ref.child('invoice')
.equalTo(id,'userId')
.orderByChild('price')
.startAt(10)
.endAt(100)
.once('value',function(snapshot) {
snapshot.forEach(function(childSnapshot) {
var item = childSnapshot.val();
sum+=item.price;
count++;
if (count==users.length) callback(sum);
});
});
}
}

First, I selected the users that have 'adam' in the name. I used .once instead of .on because I don't want to wait for new data to arrive, I want the data so far. I used .forEach to enumerate the data from the value event. With the array of userIds I call getInvoiceTotalForUsers, which gets all the invoices for each user, with a price bigger or equal to 10 and less or equal to 100, which finally calls a callback with the resulting sum of invoice prices.

For me this feels very cumbersome. I can think of several methods to simplify this, but the vanilla code would probably look like this.

I have been looking for a long time for this kind of service, mainly because I wanted to monitor and persist stuff for my blog. Firebase is all of that and more and, with a free plan of 1GB, it's pretty awesome. However, as it is a no SQL database and as it can be accessed via Javascript, it may be a bit difficult to get it at first. In this post I will be talking about how to use Firebase as a traditional database using their Javascript library.

So, first off go to the main website and signup with Google. Once you do, you get a page with a 5 minute tutorial, quickstarts, examples, API docs... but you want the ultra-quick start! Copy pasted working code! So click on the Manage App button.

Take note of the URL where you are redirected. It is the one used for all data usage as well. Ok, quick test code:
var testRef = new Firebase('https://*******.firebaseio.com/test');
testRef.push({
val1: "any object you like",
val2: 1,
val3: "as long as it is not undefined or some complex type like a Date object",
val4: "think of it as JSON"
});
What this does is take that object there and save it in your database, in the "test" container. Let's say it's like a table. You can also save objects directly in the root, but I don't recommend it, as the path of the object is the only one telling you what type of object it is.

Now, in order to read inserted objects, you use events. It's a sort of reactive way of doing things that might be a little unfamiliar. For example, when you run the following piece of code, you will get after you connect all the objects you ever inserted into "test".
var testRef = new Firebase('https://*******.firebaseio.com/test');
testRef.on('child_added', function(snapshot) {
var obj = snapshot.val();
handle(obj); //do what you want with the object
});

Note that you can use either child_added or value, as the retrieve event. While 'child_added' is fired on each retrieved object, 'value' returns one snapshot containing all data items, then proceeds to fire on each added item with full snapshots. Beware!, that means if you have a million items and you do a value query, you get all of them (or at least attempt to, I think there are limits), then on the next added item you get a million and one. If you use .limitToLast(50), for example, you will get the last 50 items, then when a new one is added, you get another 50 item snapshot. In my mind, 'value' is to be used with .once(), while 'child_added' with .on(). More details in my Queries post

Just by using that, you have created a way to insert and read values from the database. Of course, you don't want to leave your database unprotected. Anyone could read or change your data this way. You need some sort of authentication. For that go to the left and click on Login & Auth, then you go to Email & Password and you configure what are the users to log in to your application. Notice that every user has a UID defined. Here is the code to use to authenticate:
var testRef = new Firebase('https://*******.firebaseio.com/test');
testRef.authWithPassword({
email : "some@email.com",
password : "password"
}, function(error, authData) {
if (error) {
console.log("Login Failed!", error);
} else {
console.log("Authenticated successfully with payload:", authData);
}
});
There is an extra step you want to take, secure your database so that it can only be accessed by logged users and for that you have to go to Security & Rules. A very simple structure to use is this:
{
"rules": {
"test": {
".read": false,
".write": false,
"$uid": {
// grants write access to the owner of this user account whose uid must exactly match the key ($uid)
".write": "auth !== null && auth.uid === $uid",
// grants read access to any user who is logged in with an email and password
".read": "auth !== null && auth.provider === 'password'"
}
}
}
}
This means that:
  1. It is forbidden to write to test directly, or to read from it
  2. It is allowed to write to test/uid (remember the user UID when you created the email/password pair) only by the user with the same uid
  3. It is allowed to read from test/uid, as long as you are authenticated in any way

Gotcha! This rule list allows you to read and write whatever you want on the root itself. Anyone could just waltz on your URL and fill your database with crap, just not in the "test" path. More than that, they can just listen to the root and get EVERYTHING that you write in. So the correct rule set is this:
{
"rules": {
".read": false,
".write": false,
"test": {
".read": false,
".write": false,
"$uid": {
// grants write access to the owner of this user account whose uid must exactly match the key ($uid)
".write": "auth !== null && auth.uid === $uid",
// grants read access to any user who is logged in with an email and password
".read": "auth !== null && auth.provider === 'password'"
}
}
}
}

In this particular case, in order to get to the path /test/$uid you can use the .child() function, like this: testRef.child(authData.uid).push(...), where authData is the object you retrieve from the authentication method and that contains your logged user's UID.

The rule system is easy to understand: use ".read"/".write" and a Javascript expression to allow or deny that operation, then add children paths and do the same. There are a lot more things you could learn about the way to authenticate: one can authenticate with Google, Twitter, Facebook, or even with custom tokens. Read more at Email & Password Authentication, User Authentication and User Based Security.

But because you want to do a dirty little hack and just make it work, here is one way:
{
"rules": {
".read": false,
".write": false,
"test": {
".read": "auth.uid == 'MyReadUser'",
".write": "auth.uid == 'MyWriteUser'"
}
}
}
This tells Firebase that no one is allowed to read/write except in /test and only if their UID is MyReadUser, MyWriteUser, respectively. In order to authenticate for this, we use this piece of code:
testRef.authWithCustomToken(token,success,error);
The handlers for success and error do the rest. In order to create the token, you need to do some cryptography, but nevermind that, there is an online JsFiddle where you can do just that without any thought. First you need a secret, for which you go into your Firebase console and click on Secrets. Click on "Show" and copy paste that secret into the JsFiddle "secret" textbox. Then enter MyReadUser/MyWriteUser in the "uid" textbox and create the token. You can then authenticate into Firebase using that ugly string that it spews out at you.

Done, now you only need to use the code. Here is an example:
var testRef = new Firebase('https://*****.firebaseio.com/test');
testRef.authWithCustomToken(token, function(err,authData) {
if (err) alert(err);
myDataRef.on('child_added', function(snapshot) {
var message = snapshot.val();
handle(message);
});
});
where token is the generated token and handle is a function that will run with each of the objects in the database.

In my case, I needed a way to write messages on the blog for users to read. I left read access on for everyone (true) and used the token idea from above to restrict writing. My html page that I run locally uses the authentication to write the messages.

There you have it. In the next post I will examine how you can query the database for specific objects.

I have implemented a system that logs what people do on my blog, with the intent of making it more useful to my readers. In doing so I created a live dashboard where people going and leaving are displayed in real time. The conclusion is pretty humbling, but I have also noticed a pattern that might reflect badly on the state of the Internet today.

The conclusion I was talking about is that, even if I write about a lot of things, from books to software, from WPF to Javascript, the most visited posts by far are about why the Bittorrent client gets stuck, how to remove ads by installing Privoxy and Sift3, my string comparison algorithm. All of that info one can get from the Popular posts column in the right of the blog, but I had no idea how many people visit it only to find how they can download their movies faster!

And then there are the programming blog posts. I am filled with pride when people open a link to learn something from my experiences. And then I see that they are looking at the posts about Crystal Reports, AjaxControlToolkit and the old ASP.Net Ajax calls. Occasionally they come for the WPF bit, which is great, but the conclusion is clear: people are mostly interested in the old posts, the ones describing older technologies that no one is talking about anywhere anymore. True, I have not posted anything significant in the last two years, but still, I feel disappointed. My blog's merit here seems to be that it is still online!

But then I realized something else. Sometimes I feel joy at seeing that a visitor opens a post that no one has opened recently. Yet, in a very short time, other people are starting to open the same link. It has happened repeatedly several days in a row, so it can't be a coincidence. And people are coming from all over: Canada, US, Brazil, Mozambique, Ghana! I can only explain it with the theory that once visited, a link increases in visibility, its Google rank goes up, thus passing a threshold that makes it appear on the first search pages. It is a snowball effect, which in part I understand and agree with, but can't stop wondering if it doesn't apply everywhere. Instead of going for the relevance that Google and other big search engines aspire towards, they cheat by treating each click as a Facebook Like! More people read it, so more people should read it, which they do, and so on and so on.

The bottom line is that I wouldn't want to see a race towards a common goal be treated as a common race towards a goal. Let all pages share the glory, rank them based on content, not the preferences of people searching for stuff. How long before Google will helpfully suggest to me to go download a movie rather than search for something for work?

and has 1 comment
Today I wanted to read a PDF. Nothing more than that, just read a damn file. Instead, I got the first use of the Adobe Reader DC, which I may have inadvertently updated to when asked for an update (rather than a complete redesign). But I was OK with it, you know. Adobe Reader was always a lightweight reader of files and the updates have mostly been about security. So now they want to redesign it, what could possibly go wrong? Just rearrange some menus or something, right? Wrong.

I skipped EULAs and bloating features for a while until I got to (surprise!) an online login screen. I didn't want to log in anywhere, I just wanted to read the PDF, so I closed the login popup window. It reopened. I started looking for buttons or links for skipping, cancelling, ignoring, doing it later, but none were there. Quite literally I was locked until I chose to log in. You know what I did? I forcefully closed the process and installed Sumatra PDF reader. 10 seconds later I was reading my damn PDF.

And you know what? I have used Sumatra PDF on other computers in the past. What I found is that, besides some features for PDF that I will never use, like forms and such, Sumatra was better than Adobe Reader. Way faster, that's obvious, but then it read correctly some PDFs that could not be even opened by the default reading application from the company that invented the damn document standard. Once, I remember, we had a weird PDF that we had to wait for about a minute in Adobe Reader in order to render a single page. Sumatra opened it instantly. Not only it is smaller, leaner, faster, better, but Sumatra also reads a lot of other formats: ePub, MOBI, CHM, XPS, DjVu, CBZ, CBR.

Bottom line: I have abandoned the last Adobe tool that I was regularly using on my computer. Will they ever learn?

Whenever you want to test a REST API, Postman is a great tool. It allows configuring all aspects of a request: Method (GET, POST, etc), Headers, keeps previous attempts in history, manages collections of requests and saves them and it is installed as a Chrome extension, bringing it only two clicks away. It does everything! ... or does it? Short story long: no!

Reported as a problem here: Referer header is not sent when set in Postman, the issue appears to be that some headers are "protected" by Chrome, therefore unusable. Well, it is a bug in the sense that Postman should tell you that when you write something there it is completely ignored! There is a solution, that can be found as a link in the bug report, but it involves installing other crap and running Python scripts. Ugh!

Here is a list of the Chrome protected headers:
  • Accept-Charset
  • Accept-Encoding
  • Access-Control-Request-Headers
  • Access-Control-Request-Method
  • Connection
  • Content-Length
  • Cookie
  • Cookie 2
  • Content-Transfer-Encoding
  • Date
  • Expect
  • Host
  • Keep-Alive
  • Origin
  • Referer
  • TE
  • Trailer
  • Transfer-Encoding
  • Upgrade
  • User-Agent
  • Via

So whenever you believe that some web site has used a magical solution to detect your sneaky attempts to access their web API or site and you are wondering what, just remember that it is most likely a Referer header that Postman (via Chrome) silently ignored.