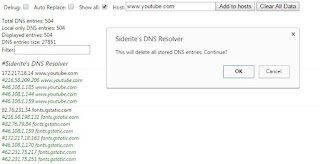
I've written another Chrome extension that I consider in beta, but so far it works. Really ugly makeshift code, but I am not gathering data about the way I will use it, then I am going to refactor it, just as I did with Bookmark Explorer. You may find the code at GitHub and the extension at the Chrome webstore.

This is how it works: Every time you access anything with the browser, the extension will remember the IPs for any given host. It will hold a list of the IPs, in reverse order (last one first), that you can just copy and paste into your hosts file. The hosts file is found in c:/Windows/System32/drivers/etc/hosts and on Linux in /etc/hosts. Once you add a line in the format "IP host" in it, the computer will resolve the host with the provided IP. Every time there is a problem with DNS resolution, the extension will add the latest known IP into the hosts text. Since the extension doesn't have access to your hard drive, you need to edit the file yourself. The icon of DNS resolver will show the number of hosts that it wants to resolve locally or nothing, if everything is OK.

The extension allows manual selection of an IP for a host and forced inclusion or exclusion from the list of IP/host lines. Data can be erased (all at once for now) as well. The extension does not communicate with the outside, but it does store a list of all domains you visit, so it is a slight privacy risk - although if someone has access to the local store of a browser extension, it's already too late. There is also the possibility of the extension to replace the host with IP directly in the browser requests, but this only works for the browser and fails in case the host name is important, as in the case of multiple servers using the same IP, so I don't recommend using it.

There are two scenarios for which this extension is very useful:
  • The DNS server fails for some reason or gives you a wrong IP
  • Someone removed the IP address from DNS servers or replaced it with one of their own, like in the case of governments censorship

I have some ideas for the future:
  • Sharing of working IP/host pairs - have to think of privacy before that, though
  • Installing a local DNS server that can communicate locally with the extension, so no more hosts editing - have to research and create one
  • Upvoting/Downvoting/flagging shared pairs - with all the horrible head-ache this comes with

As usual, let me know what you think here, or open issues on GitHub.

Update 29 August 2017 - Version 3.0.4: The extension has been rewritten in EcmaScript6 and tested on Chrome, Firefox and Opera.

Update 03 March 2017 - Version 2.9.3: added a function to remove marketing URLs from all created bookmarks. Enable it in the Advanced settings section. Please let me know of any particular parameters you need purged. So far it removes utm_*, wkey, wemail, _hsenc, _hsmi and hsCtaTracking.

Update 26 February 2017: Version (2.9.1): added customizing the URL comparison function. People can choose what makes pages different in general or for specific URL patterns
Update 13 June 2016: Stable version (2.5.0): added Settings page, Read Later functionality, undelete bookmarks page and much more.
Update 8 May 2016: Rewritten the extension from scratch, with unit testing.
Update 28 March 2016: The entire source code of the extension is now open sourced at GitHub.

Whenever I read my news, I open a bookmark folder containing my favorite news sites, Twitter, Facebook, etc. I then proceed to open new tabs for each link I find interesting, closing the originating links when I am done. Usually I get a number of 30-60 open tabs. This wreaks havoc on my memory and computer responsiveness. And it's really stupid, because I only need to read them one by one. In the end I've decided to fight my laziness and create my first browser extension to help me out.

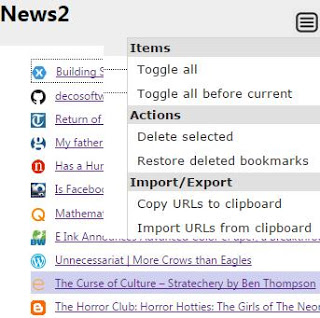
The extension is published here: Siderite's Bookmark Explorer and what it does is check if the current page is found in any bookmark folder, then allow you to go forward or backwards inside that folder.

So this is my scenario on using it:
  1. Open the sites that you want to get the links from.
  2. Open new tabs for the articles you want to read or YouTube videos you want to watch,etc.
  3. Bookmark all tabs into a folder.
  4. Close all the tabs.
  5. Navigate to the bookmark folder and open the first link.
  6. Read the link, then press the Bookmark Navigator button and then the right arrow. (now added support for context menu and keyboard shortcuts)
  7. If you went too far by mistake, press the left arrow to go back.

OK, let's talk about how I did it. In order to create your own Chrome browser extension you need to follow these steps:

1. Create the folder


Create a folder and put inside a file called manifest.json. It's possible structure is pretty complex, but let's start with what I used:
{
"manifest_version" : 2,

"name" : "Siderite's Bookmark Explorer",
"description" : "Gives you a nice Next button to go to the next bookmark in the folder",
"version" : "1.0.2",

"permissions" : [
"tabs",
"activeTab",
"bookmarks",
"contextMenus"
],
"browser_action" : {
"default_icon" : "icon.png",
"default_popup" : "popup.html"
},
"background" : {
"scripts" : ["background.js"],
"persistent" : false
},
"commands" : {
"prevBookmark" : {
"suggested_key" : {
"default" : "Ctrl+Shift+K"
},
"description" : "Navigate to previous bookmark in the folder"
},
"nextBookmark" : {
"suggested_key" : {
"default" : "Ctrl+Shift+L"
},
"description" : "Navigate to next bookmark in the folder"
}
}
}

The manifest version must be 2. You need a name, a description and a version number. Start with something small, like 0.0.1, as you will want to increase the value as you make changes. The other thing is that mandatory is the permissions object, which tells the browser what Chrome APIs you intend to use. I've set there activeTab, because I want to know what the active tab is and what is its URL, tabs, because I might want to get the tab by id and then I don't get info like URL if I didn't specify this permission, bookmarks, because I want to access the bookmarks, and contextMenus, because I want to add items in the page context menu. More on permissions here.

Now, we need to know what the extension should behave like.

If you want to click on it and get a popup that does stuff, you need to specify the browser_action object, where you specify the icon that you want to have in the Chrome extensions bar and/or the popup page that you want to open. If you don't specify this, you get a default button that does nothing on click and presents the standard context menu on right click. You may only specify the icon, though. More on browserAction here.

If you want to have an extension that reacts to background events, monitors URL changes on the current page, responds to commands, then you need a background page. Here I specify that the page is a javascript, but you can add HTML and CSS and other stuff as well. More on background here.

Obviously, the files mentioned in the manifest must be created in the same folder.

The last item in the manifest is the commands object. For each command you need to define the id, the keyboard shortcut (only the 0..9 and A..Z are usable unfortunately) and a description. In order to respond to commands you need a background page as shown above.

2. Test the extension


Next you open a Chrome tab and go to chrome://extensions, click on the 'Developer mode' checkbox if it is not checked already and you get a Load unpacked extension button. Click it and point the following dialog to your folder and test that everything works OK.

3. Publish your extension


In order to publish your extension you need to have a Chrome Web Store account. Go to Chrome Web Store Developer Dashboard and create one. You will need to pay a one time 5$ fee to open it. I know, it kind of sucks, but I paid it and was done with it.

Next, you need to Add New Item, where you will be asked for a packed extension, which is nothing but the ZIP archive of all the files in your folder.

That's it.

Let's now discuss actual implementation details.

Adding functionality to popup elements


Getting the popup page elements is easy with vanilla Javascript, because we know we are building for only one browser: Chrome! So getting elements is done via document.getElementById(id), for example, and adding functionality is done via elem.addEventListener(event,handler,false);

One can use the elements as objects directly to set values that are related to those elements. For example my prev/next button functionality takes the URL from the button itself and changes the location of the current tab to that value. Code executed when the popup opens sets the 'url' property on the button object.

Just remember to do it when the popup has finished loading (with document.addEventListener('DOMContentLoaded', function () { /*here*/ }); )

Getting the currently active tab


All the Chrome APIs are asynchronous, so the code is:
chrome.tabs.query({
'active' : true,
'lastFocusedWindow' : true
}, function (tabs) {
var tab = tabs[0];
if (!tab) return;
// do something with tab
});

More on chrome.tabs here.

Changing the URL of a tab


chrome.tabs.update(tab.id, {
url : url
});

Changing the icon in the Chrome extensions bar


if (chrome.browserAction) chrome.browserAction.setIcon({
path : {
'19' : 'anotherIcon.png'
},
tabId : tab.id
});

The icons are 19x19 PNG files. browserAction may not be available, if not declared in the manifest.

Get bookmarks


Remember you need the bookmarks permission in order for this to work.
chrome.bookmarks.getTree(function (tree) {
//do something with bookmarks
});

The tree is an array of items that have title and url or children. The first tree array item is the Bookmarks Bar, for example. More about bookmarks here.

Hooking to Chrome events


chrome.tabs.onUpdated.addListener(refresh);
chrome.tabs.onCreated.addListener(refresh);
chrome.tabs.onActivated.addListener(refresh);
chrome.tabs.onActiveChanged.addListener(refresh);
chrome.contextMenus.onClicked.addListener(function (info, tab) {
navigate(info.menuItemId, tab);
});
chrome.commands.onCommand.addListener(function (command) {
navigate(command, null);
});

In order to get extended info on the tab object received by tabs events, you need the tabs permission. For access to the contextMenus object you need the contextMenus permission.

Warning: if you install your extension from the store and you disable it so you can test your unpacked extension, you will notice that keyboard commands do not work. Seems to be a bug in Chrome. The solution is to remove your extension completely so that the other version can hook into the keyboard shortcuts.

Creating, detecting and removing menu items


To create a menu item is very simple:
chrome.contextMenus.create({
"id" : "menuItemId",
"title" : "Menu item description",
"contexts" : ["page"] //where the menuItem will be available
});
However, there is no way to 'get' a menu item and if you try to blindly remove a menu item with .remove(id) it will throw an exception. My solution was to use an object to store when I created and when I destroyed the menu items so I can safely call .remove().

To hook to the context menu events, use chrome.contextMenus.onClicked.addListener(function (info, tab) { }); where info contains the menuItemId property that is the same as the id used when creating the item.

Again, to access the context menu API, you need the contextMenus permission. More about context menus here.

Commands


You use commands basically to define keyboard shortcuts. You define them in your manifest and then you hook to the event with chrome.commands.onCommand.addListener(function (command) { });, where command is a string containing the key of the command.

Only modifiers, letters and digits can be used. Amazingly, you don't need permissions for using this API, but since commands are defined in the manifest, it would be superfluous, I guess.

That's it for what I wanted to discuss here. Any questions, bug reports, feature requests... use the comments in the post.
and has 2 comments
I met this situation where I wanted to implement an http interceptor, a piece of JavaScript code that would do something on unauthorized access to my API. The way to do this is irrelevant (and different from jQuery and AngularJS sites), but there is a problem that affects every situation and that is when you access the API from a different domain than the API's. You see, the browser needs the API server to authorize CORS for every Ajax request that accesses that server from another domain. You might think you did that already in your API, but let me ask you: when there is a problem, like not authorized access, are you sending CORS headers with your error response? Because if you do not, everything you send, including the http code, will not be parsed by the browser and any interception will just show a code of 0. The situation is a little confounded by the fact that the browser does announce that you have a CORS access problem, but also displays the status message, which in this case would be "Unauthorized access". This might make you think you can access that message or the status code. Well, you cannot.

The solution is to send the CORS headers: Access-Control-Allow-Origin, Access-Control-Allow-Methods, Access-Control-Allow-Headers. Just set their value to "*" and send them with your error response and now your JavaScript can read the error code and message.

Sometimes you want to run your browser without some protections that are enabled by default in it. One of these is the cross-origins protection when running a local filesystem script. For Chrome, the solution is to run the browser with the command line switch --allow-file-access-from-files. Seems straight forward enough, but if your browser is already open (usually I have at least 10 active tabs, ranging from documentation pages, email to the music I listen to), the command line switches will be ignored and your script will be run as just another window in the same instance of Chrome. In order to fix this, you need to use another switch called --user-data-dir. Just make sure this folder exists and it can be deleted (because it will be filled with a zillion useless files).

So, how do I run a test.html file that can access files and is located in C:\SomePath ? Like this:
start "Chrome with access to files" chrome --allow-file-access-from-files "file:///C:\SomePath\test.html" --user-data-dir="C:\SomePath\UserDir"


In your path a UserDir folder will be created which you can delete after you finish your work.

Of course, this issue applies to any other flags that you want to use ad-hoc while Chrome is already open.


Update 23 Oct 2023: Here are the latest files to directly download and use. Do read the rest of the article, as these files might not be what you are looking for:
user.action
user.filter

Update 12 Feb 2016: As an alternative, if you have access to your hosts file, you can use a generated list of domains to immediately block any access to those IPs, courtesy of Steven Black: StevenBlack/hosts, and you don't have to install anything and works on most operating systems.

Now for the rest of the article:

I discovered today a new tool called Privoxy. It is a proxy software that has extra features, like ad blocking and extra privacy. What that means is that you can install the proxy, point your browser to that proxy and have an almost ad free untracked by marketing firms or FaceBook experience. The only problem, though, is that the default filters are not so comprehensive. Would it be great if one could take the most used list for ad blocking (Adblock Plus' Easylist) and convert it to Privoxy? Well it would, only that no one seems to want to do it for Windows. You get a few folks that have created Linux scripts to do the conversion, but they won't work for Windows. Nor do they deem it necessary to make an online tool or a web service or at least publish the resulting files so that we, Windows people, can also use the list!

Well, I intend to do a small script that will allow for this, preferably embedded in this blog post, but until then, I had no script, no files, only Privoxy installed. Luckily, I also have Cygwin installed, which allows me to run a ridiculous flavour of Linux inside Windows. I had to hack the script in order for it to work on Cygwin, but in the end, at last, I managed to make it work. For now, I will publish the resulting files here and give you instructions to install them. When they become obsolete, send me a comment and I will refresh them.

So, the instructions:

  • Install Privoxy
  • Go to the installation folder of Privoxy and look for files named 'user.action' and 'user.filter'
  • Download the user.action file from here and replace the default one.
  • Download the user.filter file from here and replace the default one.
  • Restart Privoxy
  • Of course, then you have to go to your browser settings and set the proxy to Privoxy (usually localhost, port 8118)


Warning! The filter file is quite big and it will cause some performance issues. You might want to use only the action file with the filter actions removed.

Update: If you can't download the files, let me know. I am using Github pages and it seems sometimes it doesn't work as I expected.

Also, I have lost faith that AdBlockPlus rules can be completely and correctly translated to Privoxy and I lack the time, so I am publishing my crappy program as it is and if you want to use it or fix it, be my guest. You can find the program here: AdblockPlus to Privoxy. I would ask that you share with me those modifications, though, so that everybody can benefit from them.

Update October 2023: Other people have contributed by making their own translation software. Here are the links for the binary and source code of adblock2privoxy made by Zubr, in Haskell mind you, which is pretty cool:

Binary: https://www.dropbox.com/s/69u1iqbubzft1yl/adblock2privoxy-1.2.4.rar?dl=0
Source code: https://projects.zubr.me/wiki/adblock2privoxy

The original software is not available anymore, but here is a GitHub fork for the same: https://github.com/essandess/adblock2privoxy

I know of this method from the good old Internet Explorer 6 days. In order to force the browser to redraw an element, solving weird browser refresh issues, change it's css class. I usually go for element.className+='';. So you see, you don't have to actually change it. Sometimes you need to do this after a bit of code has been executed, so put it all in a setTimeout.

More explicitly, I was trying to solve this weird bug where using jQuery slideUp/slideDown I would get some elements in Internet Explorer 8 to disregard some CSS rules. Mainly the header of a collapsible panel would suddenly and intermittently seem to lose a margin-bottom: 18px !important; rule. In order to fix this instead of panel.slideUp(); I used
panel.slideUp(400/*the default value*/,function() { 
setTimeout(function() {
header.each(function(){
this.className+='';
});
},1);
});
where panel is the collapsible part and header is the clickable part. Same for slideDown.

I had to fix this weird bug today, where only in IE9 the entire page would freeze suddenly. The only way to get anything done was to select some text or scroll a scrollable area. I was creating an input text field, then, when pressing enter, I would do something with the value and remove the element.

It appears that in Internet Explorer 9 it is wrong to remove the element that holds the focus. Use window.focus(); before you do that.

It all started with this site that got stuck in the Google Chrome's DNS cache so that any changes to the Windows/System32/drivers/etc/hosts file were ignored. I didn't want to close all Chrome windows (since the DNS cache is application wide in Chrome), so I googled for an answer. And here it was, a simple url that, typed in the Chrome address bar, would allow me to clear the cache: chrome://net-internals#dns.

But there are a lot more cool things there: testing of failed sites, a log of browser network events, control over open connections and so much more. That got me curious on other cool chrome:// URLs and I found some links listing a lot of them.

I don't have the time to parse all these cool hidden Chrome URLs and review them in this blog entry, so I will just list some links and let you explore the goodness:
Google Chrome’s Full List of Special about: Pages
12 Most Useful Google Chrome Browser chrome:// Commands
About and Chrome URLs

Update: The Chrome url containing all others can be found at chrome://about/.

I was updating the content of a span element via AJAX when I noticed that the content was duplicated. It was no rocket science: get element, replace content with the same thing that was rendered when the page was first loaded, just with updated values. How could it be duplicated?

Investigating the DOM in the browser (any browser, btw) I've noticed something strange: When the page was first loaded, the content was next to the container element, not inside it. I've looked at the page source, only to see that it was, by all counts, correct. It looked something like this:
<p><div><table>...</table></div></p>
. The DOM would show the div inside the paragraph element and the table as the sibling of the paragraph element. The behavior was fixed if the page DOCTYPE was changed from XHTML into something else.

It appears that block elements should not be inside layout elements, like p. The browsers are attempting to "fix" this problem and so they change the DOM, assuming that if a table starts inside the paragraph, then you must have forgotten to close the paragraph. If I was adding it via ajax, the browser did not seem to want to fix the content in any way, as I was manipulating the DOM directly and there was no parsing phase.

If you are like me, you often google a .Net class and find it at MSDN. Also, since you want the page to load quickly and get you the information you need, you probably selected the Lightweight view on MSDN. If you haven't, you should :) Anyway, a problem with MSDN is that it shows you every possible member of the class, which is especially annoying with WPF classes as they inherit from FrameworkElement that has a gazillion events. Wouldn't it be great if one could hide the inherited members from an MSDN page?

At first I thought I would parse the content of each row and detect the (Inherited from string, but it appears it is even simpler: table row elements have a data attribute that (if the member is inherited) contains the word inherited. Probably someone at MSDN wanted to make the same thing as me, but forgot to implement it (at least on the lightweight view). The javascript is simple enough:

var trs=document.getElementsByTagName('tr');
var l=trs.length;
for (var i=0; i<l; i++) {
var tr=trs[i];
var data=tr.getAttribute('data');
if (!data||data.indexOf('inherited')==-1) continue;
tr.style.display=tr.style.display=='none'?'':'none';
}
You probably wonder why I haven't used jQuery. It is because I want it to work in a javascript: url so I can put it in a bookmark! Just as with the Firebug bookmark you need to manually create a bookmark in the Favorites folder (or to add any page as a favorite, then edit its URL) in Internet Explorer or to simply add a bookmark in the browser in Chrome and Firefox and paste the one line script. To make it easier, I will write them both here. The content of the .url favorite file:
[DEFAULT]
BASEURL=http://msdn.microsoft.com/en-us/library/
[InternetShortcut]
URL=javascript:var trs=document.getElementsByTagName('tr');var l=trs.length;for (var i=0; i<l; i++) { var tr=trs[i]; var data=tr.getAttribute('data'); if (data&&data.indexOf('inherited')>-1) tr.style.display=tr.style.display=='none'?'':'none'; }; void(0);
IDList=
IconFile=http://msdn.microsoft.com/favicon.ico
IconIndex=1
[{000214A0-0000-0000-C000-000000000046}]
Prop3=19,2
and the javascript line to use in other browsers:
javascript:var trs=document.getElementsByTagName('tr');var l=trs.length;for (var i=0; i<l; i++) {  var tr=trs[i];  var data=tr.getAttribute('data');  if (data&&data.indexOf('inherited')>-1)  tr.style.display=tr.style.display=='none'?'':'none'; }; void(0);
.

Happy coding!

I personally think that the IE8 developer tools are better than Firebug, but let's face it: Firebug was first. Besides, Firebug has also a completely javascript version called Firebug lite that you can inject into any page. Well, you might say, as a developer it is a nice tool, but how can I, the Internet surfer, use this in any page? And the answer is: the favorites links!

It all started from this brilliant post: Bookmark to inject FireBug Light into Internet Explorer. that showed how you can create a specific URL file, add it to the Favorites folder of your Windows user and then use it on any page. Elegant it may be, but it's lazy. It only works on pages that have loaded jQuery. So I did the version that works with simple javascript.

Then I realized that, since I like the Internet Explorer tools better, this is useless for me. How cool would it be to have Firebug lite on Chrome, which has yet to provide a decent developer tool. And it's even easier! Here is how you do it.

For Internet Explorer, follow the steps described in the ElegantCode post but use generic javascript: create a file called Firebug.url containing
[DOC_FirebugUI] 
ORIGURL=about:blank
[{000214A0-0000-0000-C000-000000000046}]
Prop3=19,2
[InternetShortcut]
URL=javascript:var script=document.createElement('script'); script.type='text/javascript'; script.src='https://getfirebug.com/firebug-lite.js';document.getElementsByTagName('body')[0].appendChild(script); void(0);
IDList=
IconFile=http://getfirebug.com/img/favicon.ico
IconIndex=1
then save it in the user's c:\Documents and Settings\{UserName}\Favorites folder.

For Chrome, you only right click on the bookmarks bar, choose Add Page, then enter the url in the file above:
javascript:var script=document.createElement('script'); script.type='text/javascript'; script.src='https://getfirebug.com/firebug-lite.js';document.getElementsByTagName('body')[0].appendChild(script); void(0);

And that is it. Click on the link in any of the said browsers and a small icon will appear in the bottom-right corner. Click on it and voila: Firebug! Of course, one can install the Firebug extension, which is actually also a javascript link, albeit really weird, but I think this is more clear and user friendly.

Update: in order to execute a script in any open tab inside Chrome, use the executeScript method of the tabs API.

Chrome browser extensions are so cool, that they protect you from accidentally running and adding script to a page that might interfere with the original code of the page. Unfortunately, they don't give you a parameter or option to actually do that, if it is what you actually want. All you can do, by default, is to access the elements in the page document, but not change direct members of window or even document.

I have found the solution on this page: Writing a Google Chrome extension: How to access the global context of the embedding page through a content script.. There is code and explanations for the code, but basically it is a function that injects another function in the real page context and also returns a result.