LiChess Tools is a Chromium-based browser extension (meaning Chrome, Brave, Edge, Kiwi - which also works on mobiles, even if it was discontinued - and others, as long as they have a Chromium version equal or higher to 111) and also on Firefox and Firefox Android. The extension extends the functionalities of the lichess.org web site, with their full support.
This page is the user manual for the extension, cataloguing its current features and explaining how to use them.
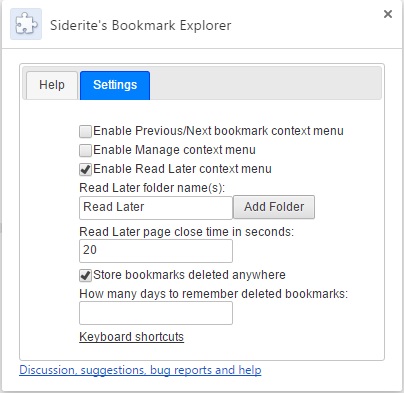
All of the features below can be individually turned on or off from the LiChess Tools item in the user menu on the top right. Note that many of the options will be hidden until you toggle Advanced Preferences - these features will be marked with Advanced in the category section. Some preferences will only show up if logged in.
Get it for:
Preference values can be backed up as a downloaded file and restored from it. You can also reset preferences to default or turned them all off, then turn on the ones you are interested in. The blueish border around some preference values means they are part of the default configuration. A sepia coloring of a preference and a WIP added to the title means the feature is "Work in progress" and results are not guaranteed.
From version 2.4.103, the LiChess Tools menu item also contains a quick toggle that disables the extension for the day or enables it back if it's disabled. If you want to disable it until you turn it back on, you can do it from the first button in the LiChess Tools preferences page.
Note: the version number below is often the one if development, so there might be differences between what you have and what is listed here.
Here are the available features in LiChess Tools v2.4.146 in pretty random order (I've got to group these somehow):
Crowdin translation
category: Languages
values: yes / no - defaults to yes
Crowdin is a community driven translation service that can help handle text translation. LiChess Tools has integrated translation from there (see https://crowdin.com/project/lichess-tools), but the only languages I can be sure of are English and Romanian. From the other supported languages, many of them are translated by machines, so they are probably really bad. If you have your Lichess in your language, but you can't stand the bad translation in the LiChess Tools strings, you have two options:
- turn off Crowdin translation and the extension text will now be in English
- go to Crowdin and help fix the translation
Obviously, I recommend the latter.
LiChess Tools team
category: Community
values: Hide forum entry / Forum entry last / No notifications - defaults to none
Needs log in
This will add a new forum entry in the forum list from where you can join the LiChess Tools users team or, once joined, you can participate in the extension community.
Note: you will be shown a notification to join the team. You can disable that just by visiting the team page, then it will not appear again on your device. The "No notifications" setting below does the same thing.
Options:
- Hide forum entry - If set, this will remove the forum entry suggesting you join the LiChess Tools users team (or, if you joined already, link to it)
- Forum entry last - If set, the forum entry will be placed last in the main list of forums (after Off-topic forum)
- No notifications - If set, this feature will never send notifications. If not set (the default value), it will add a notification to join the team. Just visiting the team page will also disable the notification, whether you join or not. This will also block any future team notifications I might choose to send into the future.
Being part of the team will be advertised on your public profile as well as on your friend's timelines. That is great for LiChess Tools, so if you want to support the extension, please consider joining.
I don't plan to spam anybody in the team, just use it to announce various changes to the extension. Which are a lot and happen all the time and might be construed as spam... OK, I will not spam you much. And also I would like to hear from you, maybe even (gasp!) form a community that will take this farther than my meager imagination could take it.
While in the team, feel free to talk to the other users, ask for features, complain, all the jazz. Use the team's forum as one would use the official Lichess Feedback forum. Only less divisive :). And don't worry, the team is called L1Chess Tools because Lichess forbids the text "lichess" in the team's name, not because I plan a L2Chess Tools team or whatever.
Although that is an idea...
Extended interactive lessons
category: Study
values: Play all variations / Show final score / Always show score / Play again from where you entered Preview mode / Fast interaction / Give up button - defaults to Play all variations, Show final score
This feature may be the flagship of the extension, as it allows you to play an Interactive lesson chapter by going through all variations instead of just the mainline. The default Lichess behavior is to only follow the mainline, considering all sidelines as bad. With the new behavior all moves in the PGN tree are good, while the ones that are not in the PGN are bad. You can mark the bad variations with glyphs (good move, mistake, blunder, etc.), for example, to indicate if a move is bad or good, but you can continue playing it to see why.
In the case a move accepted by the extended system is annotated with a glyph, like !! or ?, the "Good move" green confirmation would be confusing, to it will be replaced with the glyph name, like "Blunder" and the symbol will be displayed top-left.
There is a mechanism to choose what the computer will play next as your opponent. It uses the number of branches in 8 ply (4 chess moves for both players) to determine which is more probable. This value can be changed (see Next move probability depth feature) For example if you have something like 1. e4 (1. d4 d5 2. Nc3 (2. Nf3)) 1... e5 2. Nf3, the mechanism will see that there are two possible branches for d4 as opposed to one for e4, so it will choose d4 66% of the time. The probability can be changed manually by adding a comment in the move with the format prc:<number>, where the number is a percentage between 1 and 100. (ex: prc:90) Also, if set in the Transpositions behavior feature, the moves can be picked from moves following transposing positions.
When hints are not provided by the study creator, one will be generated to show how many possible moves are available. The hint link will show a number of possible moves, if higher than 1.
There is also a system to compute accuracy when playing an interactive lesson by counting the good and the bad moves. This will be displayed as a percentage during or at the end of the lesson and can be turned configured by option.
The lichess UI remains the same, therefore the area in which to explain why any other move is wrong only appears on mainline moves. That is why this feature also adds context menu items (Explain why other moves are wrong and On-demand hint for the player) for nodes in interactive lessons to enable editing that information. For hints, you have to add them on the move before the move you need to make. And as usual, when a "bad" move is made (meaning a move not in the PGN), the explanation text to be displayed to the user will be taken from the first next move from the current position. Therefore in order to make this work you have to right-click that node and explain why bad moves are wrong. This might be a bit counterintuitive, as you may have several moves following the current position, but the explanation has to be set to the first next move.
This feature also adds a header like Extended Interactive Lesson over the edit controls specific to interactive lessons. They usually take a lot of space, so clicking on this header will hide/show them. This allows people to edit Interactive Lesson chapters just as comfortable as normal ones.
Options:
- Play all variations - enables the Extended mode for interactive lessons, allowing you to play all variations with the computer picking random moves from the ones available in the PGN
- Show final score - shows the score at the end of the lesson. One can disable this to reduce frustration or for other reasons. Mouse over the score to see number of good and bad (or asking for solution) moves.
- Always show score - shows the score at every step of the lesson. This is disabled by default.
- Play again from where you entered Preview mode - this feature is disabled by default. It remembers the position where you entered Preview mode for an Interactive Lesson and, when the lesson ends, the Play again button will take you back to that position instead of the first move in the chapter. Obviously, this only works for creators or contributors to studies.
- warning, if you are playing for completion, like having a good score or using the lesson flow features, this will probably interfere with that.
- Fast interaction - this will remove the delay between moves, making things faster. Also, the Good/Retry large tiles will be replaced by small symbols on the comment bubble: green checkbox for good move and red x for bad move. Comments that you have already seen a few times since last page refresh will be skipped, especially if they are on your move.
- Give up button - this will render a "Give up" button next to the hint in interactive lessons. Pressing it will be equivalent to making a bad move and going directly to the end menu of the interactive lesson.
Some of these options are also available in the action menu (hamburger button) of the Analysis board when in a study chapter that is of type Interactive Lesson. This allows to quickly enable/disable just these relevant settings.
Notes:
- one can play all variations of an interactive lesson with multiple branches only with the LiChess Tools extension installed, so if you create such a lesson only people with the extension can enjoy it. It would be nice to let everybody know that in a comment if you share it.
- asking to show the next move will show arrows of all possible next moves. Be warned that pressing the button is seen by the scoring system as a fail.
Extended interactive lesson flow
category: Study - Advanced
values: Sequential / Spaced Repetition / Avoid lines marked as mistakes / Hint excluded moves / Retry on Space - defaults to Avoid lines marked as mistakes
Work in progress! - this means use at own risk.
This feature allows you to play Extended Interactive Lessons variation by variation. When any of these options are enabled, the chapters that had variations played will have a small progress indicator in the chapter item in the chapters list. Mouse over the chapter titles to see how many variations are available and their status.
When all variations have been played a reset prompt will appear. You can also manually reset the played variations from the chapter edit dialog for the studies you can modify and from the reset button on the chapter item for the ones you can't.
Options:
- Sequential - this will force playing extended interactive lessons variation by variation, in order
- if you make any mistakes, you will start over
- if you don't play from the very beginning of the variation, it will not count
- Spaced Repetition - this will force playing extended interactive lessons variation by variation, randomly, based on success or failure
- when you finish a variation, the time until you can play it again will increase or decrease, based on how many mistakes you've made
- if you don't play from the very beginning of the variation, it will not count
- Sequential and Spaced Repetition together - this will behave as Spaced Repetition, but will take variations in order
- the distinction is small, but it matters to some players to get the first variation that can be played
- Avoid lines marked as mistakes - if this is on, then extended interactive lessons are not going to consider branches starting with your moves which are annotated with negative glyphs, such as blunder, mistake or dubious as valid variations to review
- this applies only to special flows, like Sequential and Spaced Repetition
- Hint excluded moves - if this is on, then the hint will show the moves in the PGN that are NOT in the current reviewed line
- this applies only to special flows, like Sequential and Spaced Repetition
- Retry on Space - if this is on, then pressing Space at the end of a variation will retry the same chapter if more variations are to be played or move to the next chapter if not.
- this applies only to special flows, like Sequential and Spaced Repetition
More options - only meaningful in the context of either or both Sequential or Spaced Repetition being enabled:
- Avoid lines marked as mistakes - It makes sure that lines that contain moves of yours marked as dubious, mistake or blunder are not counted.
- Hint excluded moves - In some lessons it's hard to understand which line has been picked as "right". You can use show solution first and then play it, but this will also help. When you have multiple options from your position, but only one is being trained, the hint will show the moves to avoid. So something like "Only one accepted move. Avoid b4, Nf3".
Notes
- The default replay interval is one day.
- This is a work in progress. It might not work exactly as you expect it. Please report any issues to me.
- The currently selected Extended Interactive Lesson settings will be displayed when playing an Extended Interactive Lesson.
Ctrl-right to play random next move from list
category: Analysis, Study - Advanced
values: yes / no - defaults to yes
This feature will allow you to play a random move from the PGN by pressing Ctrl-right. There is a mechanism to choose what the computer will play next as your opponent. It uses the number of branches in 8 ply (4 chess moves for both players) to determine which is more probable. This value can be changed (see Next move probability depth feature) For example if you have something like 1. e4 (1. d4 d5 2. Nc3 (2. Nf3)) 1... e5 2. Nf3, the mechanism will see that there are two possible branches for d4 as opposed to one for e4, so it will choose d4 66% of the time. The probability can be changed manually by adding a comment in the move with the format prc:<number>, where the number is a percentage between 1 and 100 (ex: prc:90). Also, if set in the Transpositions behavior feature, the moves can be picked from moves following transposing positions.
Ctrl-left works almost like the left key, going to the previous position, but in this case it will go to the position you came from, not from the previous position on the line you've jumped to.
Notes:
- if set in Transpositions behavior, Ctrl-right may choose a move from another line, but made from the same position, which means that going "back" will go to the previous position in the current line, not the original one. Use Ctrl-Left to return to the position you jumped from.
- the keyboard shortcuts will be shown in the keyboard help popup if this feature is enabled (press Shift-? for the help popup - this is a native lichess feature)
Behavior of transpositions
category: Analysis/Study - Advanced
values: exclude if same line / don't add identical next moves / play moves from transpositions - defaults to none
This feature determines what a transposition is for other features that use transpositions. The options are:
- exclude if same line - two identical positions in the same PGN will not be considered transpositions of one another if they are in the same line of moves (one came before the other) (see Highlight moves in analysis and Show next moves from transpositions)
- don't add identical next moves - when showing next possible moves at the bottom of the move list, if adding them from transposing positions, don't add the same move twice (see Show next moves from transpositions)
- Note that this only applies on the default fork control. In the "Force choice" scenario all transpositions are shown anyway.
- play moves from transpositions - when picking a next move to play, use transposing positions as well (see Ctrl-right to play random next move from the list and Extended Interactive Lessons)
- none - when none of the values above are selected, any two identical positions will be considered transpositions, the move list can show multiple identical moves if they are coming from different transpositions/lines and the extension will not pick next moves using transpositions.
Next move probability depth
category: Analysis (minor)/Study - Advanced
values: equal / one move / two moves / three moves / four moves / five moves - defaults to two moves (4 ply)
This configures the mechanism calculating the probability of a next move in the PGN (see Extended Interactive Lessons and Ctrl-right to play random next move from list). The default value goes 4 moves for each player to see how many branches follow. It will then weigh each next move in the list based on that. If you want to turn this off completely, just select equal, which means it will not look at following moves at all.
Variation arrows from transpositions
category: Analysis (minor)/Study - Advanced
values: yes / no - defaults to yes
This feature is showing variation arrows for transpositions, as defined in the Transpositions behavior feature.
Next move behavior for variations
category: Analysis/Study - Advanced
values: Normal / Hybrid / Force choice- defaults to Normal
This feature will change how the next move arrow works when there are multiple variations to choose from:
- Hidden - this will hide the list of next moves entirely
- Normal - normal behavior
- Hybrid - this will highlight the variation list, asking you to make a choice. Trying again will just pick the selected choice in the list. On desktop you can cycle between choices with the Shift key or just click on the move you want. On mobile you can tap the choice you want.
- Force choice - this will show a popup with the list of variations and transposition moves. (similar to the Chessbase behavior)
- On desktop you can:
- select the one you want with up/down arrows.
- to execute a choice: Right-arrow key, Enter, the OK button or right-click or double-click or click on an already selected option
- to close the popup: Left-arrow key, Esc, the close button or clicking outside the popup
- On mobile you can:
- select the one you want with a tap
- to execute a choice: tap a selected variation
- to close the popup: tap the close button or outside the popup
Notes:
- the variation list might be affected by the Transpositions behavior feature. You could get a list of transposition variations, but then the Shift key will not work to shuffle between them. This is (so far) by design, because transposition moves are not actually moves, they are jumps to other branches.
- if you have enabled the Lichess game behavior Scroll on the board to replay moves, then that will ignore this feature, per design. So if you want to just quickly go up and down your move tree without having to enable/disable this feature, use the mousewheel or the equivalent touchpad moves.
- note that this was enabled before with a separate feature that mirrored the native Lichess functionality. That tool has been removed in v2.3.136.
PGN Editor
category: Analysis
values: yes / no - defaults to yes
This feature adds a new entry in the Tools menu called PGN Editor. Clicking on it will open a text editor where PGNs can be pasted, manipulated and copied from. The PGN Editor is actually a popup over the page you are on. For technical reasons, for the Evaluate function to work you must be in an analysis/study page, therefore if you open PGN Editor in any other page it will jump to Analysis Board page and show the popup there.
On mobile devices, you first tap on a button to make it active, then tap again to execute the command.
Functionalities (short version):
- Merge - combine all games into one (or few) PGNs
- Normalize - transfer all moves after transpositions to the first instance of the position
- Denormalize - clone all variations from transposing positions into all instances of those positions
- Split - split all variations into their own one line games
- Search - find games with particular characteristics
- Result - remove all games that were not marked as found by Search
- Cut - remove things
- Evaluate - add evaluation comments to the final moves in every variation
- Commands - run various commands
- Count - display the number of games and how many moves in the PGN
- Cancel - cancel currently running operation
- Copy/Undo/Redo/Clear/Upload/Download - operations with the content of the PGN Editor
Functionalities (oh, boy!):
- Merge - this button will take multiple games in PGN format and merge them into as little games as possible. For example, all games starting from the same position can be merged into one. Also, games that start from a position present in another game will be merged there. Games starting from positions not present in the others cannot be merged.
Example:
Original PGN content:
1.e4 e5
1.e4 d5
After merge:
1. e4 e5 ( 1... d5 ) *
- Normalize - this button will, for each game in the PGN, take all moves made from a particular board position in any variation and group them in the first occurrence of that position.
Example:
1. e4 (1. d4 e5 2. e4 a5) 1... e5 2. d4 h5

(After both paths e4 d5 d4 and d4 d5 e4 the same position is reached (a transposition). In the original PGN the first path move from the common position is 2...h5 and in the second path 2...a5.)

Normalizing this will result in:

 1. e4 ( 1. d4 e5 2. e4 ) 1... e5 2. d4 h5 ( 2... a5 )

(both a5 and h5 moves from the mainline position, while the d4 path will stop at the common position, with no following moves.)
- Denormalize - this button will, for each game in the PGN, take all the moves made from a particular board position and add them as actual moves in the PGN. The purpose is to create all possible lines as actual moves.
- This is the reverse of the Normalize function, but Denormalizing and Normalizing doesn't yield the original PGN.
- Denormalization will increase the size of your PGN.
- Split - this button will, for each game in the PGN, split each variation into their own games. Example:
1. e4 e5 ( 1... d5 ) will be split into 1. e4 e5 and 1. e4 d5 - This is the reverse of the Merge functionality above.
- Search - this button will prompt for a string, then search the games for it.
- The string can be part of a FEN or a PGN (wildcards * for anything and ? for one character are supported)
- when searching for a PGN, the original PGN is searched as well as with comments and annotations removed and then with move numbers removed, see Examples
- Another option is to search for PGN tags, like this:
Black=totalnoob69 or opening*=Gass. - *= means contains, the tag name is case insensitive
- You can search by index like this:
Index=3 (the third game in the list) - You can also search the invalid games like this:
Invalid (this marks invalid games as found) - Yet another option is to search for ply (half-moves), like this:
ply=10, ply<30, ply>15 - Searching is possible on eval comments generated by Evaluate or exported in the comments (format [%eval...]), like this: eval=1, eval>0.4, eval<-1.5
- You can search for games containing clock values (%clk or %emt) with
Clock - You can search for games containing shapes (arrows or circles) (%cal or %cls) with Shapes
- The games that match will have a new PGN tag added (called Found) in the text area. Searching will remove previous search Found PGN tags. Use Result to keep just the found results. Use Cut with "result" to remove the found results.
- Do not use full FEN strings, only the first four elements (board, who's turn it is to play, castling and en passant square) are supported (no clock values)
- Examples:
- searching for
rnbqkbnr/pp2pppp/2p5/3p4/2PP4/5N2/PP2PPPP/RNBQKB1R b KQkq - 1 3 will fail (because it has half clock and ply - 1 3 - at the end) - searching for
rnbqkbnr/pp2pppp/2p5/3p4/2PP4/5N2/PP2PPPP/RNBQKB1R b KQkq would work for the games that reach that position - same for:
rnbqkbnr/pp2pppp/2p5/3p4/2PP4/5N2/PP2PPPP/RNBQKB1R - FEN searchpp2pppp - FEN searchrnbqkbnr/*/2p5 - FEN search5?2 - FEN searchECO=C40 - PGN tag searchc4 c6 - PGN searchply=10 - search games with exactly 10 ply (5 moves for each side)ply>30 - search games with more ply than 30ply<20 - search games with less play than 20- eval>1.5 - search games where a final move has been evaluated to more than 1.5 eval
- note that if you have several branches in the games, it will show as found if at least on branch terminates in a matching eval.
- for a game that looks like this:
1. e4 {some comment} ...c5 2. c3 , all of the following PGN search patterns will find it: 1. e4 c5 2. c3e4 c5 c3e4 * c3
- Result - this button will remove all games that are not marked with a Found tag and remove the Found tag from those found. The flow is: you press Search, it finds some games and marks them with a Found tag, you press Result and only the found games remain in the text area.
- Warning! If you have not searched for anything before (or if you press the button twice), it will clear the text area
- Cut - this button will remove things based on the prompt you give it:
- if it contains "tags" it will remove all tags from games
- if it contains "comments" it will remove all comments from games
- if it contains "annotations" it will remove all annotations from games
- if it contains "result" it will remove all found games (the opposite of the Result functionality)
- if it contains "ply <some value>" it will remove everything after the specified number of ply (half moves), on every branch, in every game
- if it contains "eval<operator><some value>" it will remove branches that have that particular eval, on every branch, in every game (i.e. eval<3 will cut everything with evaluation less than 3)
- operator can be < > or =
- this works with the comments for evaluation from the Evaluate command! It does not evaluate the position itself.
- if it contains "eval" by itself it will remove evaluation markers from the PGN (in the format [%eval ...]
- if it contains "junk" it will attempt to eliminate from the text what appears to not be a valid PGN game. Use it after copy pasting text from chess webpages when you want to clean up the result.
- if it contains "clock" it will remove move time markers from the PGN (in the format [%clk ...] or [%emt ... ]
- if it contains "shapes" it will remove move arrow and circle markers from the PGN (in the format [%csl ...] or [%cal ... ]
- the above patterns can be combined
- Example: tags, comments, annotations, ply 10
- Evaluate - this button will evaluate the end positions of each game in the PGN, adding an eval: <value> comment
- Commands - this button will execute various commands based on your prompt
- if it contains "extractFen" it will extract the FEN for each move in each game. Games will be defined by their index, followed by the list of unique FEN positions
- if it contains "splitForStudy" it will attempt to split the larger PGNs into games at most 3000 moves
- Count - this button will count the number of games and total number of moves in them
- This is done automatically after most operations.
- Cancel - this button will cancel the current operation (for example when trying to merge tens of thousands of games, it may take a while)
- Copy - this button copies the content of the text area in the clipboard
- Upload - this button will ask for a file to upload to the text area (dragging files and dropping them directly to the text area works as well)
- Download - this button will download the content of the text area as a pgnEditor_<currentTime>.pgn file
- Undo - this button will undo the changes in text area (equivalent to pressing Ctrl-z)
- Redo - this button will redo the changes in text area (equivalent to pressing Ctrl-y)
- Clear - this button will clear the text area as well as the entire undo/redo history.
Notes:
- Games with no moves and no tags will be removed. Games with moves and no tags (example: after Cut "tags") will have an Event tag with the value "exported by LiChess Tools". This is there so that various import software, including Lichess studies, process the list correctly, not an unnecessary blurb.
- Normalize changes the flow of the moves. Don't expect the normalized PGN to have the same structure as the original. This functionality is particularly for grouping the moves from a particular position in one place.
- Tag search will search the exact string in the tag, but will ignore whitespaces. Use the *= syntax to search for containing strings (i.e.
opening*=Gass) - I am thinking of a meta-search option, where you can search for pins, sacrifices, pawn structures, etc., but I don't know how many people use that. Let me know if you are interested.
Enhanced PGN import
category: Analysis
values: yes / no - defaults to yes
Another important feature of LiChess Tools, this one makes changes to the import mechanism in the Analysis board page. You can now import multiple PGNs at the same time and they will get merged into a single one. It is great for creating repertoires, analyzing the games of a specific player or creating Extended Interactive Lessons. From the Analysis board you can go to options and turn it into a study. Note that the recommended way to perform PGN operations is now the PGN Editor.
As part of this you will also get the Escape key functionality for the FEN and PGN inputs, clearing the focus and allowing key shortcuts again.
Notes:
- the import mechanism in Analysis board ignores comments from the PGNs. This is a lichess limitation and to get around it I would have to rewrite the entire thing. Use PGN Editor for work with commented PGNs.
- the import in Analysis board is different from the one in Studies. The one in Analysis board is client based, while the one in Studies is on the server. That is why I can only alter the one in Analysis board.
- there is no logical limit to how many PGNs to import, but the Analysis board has a limit of about 5000 moves. Also, the API to turn it into a study has a size limitation, so if you try to turn a huge analysis to a study and it fails, know that it is too big. Highlighting moves on huge PGNs also is slow. So use with care.
- From v2.1.21 the merge mechanism will check if the PGNs start from different positions and only merge what starts from the same position. Previously the merge seemed to be working, but it made no sense from the standpoint of PGNs, resulting in an invalid PGN that cannot be loaded.
Options for PGN exports
category: Analysis/Study - Advanced
values: Export clock values / Export computer evaluation / Export PGN tags / Export arrows and circles - defaults to all
This feature lets you control what kind of PGN you get from several LiChess Tools exports:
Friends box
category: Friends
values: Default / Menu / Button / Open / Hidden - defaults to Menu
Needs log in
This has evolved a lot. Originally it was automatically opening the friends box, but then several requests came that complained about the placement of the friends box and how distracting it was. So the current version of the feature can either:
- Default - the default behavior of the friends list: stays in the bottom-right corner, only updates when opened, which requires a user click.
- Button- the friends box is removed and replaced with a friends button, similar to the Notifications one. It will update in real time with the number of friends online and will change color when any one of them is playing.
- Menu - the friends box is removed and replaced with a friends menu. It will update in real time with the number of friends online and will change color when any one of them is playing. It will also show the number of playing friends in a small blue square.
- Open - the default behavior of the friends list, but it will open automatically when loading the page
- Hidden - the friends list will disappear completely
Notes:
- clicking on the main menu item directly will open the friends page, but not on mobiles
- when the width of the page goes under 972px, menus are grouped under a hamburger menu. The Friends menu will disappear and become a button in that case.
- when the width of the page goes under 1020px, the friends box is not shown anymore, so unless the Hidden option is selected, the Button option will become the default.
- playing friends will have the time control icon on the left of their name in the friends menu.
Live friends page
category: Friends
values: yes / no - defaults to yes
Needs log in
The default lichess behavior is to load whatever list of friends you have and then leave it at that. With this LiChess Tools feature the friends list will be updated in real time, while also allowing filtering by who is online, who is playing, who is active (played in the last year) and (only if player voice alerts are enabled) which player is muted.
Each player will have a TV icon as well and (only if player voice alerts are enabled) a mute/unmute button to include them in the alerts. (see Sound and voice alert with friends start playing). This functionality extends to blocked players and favorite opponents pages.
For the Blocked players page, an action to unblock users with just one click will be available for each user.
This will also show the total number of friends as the title of the friends page.
A link to the players that follow you - a page that is only enabled by LiChess Tools - as well a a link to Favorite Opponents are also available in the live friends page.
Note: from v2.4.129 onwards, Lichess decided to remove the followers API, so I had to make due using the Activity API, which shows what happened in the last week. LiChess Tools will extract users following you and store them locally on your machine. If you skip a week or clear your browser cache you will lose this data. Also, the storing starts with the moment you update to 2.4.126 and so it will not show all of the followers, but it will at least show them newest first, which is something the old API could not do after more than 600 people.
Sound and voice alert when friends start playing
category: Friends
values: Ultrabullet / Bullet / Blitz / Rapid / Classical / Standard only- defaults to none
Needs log in
This feature will beep and spell out the player name and type of game they started. The type of the game can be chosen from the values. The definition of the game type comes from lichess, which assumes a typical game will be around 40 moves.
You can also choose which specific players to have the alert for, by going to the friends page and clicking the mute buttons. (see Live friends page)
If you select Standard only, then the alerts will only be sounded for the Standard variant of the game.
Notes:
- Chromium (and other) browsers disallow sounds from page load until the user does something like click on the page. In case an alert is attempted and audio is not allowed a red icon will appear next to the top buttons, which will disappear once the audio is allowed again.
- The audio icon is part of lichess, which will also display it once sound is attempted but not allowed. At this time, the lichess icon will NOT disappear unless you click on it, different from how LiChess Tools uses it for alerts.
- If you are playing a game on another tab, the sounds will not be played if the Quiet mode on all tabs feature is enabled.
Practice against moves from Opening Explorer
category: Analysis/Study
values: yes / no - defaults to yes
This is another great feature that allows you to play against whatever is selected in the Opening Explorer. Select masters to play against the best players, select Lichess and select the range of player to train against and select specific users to test your strategies against their played games. The feature can be turned on/off not only from Preferences, but also from the Explorer config screen.
In order to use this feature you need to go to the Analysis board or a study, open the Explorer and click on the icon next to the Masters tab, the one that looks like an arrow hitting a target.
One extra feature of this tool is making a random Explorer move if clicking on the total row on the bottom. It effectively makes a move as if Explorer Practice is enabled and it's the computer to move.
The feature is unavailable in the Analysis screen of a running correspondence game.
Notes:
- you can toggle Explorer Practice by clicking on the arrow in the target button, but also with shift-L, to make it easier to switch between computer evaluation and the practice mode
- the keyboard help popup shows this shortcut if the feature is enabled
- by default the moves in the explorer window will get hidden in Analysis board, but not in studies. The motivation being that one is more like a game, with no lasting effects, the other is research. See Explorer Practice options in order to change that.
- if the Show emojis when out of moves feature is enabled in Explorer Practice options, then at the end of a run, when there are no more moves available in the Explorer for the feature to make, a quick computer analysis will be run to show you a smiley (happy or sad).
- When Explorer Practice is running, the normal Practice button will be hidden, in order to avoid both confusion and pressing on it accidentally on mobiles when wanted to go back to start.
Explorer Practice options
Options for the Explorer Practice feature:
- Show emojis when out of moves - set by default - will run a short computer analysis when out of moves in Explorer Practice, then show an happy/sad emoji based on the eval.
- Click Explorer Σ to make a move - set by default - clicking on the Total row in Explorer will make a random move, weighted by the probabilities of the move (basically a one turn Practice move)
- Show opponent name - disabled by default - this will show a name next to the move made by the computer, giving you a hint about who played the same move in the same position
- Explorer data in Study - set by default - this will show explorer rows while doing Explorer Practice in a Study page
- Explorer data in Analysis - disabled by default - this will show explorer rows while doing Explorer Practice in the Analysis board page
Highlight moves in analysis
category: Analysis/Study - Advanced
values: Last move in each variation / Not commented last moves / Transpositions to current move / Highlight board when out of main line / Highlight pieces when out of main line / Highlight variation depth - defaults to Last move in each variation, Not commented last moves, Transpositions to current move
This feature will highlight moves in the analysis move list. Each option highlights a specific thing:
- Last move in each variation - for each branch, highlights the last move
- the highlighting will be done using a superscript capital L. For the moves made by the opposing side to the orientation one, the L will be mirrored.
- Not commented last moves - for each branch, highlights the last move that has no comment and is not a mate
- the highlighting will be done with a red underline
- Transpositions to current move - highlights positions that are identical to the current one in the same PGN (see Behavior of transpositions to change what the extension considers a transposition)
- the highlighting will be done with a light green background for the transposing lines
- Highlight board when out of main line - dims the board a little when moving out of main line (similar to chess.com)
- Highlight pieces when out of main line - dims pieces that moved from the mainline position (similar to Chessmaster 10th edition)
- Highlight variation depth - it will change the display of the moves so that they have different colors depending on the variation depth level.
- this replaced the Move colorizer theme that existed until version 2.3.
- Warning: this may have adverse performance effects on really large PGNs (1000+ moves)
- Highlight checks to kings - highlights moves that place a king in check
- the highlighting will be done by a dashed yellow underscore
Extra context menu options
category: Analysis/Study
values: Copy branch as PGN / Engine evaluation for last moves / Highlight all transpositions / Remove superfluous / Show context menu when no moves / Reorder variations / Position info / Engine evaluation for previous moves - defaults to Copy branch as PGN, Engine evaluation for last moves, Remove superfluous, Show context menu when no moves, Reorder variations
This feature will add extra options to the Analysis board/Study move list context menu. The options are:
- Copy branch as PGN - this works in Analysis board and Studies and turns all the previous moves of the line you are in, plus all the branches after the move, into a PGN in your clipboard.
- If you press the Shift key when clicking on Copy branch as PGN the copied PGN will start from current position, not from the beginning of the original chapter.
- If you press the Control key when clicking on Copy branch as PGN each variation branch will be copied as a separate PGN game.
- If you press the Alt key when clicking on Copy branch as PGN then the PGN will get copied only to the current position.
- You can use it to split large PGNs by copying variations into their own chapters, then maybe deleting them from the original one.
- Engine evaluation for last moves - this works only for Studies, because it involves move comments. It will go through all of the uncommented last moves and create a comment in the form eval:<evaluation> using the local computer engine. The evaluation will stop at the engine depth selected in Preferences (see Custom analysis engine depth).
- Engine evaluation for previous moves - this will evaluate all the moves up to the selected position, but will not add comments with the evaluation, as above, so it works in Analysis Board as well as Studies.
- Highlight all transpositions - this works for both Analysis board and Studies and highlights all moves that have transpositions. You can configure what a transposition is in Preferences (see Behavior of transpositions)
- Remove superfluous - for purposes of saving space, this removes the following entries from the context menu:
- Annotate with glyphs - there is a button for this under the board
- Comment on this move - there is a button for this under the board
- Copy variation PGN - LiChess Tools already provides a better version
- If Auto expand is set (thus disabling the Lichess collapse/expand functionality):
- Expand variations
- Collapse variations
- This will also color the Delete from here icon red on the analysis menu
- Show context menu when no moves - this allows for showing the context menu when there are no moves in the tree. When the board starts from a FEN position, there is a little "..." element that you can right-click. When the board is completely empty, there is a row that highlights when you hover and you can right-click for the context menu.
- Reorder variations - this will add "Bump up/down" context menu actions for analysis/study/game moves, when you can move a variation up and down in the list of its siblings. "Bump up" will not appear for the first child of a node and "Bump down" will not appear for the last child of a node. The Bump options will always be available on the starting node of the variation only.
- example: 1. e4 e5 (1... d5 2. f4) (1... c5 2. f4) (1... b5 2. f4)
- on 1.e4 there will be no bump options because it has no siblings (there is only one move from the previous position). Same applies to the 2. f4 moves, regardless of their branch, since they are the only moves from the previous position.
- on 1...e5 there will be no Bump up, since it's the first variation already, but there will be a Bump down, which will swap it with 1...d5, which becomes the main line.
- on 1...d5 there will be a Bump up which appears to do the same thing as Promote, but Promote also destroys the force variation of the first child. There will also be a Bump down.
- on 1...c5 there will be both Bump up (which swaps it with 1...d5) and Bump down (swapping it with 1...b5)
- on 1...b5 there will be a Bump up (against 1...c5), but no Bump down, since it's the last variation from the previous position already.
- Position info - this will add a menu item that will give you some meta data related to the selected position, like how many moves to get to it, how many moves following, how many branches, etc.
Move assistant
category: Analysis/Study
values: Move destinations / Squares / Pawns / Moves / Pieces - defaults to all
This feature will add a little eye icon button () in the computer evaluation window, next to the settings. Clicking this button will enable the Move assistant. Right clicking (or long tapping) on it will give you a menu to toggle the various options.
Based on the options you selected it will do the following:
- Move destinations - this which will show, when selecting a piece, the evaluation on each possible destination square.
- The colors represent the quality of the move. Green is good, Red is bad, Yellow is not recommended.
- The small circle inside the destination square represents the evaluation relative to the worst and best possible move.
- This means that if the best move achieves equality and the worst move loses 0.2 pawns, the first one will appear green and the other red.
- This is the less important metric, so it's not that serious that you can't see it when the destination square is a capture.
- The border color of the destination square represents the inaccuracy/mistake/blunder metric.
- While this is still a gradient, anything that will cause a 3 pawn loss from the best move will appear as red, 2 pawns will get you orange, 1 pawn will get you yellow and only under you will get green.
- The bar inside the border represents the WDL (win-draw-loss) chances after making the move. Again, red is loss, green is win and yellow is draw.
- Take these with a grain of salt, as the WDL values of Stockfish are not that relevant.
- Squares - this will highlight squares on the board:
- red - weak squares for the board orientation side
- green - weak squares for the opponent of the orientation side (possible outposts)
- Pawns - this will highlight pawns on the board:
- red - backward and isolated pawns
- yellow - hanging pawns
- Moves - this will show types of moves on the board:
- purple arrow with yellow outline - possible pawn break (pawn breaks are not good or bad, they just are highlighted)
- Pieces - this will highlight pieces (that are not pawns) on the board:
- Green smiling face on the left of piece - happiest piece in terms of piece mobility
- Red frowning face on the left of piece - unhappiest piece in terms of piece mobility
Definitions:
- weak square: an empty space that cannot be defended by pawns left or right of its file and which is either in front of a friendly pawn or attacked by an opponent pawn.. A weak opponent square is an outpost square for you, therefore it appears green.
- note that any square that cannot be defended by pawns is by definition weak, but showing them all would crowd the board
- some restrictions apply related to what ranks these squares occupy. Outposts in your own territory make no sense, as do weak squares on the starting rank.
- isolated pawn: a pawn on a file that has no friendly pawns on the adjacent files.
- backward pawn: a pawn that has no friendly pawns behind it to support it on the adjacent files and has the empty square in front of it attacked by an opponent's pawn.
- hanging pawn: two friendly pawns on adjacent c, d, e or f files that have no friendly pawns on the files left and right of them and are placed on the same rank. They also cannot be on their starting position.
- note that in theory, that could mean two pawns just about to promote. That's not really in the spirit of the definition.
- pawn break: a pawn move that would attack an opponent pawn that is blocked from moving forward by a friendly pawn.
- happy/unhappy pieces: pieces that have or don't have as much mobility as they could. This is calculated based on squares they can go to and who controls them, direct and secondary moves.
This is not meant to replace, but be complementary to the computer analysis. Move assistant enabled value is persistent on page reloads.
If Move destinations is enabled, once a piece is selected, the background engine will run using the configured thread count and hash - for 90 seconds and then stop. During that time the color of the squares will be updated as the evaluation changes. 90 seconds corresponds to a depth of about 20 on my older laptop in a middlegame position. Unselecting pieces will stop the processing.
Obviously, this consumes processor power, so if you are on a mobile device or a laptop it will consume battery. Running both local computer analysis and Move assistant will use CPU for both processes. Opening multiple analysis browser tabs will use resources for each tab in which a piece is selected.
Sometimes destination squares will not be colorized. For example, this is the case for mate threats, where moves that do not interfere with the mate will not be evaluated.
Custom analysis engine depth
category: Analysis/Study - Advanced
values: a number representing the depth - defaults to empty
This feature will allow you to set a depth level for the computer engine. If the current move has a smaller depth level (let's say it was cached in the cloud with that level) it will start the local computer evaluation. Once it reaches the set depth, the engine will stop. You can restart the analysis by pressing the little + button next to the computer engine depth indication.
This value can also be changed from the analysis options in Analysis board or Study.
This feature is also used as the level at which to consider evaluation done for the Engine evaluation for last moves option (see Extra context menu options - Engine evaluation for last moves and PGN Editor - Evaluate)
This feature is also used in Practice, where it controls the level of play (See Custom analysis engine options)
Custom practice engine depth
category: Analysis/Study - Advanced
values: a number representing the depth - defaults to empty
Same as Custom analysis engine depth, but only applies to Practice mode. If not set, the level will be taken from Custom analysis engine depth. And, of course, if Custom analysis engine options Apply in Practice mode is not set, it will have no effect.
This value can also be changed from the analysis options in Analysis board or Study.
Custom analysis engine options
category: Analysis/Study - Advanced
values: Ignore cloud data for evaluation / Ignore cloud data for external engines / Infinite analysis for external engines / Apply in Practice mode / Fix external engine 503 errors / Plus to analyse deeper- defaults to Plus to analyse deeper
This feature controls the behavior of the analysis engine used in Analysis board and Studies.
Options:
- Ignore cloud data for evaluation - Use this option to never show computer evaluations from the cloud. For example if you want to not see evaluations over a certain level or in practice mode. You can also toggle this on/off from the Analysis board hamburger menu.
- Ignore cloud data for external engines - just like the one above, but only applies when you have configured an external engine. This makes sense, as the evaluation in the cloud is computed by Stockfish and you might have another engine altogether. The Analysis board hamburger menu will only show this feature when the current active engine is external.
- Infinite analysis for external engines - remove the maximum depth cap for analysis when an external engine is used
- Apply in Practice mode - Use this to apply both the custom engine depth (or custom practice engine depth - if set) and the no cloud option before in Practice mode. This means you can play against a computer of your own level and ignore cloud and table bases. You can also toggle this on/off from the Analysis board hamburger menu.
- Fix external engine 503 errors - When you configure external engines, you sometimes get 503 errors, meaning that the API was not reachable. This might be because you haven't started your Lichess Local Engine utility, but more often it's just a timeout. This will disable the alert and just silently retry after 5 seconds.
- You rarely need this, as the reason it was created was to fix a bug that had a different solution. But it might still be helpful if you have unreasonable timeouts.
- Plus to analyse deeper - this introduces the Plus (+) keyboard shortcut to "Go deeper" in local analysis. However, this works even when the engine has not stopped at the maximum set limit. Which means you can have a limit (custom LiChess Tools or the normal one that Lichess uses) and you tell it beforehand you want it to be unlimited and just for that move. This helps with external engines in particular, where pressing the little plus button to Go deeper restarts the analysis from scratch.
LiChess Tools analysis engine threads
category: Analysis (minor)/Study - Advanced
values: a number representing the number of threads - defaults to 1
LiChess Tools uses a local analysis Stockfish engine for various features, like Move Assistant or PGN Editor. This configures how many threads to use for that engine. Note that this value applies per open tab, so if you have Move Assistant enabled in Analysis board, for example, and select one piece in multiple tabs, the number of threads will multiply with the tab count.
LiChess Tools analysis engine hash
category: Analysis (minor)/Study - Advanced
values: a number representing the number of megabytes in the hash - defaults to 128
LiChess Tools uses a local analysis Stockfish engine for various features, like Move Assistant or PGN Editor. This configures how many MB or memory to use for that engine. Note that this value applies per open tab, so if you have Move Assistant enabled in Analysis board, for example, and select one piece in multiple tabs, the size of the hash will multiply with the tab count.
Show next moves from transpositions
category: Analysis/Study - Advanced
values: yes / no - defaults to yes
When you get to a certain position in the PGN which has transpositions, the next moves from those transpositions will be displayed under the move list, just like for a fork into multiple variations. You can configure what a transposition is, as well as if you want multiple identical moves to be shown or not and if the moves in this list should be considered by Ctrl-right and Extended Interactive Lessons in Preferences (see Behavior of transpositions)
For desktop, a transposition will show a capital T at the start (like T12...Qd5). On mobile it will show a superscript capital T (like Qd5T)
Improved best move arrow
category: Analysis (minor)/Study - Advanced
values: Enabled / Use local evaluation / On all moves / Only moves for orientation side - defaults to all
This is an improvement on the "best move arrow" functionality in Lichess.
Normally, when requesting a server analysis, the best move for an inaccuracy, mistake or blunder is shown with a faint green arrow - assuming, of course, the native Lichess Best move arrow toggle is on. However, this doesn't work on study chapters, the arrow is so faint you barely see it and it only works for bad moves. This feature fixes all that.
Options:
- Enabled - the entire functionality is toggled on and off by this
- Use local evaluation - the best move found by the local evaluation will be used for best move arrows
- On all moves - the best move arrow will be shown for all moves, not only inaccuracies, mistakes or blunders
- Only moves for orientation side - this will only show the best move arrow for the orientation side (the side on the bottom of the board as it is currently flipped)
- note that this will affect every best move arrow, not just the one enhanced by LiChess tools
It also slightly improves the visibility of the best move arrow
Remember local computer evaluation
category: Analysis (minor)/Study - Advanced
values: yes / no - defaults to no
This feature will store in the browser database the local computer evaluation values and display them when found. When/if the storage gets past the allowed quota, the move database is cleared completely, so new moves can be added. This is created for people with strong engines who want to not lose the evaluations they've spent time computing.
Notes:
- only values with depths larger than 20 will be stored. For lower values, you can just run the engine.
Extra key shortcuts
category: General - Advanced
values: yes / no - defaults to yes
This feature adds extra key shortcuts:
- to the Analysis board/Studies:
- first it changes the functionality of the i, m and b keys to work in Analysis board as well as Studies and to use all variations, not just the main line as the original lichess behavior. The functionality of these keys is to jump to the next inaccuracy, mistake or blunder, respectively
- it adds the same functionality to Alt-i, Alt-m and Alt-b, only for the opponent
- g and Alt-g cycle through good/brilliant/interesting moves
- if Explorer is shown:
- shift-T will cycle between Masters and Lichess database
- it adds the ability to select any of the moves in the available moves lists:
- press . (dot) and then a digit and it will make to the nth next move available in the PGN (see Transpositions behavior if you want to select moves from transpositions, too)
- press Ctrl-. and then a digit and it will make to the nth next move available in the computer evaluation list
- press Shift-. and then a digit and it will make to the nth next move available in the opening explorer list
- ` (the key before 1) and then f will freeze/unfreeze the board - this means you can still move pieces, but the board will appear as when it was frozen. Helps with visualization.
- ` (the key before 1) and then r will activate the random chapter navigation button. You need to have that button enabled in order for it to work.
- in correspondence games, in analysis mode, the Backspace key can be used to return to the current position
- in the Board Editor screen:
- 1-8 to select the buttons under the board (select, pawn, knight, bishop, rook, queen, king, erase)
- Shift+1-8 to select the buttons above the board (same thing, different color)
- c to clear the board
- p for the starting position
- everywhere:
- ` (the key before 1) and then h will toggle the header of the site. It's a pretty niche feature, but it helps if you are distracted by the header, like when you're playing in 3D mode and the header overlaps the taller pieces.
- Ctrl-c to copy the current position in FEN or image format to the clipboard
- this only works if there is nothing else to copy, like a selected section of text, as it hijacks the text copying mechanism in browsers.
- if you are in a screenshot/board image dialog, the image will be copied instead of the FEN
- the shortcut might be slightly different for you, depending on operating system and browser, it should be the same as the one for a normal Copy operation,
Notes:
- the keyboard help popup (Shift-?) shows all of these shortcuts in Analysis/Study if the feature is enabled.
Quick actions
category: General - Advanced
values: Flip game board / Request server analysis / Chat emojis / Toggle practice - defaults to Flip game board, Request server analysis, Chat emojis
This feature will add a popup menu when moving the mouse over the board hamburger menu. Clicking on the menu will still work as before. If Read move comments is enabled, a button to enable/disable the feature will also be available.
Options:
- Flip game board - button to flip the board
- Request server analysis - button to request server analysis (where available)
- Chat emojis - shows emoji buttons in inbox chat
- Toggle practice - toggle practice mode button
- this also hides the practice button from the default analysis buttons
Read move comments
category: Analysis (minor) - Advanced
values: Enabled / Ignore emojis / Read annotations - defaults to none
This will allow reading of comments in studies and games. When enabled, comments in the current move of analysis will be read aloud. There is a quick action to enable/disable the feature, as well as a button that appears in the comment box of a running interactive lesson.
Options:
- Enabled - if this is off, the entire feature will be disabled (including the quick action)
- Ignore emojis - if this is set, emojis in the comments will not be read
- Read annotations - if this is set, the read text will also contain the annotations (good, mistake, etc)
Show total game duration
category: Analysis (minor) - Advanced
values: yes / no - defaults to yes
This will show the total duration time of a game on its Move times chart.(Implemented natively in Lichess)
Additional glyphs
category: Analysis/Study - Advanced
values: Enabled / Mate / Book / Miss- defaults to all
This feature displays an extra ♯ glyph on mate moves and a 🕮 glyph on moves Lichess or LiChess Tools recognize as openings (not very precise). For moves that are determined to be missed opportunities, the blunder ?? sign is replaced with a ⓧ.
Also it enlarges glyphs on mobile devices.
If Enabled is not selected, the entire feature is off. Even if you do not want the Mate, Book or Miss glyphs, I recommend you leave Enabled on, as it affects glyphs in a general manner.
Notes:
- The lichess UI allows for multiple glyphs on the same move. The one shown on board will just be the first one in the list.
- Originally this feature was created to show annotations that lichess was not showing. From September 2023 lichess started natively showing all annotations, therefore eliminating the need for much of the functionality of the feature.
Extra analysis charting
category: Analysis/Study - Advanced
values: Material / Principled / Max tension / Max potential / Find interesting moves / ... more moves / Local eval / Accuracy / Sharpness / Coordination / Chart smoothing / on Eval gauge / More info on Accuracy / Hide legend
defaults to Material, Principled, Max tension, Find interesting moves, Accuracy, Chart smoothing, on Eval gauge, More info on Accuracy
When not logged in, Local eval, Find interesting Moves and ... move moves are enabled by default.
This feature is adding extra lines on the computer analysis chart. In the search for good/great/brilliant moves - as shown on chess.com and requested by a lot of players, the lines drawn over the normal computer eval chart are meant to give some indication of what is going on without asserting an exact significance of the values. Hopefully players recognize some aspects of the game in the numerical values charted and their intersection.
For example, many of the moves generally considered brilliant see a steep increase in evaluation, but a steep decrease in material and/or principled position, indicating a sacrifice or an unnatural seeming move that wins the game.
If Find interesting moves is enabled then an extra entry in the analysis summary shows the total of interesting/good/brilliant moves in the PGN. With ... move moves the extension will endeavor to show which moves are good, best and brilliant, but take it with a grain of salt.
Under the chart a legend of what each line means is displayed, unless Hide legend is toggled. Click on the individual buttons in the legend to toggle the lines.
Options:
- Material - green dashed line shows a more classical material difference between the sides
- Principled - blue dashed line shows how principled the position is. This means stuff like square control, freedom of movement, developed centralized pieces, etc, but excepting material value.
- Max tension - red dotted vertical line shows the point of maximum tension in the game. Tension here is defined as the total material that can be captured by both sides in just one move.
- Max potential - green dotted vertical line shows the point of maximum potential (similar to tension, but it superficially looks at capture chains)
- Find interesting moves - if enabled, this will show good/brilliant/interesting moves in the analysis summary as a link that cycles through them. It will also automatically find some categories of interesting moves and mark them with !? glyphs (if not already annotated). The glyphs added by this algorithm will be temporary (not persisted on the server).
- ... more moves - this will automatically calculate good/best/brilliant moves. It will also change the behavior of the good/brilliant/interesting moves link to only search brilliant and interesting moves. The G shortcut will work as before.
- this uses both the server evaluation and the local computer eval. If you run the computer engine locally it will change the glyphs in real time.
- every move that isn't bad is good, so you will get A LOT of good moves.
- as I don't know which is the best move, only the eval associated with it, a "best move" is a move as good as the previous evaluation. This means more moves could be "best" and depending on Fishnet, you will sometimes need to run local eval to get a "best" or to clear a false one.
- Local eval - if this is set, the local evaluation will also generate a yellow line chart. This will also add charting to the Analysis board, once the local engine has been started, and it also updates various other chart lines with local eval, if the depth is higher than the server one.
- the yellow chart shows the evaluation of the current variation branch, not the mainline like all the other chart lines. Meaning that the chart line will appear and disappear depending on if the current branch has computer evaluations.
- if the chart is local only (no server eval available or run yet) this will show inaccuracies, mistakes and blunders as well. The nice summary on the right side that you get with the server eval will NOT be there.
- it will also show the middle game and end game delimiter lines for the main line if the chart is local only
- it will also show a thinner yellow line that will represent the average of the local engine PVs (multiple computer lines), so the other lines of the analysis. This is useful to determine how forced a position is.
- Accuracy - if this is set, the accuracy of the moves of the side the board is oriented from is charted with a magenta color. More on the actual formula here: Lichess Accuracy Metric
- Sharpness - if this is set, the sharpness of the position is charted with pink.
- note that this chart depends on Explorer values, so it will only show as far as there are records in the Lichess Explorer database and you have visited those positions with Explorer enabled.
- also, since the values are taken from the Explorer, having it open and moving between the moves is necessary and the values are going to depend on your Explorer setup.
- Coordination - with this enabled, a light-cyan dotted line will show the piece coordination, calculated as how non-pawn pieces defend each other (or how quickly they can defend each other).
- Chart smoothing - if this is enabled, the chart will be smoothed, removing sharp spikes.
- on Eval gauge - if this is set, two lines (one green and one blue) will appear on the evaluation gauge when it is visible, changing with the values of material and principled values, respectively.
- More info on Accuracy - if this is set:
- hovering over the accuracy stats will show the percentages of moves that have a specific glyph associated with them, starting with brilliant, best, good, neutral, inaccuracy, mistake, blunder in the current branch
- It will show the Accuracy chart line, if not already enabled, for the main line
- It will estimate your Lichess rating based on your accuracy - this is a statistical estimation, not anything indicative of you individually.
- It will calculate accuracy per game phase (opening, middle game and end game) for the main line and show them
- Hide legend - hides the legend under the chart
Notes:
- I called it "interesting moves" because there is no objective good/brilliant move algorithm. If you want those, enable ... more moves.
- If you are not logged in, Local eval, Find interesting moves and ... more moves will be enabled by default.
Study links options
category: Study - Advanced
values: Video popup / Open links to studies in same window / Ensure comment tab in studies - defaults to all
This feature handles links inside study comments. It enables Chessable/Chessmood kind of courses, where you can play the course or do the puzzles or research lines while the video is running on top.
Options:
- Video popup - if the link is to a recognized video provider, clicking on the link will open a popup where the video runs. The popup can be resized, moved and the settings for this will be persisted for the current device.
- only YouTube, Vimeo and Twitch videos are supported for now, because Lichess blocks anything else
- start timestamps are supported for all three types of videos
- for YouTube links an "e" parameter just like "t" can be use to end the video at that timestamp. Example: https://youtu.be/<someId>?t=300&e=400
- this does not work in Firefox because they don't support credentialless iframes
- if YouTube shows a sign in to confirm you are not a bot thing, there is nothing you can do, really. It should go away the next day or so. At least it did for me.
- Open links to studies in same window - this makes links from move list comments which lead to studies to open in the same window. The reason for this is that you want to continue a variation that is split into multiple chapters or that leads to another study in the same window, especially in Extended Interactive Lesson mode. Now you can utilize this with the Bookmarks option of the Move List Options feature to jump from move to move and chapter to chapter.
- links to chapters in the same study will just change the chapter on click, rather than open the link.
- Ensure comment tab in studies - ensures there is a read only comment tab under the board on non interactive study chapters that you don't contribute to.
Notes:
- the video popup will snap to the margins of the screen, so if you place it in the bottom right corner and resize the window, it will keep a fixed position relative to the bottom and the right sides of the screen
- if less than 50% of the video header is outside the screen, the popup will reset to original position: center of the screen with 640x480 size
- the video link can have a start time parameter which should be respected by the video popup
Study topics options
category: Study - Advanced
values: Sortable / Expandable - defaults to all
This feature handles study topics.
Options:
- Sortable - enables sorting of topics, on the left side navigation bar, by dragging and dropping. (kind of like study chapters)
- this also allows sorting the tags in the Topics box, working the same way. This functionality is available natively in Lichess now.
- this also allows sorting the tags in the individual study topics dialog, if you care about that stuff.
- Expandable - enables expanding/collapsing topics on the left side navigation bar, showing links to the owned studies under those topics.
Learn from your mistakes in Studies
category: Study - Advanced
values: yes / no - defaults to no
Needs log in
This feature will add a Learn from your mistakes button for study chapters that have a server computer analysis, just like for game analysis.
Change chapter names from PGN tags
category: Study - Advanced
values: yes / no - defaults to yes
Needs log in
This feature will give you the option to quickly change the name of a study chapter to either the content of its Event PGN tag or the White and Black PGN tags combined when editing the chapter. Sometimes people want to import a series of PGNs into a study, but with the default lichess behavior only the first chapter gets a proper naming from the PGN tags, the rest getting the default Chapter 2, Chapter 3... etc name. With LiChess Tools you can go to each of them, edit them by clicking the cog button next to their names, then choosing with one click the name the chapter should have.
A newer functionality of this feature is to suggest a name based on the mainline moves. It should help to structure studies with a variation per chapter.
Study chapter navigation controls
category: Study - Advanced
values: Navigation controls / Hide next chapter button / Subchapters - defaults to Navigation controls,Hide next chapter button
This feature will control study chapter navigation:
- Navigation controls - this will add a set of buttons at the end of the chapter list in a study. The buttons navigate to the first chapter, previous chapter, random chapter, next chapter and last chapter respectively.
- Hide next chapter button - given that you have the navigation control, or because it's just very annoying, you can hide the big blue "Next chapter" button appearing when you reach a position with no next moves. When you do that, a smaller version of the button will appear as a small arrow in the comment box.
- Subchapters - enable chapters that are children to other chapters. Any chapter starting with any combination of | \ or - are considered subchapters to the one without such a name above. The parent node will be collapsible. Only one level of hierarchy is supported, so children cannot have children.
Notes
- You can add in the title a rnd:N text, where N is a percentage number between 0 and 100. This will change the chance that a chapter will be selected by the random button.
- If the mechanism above is used, the current chapter can be chosen (so basically remains the same) by pressing the random button
- dragging a collapsed parent chapter will drag all of its children. If they are expanded, they can be moved anywhere independent of their children
- example of a parent/child setup:
- Parent chapter
- |- child chapter
- \ another child
Sticky study Preview mode
category: Study, Interactive Lesson chapters - Advanced
values: yes / no - defaults to yes
This feature will keep you in Preview mode as you move from one Interactive lesson chapter to another. As one trains using interactive lessons, at the end of one they are presented with the option to move to the next chapter. The default lichess behavior is to show you the chapter in edit mode (assuming you are the owner or a contributor) which requires you to press the Preview button all the time to continue training, after also having seen the move list. Now you can press Preview once and play chapter after chapter with no hassle.
This is preserved also between page reloads, so you will have to manually unset Preview mode to edit a study Interactive Lesson.
Show game opening names
category: General
values: For large board / For minigames / In Explorer / In Analysis Board page title - defaults to For large board, For minigames, In Explorer
This feature will load the lichess opening name for games and display it. When watching a game or analyzing it, the opening will be shown under the player names. For mini-games (the tiny ones that appear when hovering over a game link or put somewhere on the page) it will appear at the bottom. For Analysis board, if the wiki side is empty, it will show the opening there, assuming the position is in the local cache. For Explorer, if open and the option is set, the extension is going to attempt to add just the relevant information to the existing opening name.
Options:
- For large board - this will enable showing the opening name for Analysis Board, Studies, Board Editor, TV games.
- For minigames - this will enable showing the opening name for games shown when hovering over a player name, games shown in the Current Games or broadcasts and any other games shown in small board format.
- In Explorer - this will enable showing extra opening information in the Explorer header, next to the normal opening name coming from Lichess, if applicable. It will also change the URL of the Explorer opening link to contain the moves to the current position (up to 10, because of API limitations)
- In Analysis Board page title - if this is enabled, then the Analysis Board page/tab title will be replaced with the name of the opening as determined by both Lichess and LiChess Tools.
In the very rare cases where the same exact position is found with colors reversed, the name of the opening will appear with a little (R) at the end.
This should work for Analysis Board, Game analysis, Studies, TV games, Board Editor, Broadcasts, Swiss tournaments, etc.
Show pawn structures
category: General
values: Enabled / Only named structures / Fuzzy search - defaults to Only named structures, Fuzzy search
This feature, similar to Show game opening names, shows the pawn structure of the current game position. Because it's all very local, with no API requirements, it also works for current game pages.
An entire blog post about it can be found here: The Pawn Structure feature in LiChess Tools
Options:
- Enabled - enables or disables the feature - disabled by default.
- Only named structures - show only structures with names. This is enabled by default, but of course will not work unless enabling the whole feature. If you disable this, you will see a very technical name for each and every move.
- Fuzzy search - this will show named pawn structures within a certain proximity. It helps to determine the general structure, even if it might not be totally accurate.
Notes:
- This feature has a lot of potential, as the pawn structure is something that informs medium to long term plans. Knowing these will help you grow a lot as a chess player.
- If the pawn structure is named, it will show as a link which can be clicked to learn more.
- If the structure is not found in the available list, it will be searched from the opponent's perspective, in which case it will be shown with a (R) at the end if found
Show player country flags
category: General
values: yes / no - defaults to yes
A very early feature of the extension, it has also evolved a lot. The latest version is much more efficient in terms of how it gets the data from the server and adds flags to almost every place where a user link is shown.
In order to not use too many resources, the flags for players are cached for 10 days. If you want to clear the cache, go to Preferences and turn it off and on again.
Show player total game count
category: General - Advanced
values: yes / no - defaults to no
author: Mitchellpkt
This feature will show the total games next to a player's name, just like for flags.
Show player score deviation
category: General - Advanced
values: yes / no - defaults to no
This feature will add the rating deviation to some of the ratings in the user popups (the one popping up when you mouse over player links). The deviation will be either red, normal or green based on the progression in the latest games. Red means loss of rating, green means increase in rating.
It will also add the expected Glicko2 rating deviation when playing against the player to the tooltip for each time control. You need to hover the mouse over a specific rating to see it.
Show K-MAPS
category: General - Advanced
values: yes / no - defaults to yes
This feature will add a K-MAPS text under or next to boards you watch or analyze. Each letter stands for a principle of chess used to evaluate a position and will have a color ranging from green (advantageous to you) to white/black (neutral, depending on your preferred theme) to red (advantageous to the opponent):
- King safety - pawns protecting the king, opponent pieces attacking the king, open files near the king
- This will be green when your opponent has poor king safety, red when your king is not safe, white when it's kind of equal.
- Material - how many pieces and pawns you have over your opponent
- The classic 1,3,3,5,9 value for each piece applies.
- Green means you have more material than your opponent, Red means you have less.
- Piece Activity - how many options your pieces have compared to those of your opponent
- Pawn structure - isolated pawns, passed pawns, etc., relative to your opponent.
- Space advantage - how many squares from the opponent part of the board you control, relative to your opponent.
Clicking on the K-MAPS text will toggle between text and radar chart view. This setting is persistent and applies to all K-MAPS on the screen. Mouse over a radar chart to see it bigger.
Notes:
- this feature applies to the current position only. It does not use a computer evaluation engine, like Stockfish, and it doesn't care about previous or next positions.
- the values shown in the tooltip, when hovering over the K-MAPS string, will be normalized to an interval between -100 (worst) and 100 (best). 0 is neutral.
- so when you see material -13 and you are only 4 pawns behind, that's why
Challenge options
category: General - Advanced
values: Show latest games / Random challenge button / Generate link in popup - defaults to Generate link in popup
Needs log in
This feature adds options related to game challenges.
Options:
- Show latest games - when this is set and you have no challenges, a list of your last 5 finished games will be displayed in the challenge menu, so you can challenge the people you played with.
- Random challenge button - when this is set and you have more than one person challenging you, you will get a green button above the challenges to accept a random challenge.
- Generate link in popup - when this is set, the popup to generate a challenge will also show a link to that popup.
- This applies to: general challenge (game setup), friend/user challenge, game with computer setup.
- Note that not all settings are encoded in the URL, some must always be set manually, like: min/max Stockfish engine level for AI challenges, choice of color and casual/rated for friends, choice of rating interval for general game setups.
Player tooltip buttons
category: General - Advanced
values: Report and block - defaults to none
This feature will add more buttons to the tooltip appearing when you hover over a player's link.
Options:
- Report and block - this feature will add a report button on the player. Clicking the button will open a new tab with the page where you can report a player for rule violations. This also adds a button "Report and Block" on this page which allows you to submit the report and block the user in one go.
Chat/forum options
category: Chat, forums, blogs
values: Paste image support / Large one emoji message / Refresh on new message - defaults to all
Needs log in
This feature applies to the inbox chat and writing forum posts. There is another type of chat (below) used in games, studies and team pages.
Options:
- Paste image support - allows for pasting images directly in the chat or the profile biography. Here, by "directly", I mean that it uploads the image to ImgBB, retrieves a URL for it and pastes the resulting link. From there, Lichess has support to display the image.
- Lichess has implemented image pasting/droppping in forums and team descriptions, so I removed the image pasting from there. If they continue with the inbox chat and/or profile, I will remove it from there, too
- For the areas where the LiChess Tools image pasting works, you also have the option to delete the image that you pasted. The option will only be available to you on the device you pasted the image from and assuming you don't clean your browser local storage.
- Large one emoji per line - in Inbox chat, when you have only one or a few emoji messages, like 👍, they will appear larger
- Refresh on new message - when this is enabled, any message sent or received in the Inbox chat will refresh the chat list.
- This helps showing people going online or offline, since by default the Inbox only populates this information at page load and when changing recipient.
- If you press the "Load More" link to get older messages, this feature will be disabled until you switch to another chat user or refresh the page
Team/Study chat options
category: Chat, forums, blogs
values: Highlight URLs / No length limit / Image support / Team chat notifications / Auto whisper button / Auto add move button / Insert move button - defaults to Highlight URLs, No length limit, Image support, Team chat notifications
Needs log in
This feature adds some much needed functionality to the chat used in games, studies and team pages:
- Highlight URLs will turn URLs in the chat text into links
- Image support will show images instead of text in the highlighted URLs (assuming the URL is of an image) - requires Highlight URLs
- No length limit will allow you to write as much as you want and then split the message in 140 characters slices - because that's what the lichess server allows
- Team chat notifications will show you notifications when messages are added to the chat of a configured team. The teams list will now show a notification bell next to each team that will toggle notifications for that team. A maximum of three teams can be configured for notifications. By default, no team is configured for notifications.
- If you stay on the team list page long enough, the notification bell button for enabled teams might show a number on it. That's the number of people active on the chat (which includes people who have enabled notifications for that team) if there are more than 1. Obviously, in order for this to work, you must be one of them.
- Auto whisper button - adds a toggle button to your running game chats that, when toggled, will auto prepend "/w" in front of your chat texts. This will "whisper" to the spectators, instead of sending the text to the opponent
- Auto add move button - adds a toggle button to running game chats that, when toggled, will auto prepend the last move of the game in front of your chat texts. Note that it will prepend the last move from when you started the chat at and if you want it updated you need to manually clear it so it can be reapplied.
- Insert move button - adds a button to game chats that, when pressed, will insert the move that led to the current position in front of your chat texts. It will be added as if you were typing it, so at the cursor position and overwriting any selected text
Notes:
- Team chat notifications is different than the team "Subscribe to team messages" toggle, which is a native Lichess control for receiving mass team messages from the team admins.
- visiting the page of a team will reset the notification for new messages (will mark all as read).
Better exported board image
category: Analysis/Study/Board editor - Advanced
values: yes / no - defaults to yes
This feature will override:
- the default share Board button in studies
- Screenshot current position in game analysis
- SCREENSHOT button in the board editor
It will also add a SCREENSHOT button to the analysis board with the same functionality.
When clicked, the button will export not only the board position, but also the arrows and anything else drawn on the board in the current position. You retain the original behavior by right-clicking the button and opening in a new tab or window.
Coordinates will be rendered inside or outside of the board based on your Lichess preference. If you Shift-click, the board will be rendered without coordinates.
There will be a tiny arrow showing whose turn it is on a center file on the side who is to play.
Note: if you have custom board or piece sets, some of them may fail for various reasons, like CORS permissions or people removing them. In that case, this feature will revert to the default maple and cburnett pieces.
Link to current analysis
category: Analysis (minor) - Advanced
values: yes / no - defaults to yes
You ever wanted to send to a friend the state of the Analysis Board you've been working on for? Now you can. Under the PGN label of the text under the Analysis Board you get a small link icon that contains the link to the Analysis board with the same PGN, orientation and move number.
Notes:
- the maximum allowed size for a browser URL is 2048 characters. If that size is exceeded, the link will not be available.
- if the current position is not on the main line, the resulting link URL will take people to the same position only if they have LiChess Tools installed, otherwise they will set to the starting position.
Autosave analysis for reload
category: Analysis - Advanced
values: yes / no - defaults to yes
This happened to me a lot of times: I am analyzing something and I accidentally swipe the touchpad or press some key that reloads the page. All my work is gone! This feature keeps track of the latest modifications of Analysis board PGN and reloads it on page load. It is your choice if you want to import it or not by going to the PGN text area and clicking the Import PGN button.
Notes:
- The saved PGN as well as the Analysis board import text area content will be overwritten by whatever move you make, so if you fail to import the PGN and make a move, you lose the data.
Opening explorer player features
category: Analysis/Study - Advanced
values: Me button to switch to your player - defaults to none
Needs log in
This feature controls the choice of the player in the Opening Explorer.
- Me button to switch to your player - adds a tab next to Masters database, Lichess and Player named Me. If you click on it the choice of the player will toggle from your user to the last selected user. The button can be shown/hidden from the Explorer config screen as well.
Notes:
- The Me button will appear only if you have any another players configured for the Player tab name list
Toggle snapshots of Explorer settings
category: Analysis/Study - Advanced
values: yes / no - defaults to yes
This feature will add a new button called Snap! in the Explorer settings of the Lichess database tab. This will allow to save the current Explorer settings under a name, then quickly toggle between the various sets saved by clicking on the same tab, which will now change text to reflect the name of the selected "snap". You can easily delete existing snaps and create others.
Bonus: if you switch to the player tab in Explorer by ctrl-click, it will switch to that user with all of the time controls. Clicking back on the lichess tab will restore whatever time controls were set. The reason is that Lichess has a common time control setting that applies to both lichess games and player games.
Show more Explorer games
category: Analysis/Study - Advanced
values: yes / no - defaults to yes
This feature adds more games in the Explorer, in the Recent Games section.
There are different reasons why Lichess chooses to not show those games. Too many games, not important enough, similar to other games and, more importantly, cheater games. Whenever you get to just one or two possible moves in the Explorer and you see no games in the games list, that's usually because the account of one or both players has been closed for cheating or otherwise breaking the rules of Lichess. So, be warned, this feature will show those games, too.
Resize Explorer
category: Analysis/Study - Advanced
values: yes / no - defaults to yes
This feature will allow you to resize the Explorer window height inside the analysis tools, therefore controlling how much space it takes when opened. Just drag the divider above or below the Explorer to change the size.
Notes:
- The mechanism works very differently from desktop to mobile (to the point where I had to install a polyfill to enable drag and drop on mobile). On desktop the divider is on top, on mobile is on the bottom. Also, because lichess is not really particular about how the website looks on mobile, you will probably not be happy unless you also enable the Mobile theme. Tests with various devices show wildly different results. On my phone and the Chrome emulator it works smoothly, on a friend's Motorola the resize bar doesn't seem to work properly. So be warned, mobile support is (and will probably remain) sketchy.
- Turning the feature off and on again will also reset the heights, if you get in some sort of trouble.
Sound Options
category: General - Advanced
values: No move sounds / Time flicker sound / Main menu volume bar - defaults to none
This feature gives finer options for sound.
Options:
- No move sounds - disable piece movement sounds only. Note that if you have set the Silent sound schema or the volume to 0 you will not hear anything anyway.
- Time flicker sound - if your playing clock jumps for more than a second, a heartbeat sound is heard to warn you. This usually happens on lag or other technical problems.
- Main menu volume bar - this will show a sound volume slider directly on the main menu. It normally appeared only in the sound section. If the theme is set to Silent, the volume bar will disappear.
Sound themes
category: General - Advanced
values: Chess Pursuit - defaults to all
This feature adds extra sound themes to your sound theme selector. In the preferences you just enable them to appear in the selector, you still have to select them from the Lichess sound menu.
You too can have sound themes in LiChess Tools, all you have to do is create a GitHub repo with the sounds, then enable public github.io pages. The sounds have to be named like this: https://github.com/lichess-org/lila/tree/refs/heads/master/public/sound/nes. To enable GitHub Pages for your repository:
- Go to your repository settings on GitHub.
- Under "Pages" (in the left sidebar), select a source branch (e.g., main or gh-pages).
- Save the changes. This will make your repo accessible at <username>.github.io/<repo-name>/.
The repo has to be public. Then let me know.
Notes:
- The Mortal Kombat theme was briefly available, but the creator unpublished it.
Sound volume (0-100)
category: General
values: Number between 0 - 100 - defaults to 70
Self explanatory. It sets the volume of the sounds generated by LiChess Tools.
Sound voice
category: General
values: The voices available on the system - defaults to the first one
It selects the voice used for reading text aloud
Voice input
category: General - Advanced
values: Study comments - defaults to none
This feature allows using the microphone to input text in various places. Usually you press a button, speak, then release the button to input the spoken text.
- Study comments - will show a little microphone button next to the study comment text area.
Time alert (minutes)
category: Play - Advanced
values: 0:30 / 1:00 / 1:30 / 2:00 / 3:00 / 5:00 / Sound alert / Read seconds when less than 6 / Alert when behind on time - defaults to none
This feature allows you to choose additional time warnings during play. Every time an enabled threshold is reached, the bottom player name and clock section will glow red and, if so enabled, a low time sound will be emitted.
If Read seconds when less than 6 is enabled, then LiChess Tools will read aloud the seconds you have left when they are 5 or less.
If Alert when behind on time is enabled, a low time sound will sound and the clock section will glow red if you get behind the time of the opponent.
Various TV options
category: TV
values: Link for current TV game / Bookmark for current TV game / Streamers current games / Friends current games / Previous two games in player TV / Persistent TV category- defaults to all
Needs login for friend games
This feature has been introduced in version 2.2.0 to merge four existing tools for TV with the same functionality. Make sure you review your Preferences.
Options:
- Link for current TV game - adds a link to the currently played game in TV on the title, just like in Analysis mode
- Bookmark for current TV game - adds the ability to bookmark a currently playing game by hovering the mouse next to the game title
- Streamers current games - adds a Streamers tab in the Current Games page where you can see the games of all currently playing streamers
- Friends current games - adds a Friends tab in the Current Games page where you can see the games of all currently playing players that you follow
- Previous two games in player TV - In category TV (when you are watching Blitz games for example) you get a list of two previous games in that category under the main playing board. For player TV, when you go to a specific player to watch their games, this is missing. This feature will add the two previously played games by the player you are watching.
- Persistent TV category - will remember which "channel" you watched on (best, blitz, classical, etc.) and will select it again when you go to Watch -> Lichess TV.
Follow tournament top board
category: TV - Advanced
values: yes / no - defaults to yes
Needs log in
When watching a tournament and clicking the top board, the game will show as usual, but when it ends, the next featured game in that tournament will be shown automatically. Good for watching bullet tournaments without having to go back to the tournament and clicking the top board every 2 minutes.
Previously viewed game menu item
category: TV - Advanced
values: yes / no - defaults to yes
- This feature adds an extra menu item in the Watch menu that will take you to the previously seen chess game. Just opening any game will consider it as watched. If you go to the previously watched game, then clicking on the menu item again will take you to the game you watched before that, and so on. The total number of remembered games is 10.
Pin broadcasts and studies to home page
category: Appearance - Advanced
values: yes / no - defaults to yes
This feature will add a red pin to the studies and broadcasts tabs on the top left, right after the search icon. Click on this pin to pin/unpin the study or broadcast to the home page. All the things you pinned will be added in the side area of the lobby. That's top left on desktop and under the play buttons on mobile.
Download broadcast PGN
category: Study - Advanced
values: yes / no - defaults to no
This feature will add a button to the broadcasts allowing you to download the entire PGN of the broadcast. It was created before I knew you could just select any round, go to the sharing tab and select Download All Rounds. Now there is also a Download section in a broadcast Overview area where you can download the entire thing. So this button is for convenience only, in very niche scenarios.
Bot list filters
category: General - Advanced
values: yes / no - defaults to yes
This feature adds filters to the bots list page. You can specify which types of games you want the bot to play (time controls and/or variants) and the interval of rating and played games.
Last visited study menu
category: Study - Advanced
values: yes / no - defaults to yes
This feature adds an extra menu item in the Learn menu that will take you to the previously visited study.
Hovering over the entry will show a maximum of 5 previously visited studies. This feature does not work for mobile devices.
Just opening any study will consider it as visited.
Notes:
- the Broadcasts feature and some Puzzles use studies in the background, so this will show them as the last visited study
Chess Pursuit in menu
category: Play
values: yes / no - defaults to yes
Work in progress! - this means use at own risk.
This feature adds a new Play menu item where you can pay Chess Pursuit, the Lichess mini-game that usually appears when opening a non existent page. This time it's an improved version.
Styling for study comments
category: Study
values: yes / no - defaults to yes
Needs log in
This feature adds the ability to style the comments in your PGNs. You can choose between a number of styles that you can place anywhere in a comment with cls:<styleName>. It also adds a new button next to the comment button in a study chapter (a quill in an inkwell ) that with cycle through all of the classes at the very beginning of the comment to the current move. The usable classes are: red, orange, yellow, green, lightgreen, cyan, lightblue, blue, violet, magenta, pink, underline, strikethrough, italic, bold, cursive and nothing or clear to clear existing class. (ex: cls:red will make the rest of line of the comment red)
Notes:
- the quill button only appears when a comment is actually there. If current position has no comment, the button is hidden.
- the name of the class declares the intent, not the actual result of the styling. Given that there are dark and light themes on lichess, the styles have been updated to be readable in both situations, using shadows or slightly different colors.
- the style of the comment will only be visible to you and people with LiChess Tools installed. All others will see cls:blue or whatever in the comment.
- you can actually put anything as the class name and the comment will be put inside a span with the CSS class lichessTools-<your class name>, which allows you to customize your style even more with the addition of custom styles from other extensions like Stylus. In this case all people seeing the comment would also need the custom styling.
- bonus: the same cls: notation can be used for chapter titles, where it will assign the same the class lichessTools-<your class name> to the chapter title
Improved editing for study comments
category: Study
values: yes / no - defaults to yes
Needs log in
This feature will add more functionality to study comments.
It allows you to take a read only study comment in your own studies (the ones that you get when you import a PGN with comments) and add a button that makes it editable, by deleting it and copying its content into the editable comment.
It also changes the handler of the delete button for comments that are not your own so you can delete them directly, without a prompt, by pressing shift-click on the trash icon.
Show the order of arrows and circles
category: Analysis (minor)/Study - Advanced
values: yes / no - defaults to no
This feature shows a number on each drawn shape, so that you can see their order. Sometimes in studies you want to convey the moves that could follow the current position using arrows and circles, but in certain situations the order of the moves is important. Set this to true in order to see which arrow comes first.
Ctrl-Space for best computer move
category: Analysis (minor)/Study - Advanced
values: yes / no - defaults to yes
The default functionality of the Space bar in analysis mode is to start the computer engine if not started or play the best move in the computer move list. Because I was often using lichess with YouTube in another tab, pressing Space accidentally was always an annoyance. This feature changes the shortcut to Ctrl-Space.
Notes:
- A previous version of the feature was using Shift-Space, but it would overlap with a lichess feature.
Clear chapter artifacts
category: Study - Advanced
values: yes / no - defaults to yes
Needs log in
This feature allows you to choose which artifacts to clear from the current study chapter only. To use it, click on the cog button next to the chapter name and, instead of the Clear annotations button now you get the choice of just comments, glyphs (good move, bad move, that kind of thing) and drawn shapes (circles and arrows) as well as all of the above. There is an extra option of clearing all PGN tags.
This feature also adds individual delete buttons to all tags in the current study chapter.
This feature also adds a button to Edit PGN tags, which will allow you to edit the PGN tags of the current chapter all at once, in text form.
Notes:
- this only works for the current chapter, as the site does not have access to the moves or tags in the PGNs of other chapters
- the feature could be modified to work on all chapters, but it would have to first select the chapter, then alter it, which I think is not something that should be done automatically.
- this works on the client, which means that instead of sending one command to the lichess site, it creates delete requests for each item. If the PGN is large, this can take a long time.
Customize chat buttons
category: Play
values: yes / no - defaults to no
Needs log in
When playing the first few moves and after the game has ended, lichess gives you the option to click on some buttons for some standardized message like Hello, or Have fun! This feature will give you the ability to customize these buttons.
The interface may not be the most intuitive. To edit buttons you click on the little cog button, to exit edit mode you click on the same. This allows altering, adding and deleting buttons. Click on the small X button to enter delete mode, after which you click on buttons to delete them. Delete them all and you get the default buttons back.
In order to add or alter buttons you have to write in the chat text input something like <name>/<message>. Example: hi/Why, hello there, old chap!, which will create a button with the text HI which will send the chat text "Why, hello there, old chap!". In order to add the button, you click the + button. In order to alter an existing button, you click on that button.
Notes:
- the name of the button can be only 2,3 or 4 characters long.
- if you attempt to add or edit a button without a recognizably correct input text, the input box will jiggle to let you know you are doing something wrong
- to edit the end of game buttons you have to reach the end of a game. This may be inconvenient and I am thinking of solutions
- I am considering expanding this feature with buttons for the duration of the game as well as for spectators. Let me know what you think!
- Until v2.4.102 the feature only allows Latin letters. Now it should work for all languages.
Player lag indicators
category: Play
values: none / bars / chart - defaults to none
Needs log in
This feature adds bars or a chart next to your and your opponent's name showing the lag and server latency. To limit use of server resources, the opponent lag indicator is updated only every 5 seconds, while yours every second or so.
Player warning alert
category: Play - Advanced
values: Disconnect rate / Time control discrepancies - defaults to none
Needs log in
This feature will add a small warning icon next to the opponent's name if:
- the percentage of disconnects for the current time control is higher than 3%.
- the rating for slow time controls is significantly higher than that of low time controls (200 or more)
The purpose of this is to allow you to abort a game before wasting time on a malicious opponent.
Note: this is just an informative alert, you do what you want with it. If you abort too many games, you might end up getting punished by lichess.
Common teams
category: Play/Analysis/ Study - Advanced
values: yes / no - defaults to no
This feature will add a small icon in the player crosstable (the thing showing you how many times the players have played against each other and the results of the latest games) if the two players in the game share at least one team. Mouse over the icon to see which teams. Clicking on the link will open the first team page.
Play layout
category: Play
values: Normal / Hide left side / Hide chat - defaults to Normal
This feature will control the layout of the page when playing.
Options:
- Normal - no changes
- Hide Left side - will hide completely the left side of the screen (game information and chat) in large screen layouts (width 1260px or more)
- Hide chat - will hide the chat and rotate the game information, gaining some space in large screen layouts (width 1260px or more)
- in this mode, the game icon in the game information section will glow if there are unread chat messages. Clicking on it will toggle the chat being shown/hidden and mark existing chat messages as read.
- Option to hide chat - same as Hide chat, but chat starts by being shown and you have the option to click on the game icon to toggle the chat.
Play layout elements
category: Play - Advanced
values: Non interactive crosstable - defaults to none
This feature controls elements on the page while playing
Options:
- Non interactive crosstable - this will make the crosstable (the small table showing the game history for you and your opponent) non interactive. That means moving the mouse over or clicking or tapping will have no effect.
Layout for game analysis
category: Analysis - Advanced
values: Fit page - defaults to none
This feature will alter the way the game analysis page looks like. This is where you analyse a game, not Analysis Board or Study!
Options:
- Fit page - This will attempt to push as much stuff on one page. This works only for resolutions larger than 1260px and introduces a new tab on the left of the page called Review, next to Spectator Room and Notes. This is where most of the stuff that normally was under the board will appear.
- a little link to toggle the layout will also be made visible, just to toggle the layout back and forth, but it's not a persistent setting. To disable this you have to use the LiChess Tools preferences page.
Timeline notifications
category: General - Advanced
values: Forum post / Blog post / Lichess announcement / Stream start / Simul create / Simul join / Team create / Team join / Tournament join / Following / Study like / Blog post like - defaults to Forum post, Blog post
Needs log in
This feature will add a notification when there are unread items in your Timeline. The default values include comments on forum or blog posts you follow, forum or blog posts from people you follow. Basically posts that you wouldn't normally be notified about.
Clicking on the notification will take you to the Timeline page. Opening it from here or anywhere else will consider the items read and so you will not see the notification until new ones turn up. On the timeline page, the new items since last read will be highlighted.
Notes:
- there will be no notification if quiet mode is on (meaning you are playing a game or you have quiet mode manually set)
Mobile device features
category: Mobile devices
values: Evaluation gauge / Hide the octopus mascot / Analysis arrows / Random move button / ... only when variations / Scroll lock when playing / Extra buttons in interactive
- defaults to Evaluation gauge, Random move button, ... only when variations
This feature alters some behavior specifically for mobile devices. There are Chromium-based mobile browsers, like Kiwi, which accept browser extensions, as well as Firefox Mobile. Enjoy LiChess Tools on mobile installing one and then the extension, then customize the experience with this feature.
The options are:
- Evaluation gauge - makes the evaluation gauge visible even on small screen widths (for mobile)
- Hide the octopus mascot - hides the octopus mascot that takes a lot of space in Interactive Lessons
- Analysis arrows - adds a button next to the Explorer and Practice ones that allows for drawing arrows and circles on mobile devices in Analysis board and Studies
- Random move button - adds a button between the previous and next move buttons that will randomly play a move from the move list (same functionality as Ctrl-right to play random next move from list on desktop)
- ... only when variations - this makes the Random move button above only appear when there are variations to choose from
- Extra buttons in interactive - When playing interactive lessons you don't have buttons under the board. This will add some of them, mainly a flip board button and a draw shapes button.
Notes:
- Because both the shape drawing and random move buttons take up space, this feature also changes the style of the buttons so that they take two rows of space: the first for utility buttons (left) and the hamburger menu button (right) and the second row for PGN navigation buttons (first, previous, random, next, last move). If none of the two options mentioned are enabled, then the regular "one row for all buttons" style is used.
- Screen locking when "playing" doesn't necessarily means when playing, but when lichess is in "playing mode". For example that also means when you haven't yet started the game or when you just ended the game or when you are doing puzzles.
Mobile device game features
category: Mobile devices - Advanced
values: Game arrows / Standard buttons / Swap user and clock / Tap bottom clock to flip board- defaults to none
This feature alters some behavior specifically for mobile devices when in-game. This means playing, or solving puzzles or even watching running TV games. There are Chromium-based mobile browsers, like Kiwi, which accept browser extensions, as well as Firefox mobile. Enjoy LiChess Tools on mobile installing one and then the extension, then customize the experience with this feature.
The options are:
- Game arrows - adds a button next to the button for Analysis that allows for drawing arrows and circles on mobile devices in games
- Standard buttons - the default behavior of lichess.org is to hide the move navigation buttons for games on small screens, instead showing one line of PGN with previous and next move buttons on either side. Set this in order to see all buttons (including the Game arrows one above). For normal play this is not necessary, but in puzzles, TV and such screens this is the only way to access the drawing arrows button.
- Swap user and clock - swaps the position of user and clock during play, to avoid hiding the clock with your dominant finger.
- Lichess added a similar feature in October 2025, so if you enable it in the Lichess Preferences, this one will not do anything anymore.
- Tap bottom clock to flip board - flip the board when tapping on the bottom clock (when playing or watching TV)
Colors for shapes on mobile
category: Mobile devices - Advanced
values: 1 / 2 / 3 / 4 - defaults to 1
This is part of the Mobile Experience feature and it selects the count of colors you can use on mobile to draw arrows and circles. If you only want to turn the drawing mode on/off with a single tap, select 1.
Screen lock
category: Mobile devices - Advanced
values: During play / During puzzles - defaults to none
This will lock scrolling and zooming on mobiles when playing (or during puzzles). A lock icon will appear as a button on top of the screen that you can tap to temporarily lock/unlock the scrolling on that page. Whether the screen is locked or not will be persisted, so you have to tap it again to enable if you disabled it.
Keep screen active
category: Mobile devices - Advanced
values: During puzzles / Watching TV - defaults to all
This will prevent screen locking on mobiles or other such devices while you are on a TV page or playing puzzles. At the moment only Chromium browsers support this feature, Firefox does not.
Feedback
category: General - Advanced
values: Piece pick or select / Piece move / Opponent move / Start of game / End of game - defaults to none
Needs log in to determine who won
This provides various (non textual) feedback to the user. At this time it is exclusively about haptic feedback, so it only makes sense for mobile. Also, it does NOT work on Firefox, because Firefox.
Options:
- Piece pick or select - this causes the device to vibrate when picking up or selecting a piece
- Piece move - this causes the device to vibrate when dropping or moving a piece
- Opponent move - this causes the device to vibrate when the opponent makes a move
- Lichess will implement this particular type of feedback really soon, too, so you have the option of choosing which one you prefer
- Start of game - this causes the device to vibrate when a game of yours starts
- End of game - this causes the device to vibrate when a game of yours ends
- the vibration pattern depends on whether it's a win, draw or loss
Show evaluation of explorer moves
category: Analysis/Study - Advanced
values: From computer eval / From ChessDb / From Lichess / From winning stats / Rows from eval / Bar precision / Stronger Player Outcome Average / Hidden - defaults to From computer eval, From ChessDb, Highlight list moves
Options:
- From computer eval - will show the evaluation from the computer engine
- From ChessDb - will show the evaluation from the chessdb.cn database
- From Lichess - will show the evaluation from the Lichess evaluation API
- because this also populates the evaluation cache, you will start seeing arrows with the computer evaluation even when you're not turning the local eval on/off. Let me know if that's a problem.
- From winning stats - will compute an evaluation based on the win/draw/loss statistics
- Rows from eval - will add extra rows with the move and the evaluation if the explorer doesn't contain a line for that move
- Highlight list moves - will highlight Explorer rows with moves that are next in the move list (bold and enlarged text for the SAN notation for that row)
- Bar precision - will add a decimal digit of precision to the percentages in the move Explorer bars
- Stronger Player Outcome Average - shows the outcome average for the stronger player (SPOA) in each game
- explanation: this works for both Top Games and Recent Games sections of the Explorer. For each game, the result (1, 1/2, 0) is taken for the stronger player by rating. The average of these results is the SPOA value, displayed as a percentage (all wins will show 100%, all losses will show 0%)
- Hidden - hides any evaluation in explorer, but retains the settings if you want to show them again. This option can also be changed from the Explorer settings
This feature will show the move evaluation for Explorer moves. This information is retrieved from three different sources that can be enabled or disabled: the local computer eval, chessDb.cn, the lichess evaluation API and the Explorer stats themselves. If Hidden is set, then the settings for evaluation will remain, but the column will not be shown. The feature can be hidden not only from Preferences, but also from the Explorer config screen.
ChessDb.cn will be used first (if enabled) and then the Lichess eval API, so if you prefer the Lichess API, you should disable ChessDb. In case ChessDb fails for whatever reason, lichess eval API will be used instead. Just note that the Lichess API is limited in how much calls one can make and contains less data than ChessDb.cn.
The statistics eval will only be shown if there are 100 or more games in the lichess database for that move and not all won by one side. Its faded coloring signifies that it's not a true eval, but if enabled can compare with the other values.
Computer evaluations will have a white color, stats evaluations will have a grey faded color and the cloud evaluations will be slightly blue. If using chessDb, the eval will show either red, green or bright green for bad, good and best moves.
The feature is unavailable in the Analysis screen of a running correspondence game.
This also adds a warning icon on the right side of moves that have large differences between evaluation and winning stats, indicating a possible trap or gambit situation. It also calculates the sharpness of a move, as defined in Evaluating sharpness with Leela’s WDL and adds a blue warning icon on the right side of the move when it's higher than 100. It will also show the "win margin", defined by (wins for White - wins for Black) / (total games) as a percentage that can take values from -100% to 100%.
Since this and Explorer Gambits features are adding more stuff into the Explorer, there is another feature to "Compact" the explorer by various means, including abbreviating game counts (something like showing 7.1B instead of 7,090,000,000). This can only be toggled from the Explorer configuration menu.
The "compact Explorer" effect was adopted by Lichess native, so it was removed from LiChess Tools almost as soon as it was added.
Notes:
- The more lines you have configured on your computer analysis, the more items in the list will be evaluated. Explorer can show 12 moves, for example, while the computer analysis is configured with Multiple lines=2, this means a maximum of 2 items in the Explorer will have an evaluation. With 5, you get 5, assuming the computer moves are in the Explorer list.
- There is an internal cache of these evaluations, so you can run the computer eval for some moves, then stop it, but when going to those moves you will still see the evaluations as done before at whatever depth was last computed.
- Take care with stats evals in positions with few games. It might tell you that you are absolutely winning, but that's just because no one played a winning move from that position. That is why eval from winning stats is disabled by default.
- The evaluations from cloud differ in depth based on how many moves you want to see. For example you could ask for just one move (the best in the position) and it might show you the eval with depth 55, but if you ask for two moves it will give you depth 44, for 20 moves you would get depth 13 or even nothing. To account for this, cloud eval combines the values from two calls: for 5 moves and for 10 moves. Since the cloud data comes from local evals, server evals and different versions of Stockfish and I am combining two different depth evals, take the evaluation as an estimation, not a given.
- Changing the options for evaluation in Preferences will reset the local cache for each move.
- If computer evaluation is started and used as a data source, the cloud eval will not be accessed.
Show explorer moves leading to gambits
category: Analysis/Study - Advanced
values: yes / no - defaults to no
This feature adds a new column to the Explorer table showing the number of gambits reachable from the current position and for each move to play. The feature can be turned on/off not only from Preferences, but also from the Explorer config screen.
The feature is unavailable in the Analysis screen of a running correspondence game.
Options for puzzles
category: Puzzles
values: Prevent screen lock playing puzzles / Show completion time / Show session total - defaults to Prevent screen lock playing puzzles, Show session total
This feature controls various options related to puzzles:
- Prevent screen lock playing puzzles - this will prevent the screen from autolocking when playing puzzles (or thinking about how to solve them) - this only works for Chromium mobile browsers, Firefox doesn't provide this option.
- Show completion time - this will show how many seconds it took to finish a puzzle
- Show session total - this will show the successful puzzles over the total, as well as the total points you won/loss in a puzzle session (the little green and red icons under the board when playing puzzles)
Enhanced Puzzle Dashboard
category: Puzzles - Advanced
values: yes / no - defaults to yes
Needs log in
In the current iteration, it adds a table to the bottom of the Puzzle Dashboard, with a row for each puzzle tag you've played in the selected interval. It shows where you are better or worse and allows you to play only that or to replay the failed puzzles there.
Above the table you also get a past performance chart for the period selected in the dashboard dropdown and - if you played puzzles or Puzzle Streak in the last 7 days - how many rating points you won and what's the maximum puzzle streak length.
Notes:
- this used to be called Puzzle performance chart in Profile, but that page was removed by Lichess and the functionality was added to the Puzzle Dashboard
- the green background bars show the puzzles you completed, with a darker gradient towards the puzzles you completed on replay. Mouse over to see the actual values of wins + replay wins.
- click on the theme name to play puzzles in that theme. click on the To replay numbers to replay the puzzles in that category.
- Warning: based on which theme you choose, you might find that you lose a lot when you fail and win very little when you win, or vice versa. Truly, the idea of a general puzzle rating makes no sense and you should not consider it. Instead, look at the performance value for each theme. Do not let your chess progress get hampered by a meaningless numerical value in any case.
Puzzle history
category: Puzzles - Advanced
values: yes / no - defaults to no
Needs log in
This feature will show the history of puzzles you started playing on the current device at the bottom of the Puzzle Dashboard.
Lichess has a puzzle history page as well. It looks good, too. This feature will default to no, but you may want it, because it also logs the puzzles you started, but didn't complete.
Find position in Lichess puzzles
category: Puzzles/Analysis/Study - Advanced
values: a NIF file
This feature requires a separate file to be downloaded on your computer. Once loaded, the Explorer will try to find puzzles similar to the current position. Since there are more than four million Lichess puzzles, the only way to create a small enough index on your local machine was to just keep the significant elements of the position FEN, meaning that the positions will not be exactly the same. In v2.3.172 I've added a CRC mechanism to dramatically reduce false positives.
Get the latest file here: puzzle.nif.zip (about 330MB) - download it and extract it somewhere, then pick the file in the Preferences.
So it works like this: in analysis, if the current position is found in Lichess puzzles, a new section will be added to Explorer called Puzzles, with a list of puzzle links. When this happens, also a new tab is added to Explorer with a magnifying glass icon on it. You click it and Explorer will scroll down to the Puzzles section.
Find position in puzzles from your games
category: Puzzles - Advanced
values: yes / no - defaults to no
Needs log in
Just like the previous feature, it will search the currently analysed position in the puzzles derived from your own games. Since this subset of puzzles is usually small, this can be safely enabled. The puzzles will be also cached on your local device, for performance.
Download PGN for puzzles
category: Puzzles - Advanced
values: yes / no - defaults to yes
This feature will add a button next to the puzzle id (once the puzzle has been completed or abandoned) to download the puzzle PGN. A popup with the PGN will appear and you can copy whatever part of it you want. The PGN will start with a FEN position and the puzzle moves.
Shift-click on the button will give you the PGN with the previous move (the opponent move) in it.
Quiet mode on all tabs
category: Play - Advanced
values: yes / no - defaults to yes
When a game starts, lichess sets a quietMode variable to true, instructing various notifications to not be displayed. Unfortunately, that only happens on the page that one plays on. This feature makes all open lichess pages get the value for quiet mode from the same place, so they don't behave inconsistently.
There is also a button added to the lichess menu which can manually enable/disable quiet mode. Warning: once manually enabled, quiet mode will remain on until manually disabled! The normal game playing quiet mode will turn on and off automatically, as before, only it will affect all open lichess pages.
Note:
Insert new chapter after current one
category: Study - Advanced
values: yes / no - defaults to yes
Needs log in
This feature adds a button to the create study chapter form with the text Create after current. Using this button instead of the normal Create chapter will create the chapter immediately after the currently selected chapter.
Note: the button will not appear if already on the last chapter in the study.
Show PGN in studies
category: Study - Advanced
values: yes / no - defaults to yes
This feature adds a textarea in the study Share tab called PGN. Similar to the one in Analysis board, it will show the PGN text of the current chapter. The PGN will be generated by the same code that generates the one from Extra context menu options and may differ from the one generated by the Copy PGN or Download PGN buttons.
Persist study settings
category: Study - Advanced
values: New/edit chapter settings / Position/move in the study - defaults to Position/move in the study
Needs log in
Options
- New/edit chapter settings - will persist the settings for studies when you create or edit them. Then it will use the same values when creating new studies.
- Position/move in the study - will remember the position (move in the list) in a study chapter and restore it on page refresh
- Note that if lichess does not restore the chapter on refresh (it happens sometimes when the user get disconnected) then this will not work. This just restores the move in the current chapter, it does not change it.
- Also note that this will not work in Interactive chapters while playing them
Move list options
category: Analysis/Study - Advanced
values: Indented variations / Bookmarks / Expanded move list / Hide left side / Open in new window / Eval button on the right - defaults to Bookmarks
Needs log in to alter bookmarks
This feature will change the functionality or appearance of the move list in Analysis board. There are already such changes with the Highlight moves in analysis functionality.
Options:
- Indented variations - this will make even variations that follow inline (when they are less than three, they are displayed one after the other in parentheses, like in a PGN text) show as tree branches, increasing readability and preparing for new features that will use this.
- Bookmarks - Study only - this will allow for bookmarks, which are very cool (read below). Let me know how they could be more of use to you.
- Expanded move list - Only for desktop resolutions (1260px+), this feature is removing the left and right margins and expanding the move list to the edge of the screen and also downwards. It is meant to improve analysis on very complex PGNs.
- Hide left side - Most of the time the left side of the analysis screen is useless: chat, notes, study participants and stuff like that. With this, you can hide that side to gain even more space for the move list. This is intended to be used together with Expanded move list, but you can use it separately as well.
- Open in new window - Study only - this adds a small button in the top-right corner of the page, just before the computer evaluation toggle. Clicking it opens a new window with just the analysis tools (move list, computer eval, explorer) that you can move to another monitor, for example, or resize and place wherever you want.
- Use the study SYNC button to keep the two windows synchronized.
- the SYNC button only appears under the board when the study is set to Enable sync. If you "Let people browser freely" then the popup position will not be synchronized with the one on the main board
- this is also useful for printing PGNs, as the new window is optimized for printing.
- Eval button on the right - this will move the computer evaluation button to the right side of the eval header and also make it a little bit smaller.
How bookmarks work:
- right-click on a move in a study move list and select Add/Remove bookmark from the context menu
- put any text in the textbox that appears (or remove it all to delete the bookmark)
- this will create a bookmark, which serves several purposes:
- it will show as a named label in the move list (good for naming variations or making the PGN more readable)
- it will allow to expand/collapse the branch from that move on (which will also persist between reloads)
- unlike the disclosure method of Lichess, bookmarks hide all of the moves following it, so you can see the first move of a branch, for example, and only expand what follows if you are interested.
- it will serve as an anchor for URLs to this exact variation
- for any bookmarked move you can right-click it and get:
- Collapse/Expand all bookmarks - collapse and expand all bookmarks in the tree
- Get bookmark URL - will copy to clipboard a URL to that specific move in that specific chapter and study (the link will look like this: https://lichess.org/study/<studyId>/<chapterId>#<bookmark name>)
- Split chapter here - only if the bookmarked node has children (following moves) - it will create a new chapter with the following moves, then add a comment with the URL to the new chapter. If you want to also delete the following moves, press Shift when you click on the menu item. The confirmation dialog should reflect that moves will be deleted.
Notes:
- Bookmarks are saved in the comments as bkm:<label>
- Only you and people with the LiChess Tools extension (and bookmarks enabled) can see and use the bookmarks, the rest will just see the bkm:<label> in the comment
- Splitting a chapter with Shift-click DELETES THE EXISTING FOLLOWING MOVES from the initial chapter. Don't tell me you weren't warned.
- You cannot collapse a bookmark if the current selected move is under it
- selecting or moving to a position under a collapsed bookmark will expand it
Link to download all studies of a player
category: Analysis/Study - Advanced
values: yes / no - defaults to yes
This feature will add a "Download all studies" link in the studies list section whenever a user is selected in the query. This happens in two situations: either you went to your studies or you selected the studies of another player. The necessary condition for the link to appear is that the study search query contains "owner:<user>" where <user> is any user id. The link will download one PGN with ALL studies of the selected user that you have access to. Naturally, your studies will all be downloaded. For other users, only the public studies will be downloaded.
Study flairs
category: Study - Advanced
values: Author flair / Member flairs / Flairs from study topics - defaults to Flairs from study topics
Important: Lichess has implemented the same feature for study and study owner flairs. If you want to stick with the native version, turn all options off here!
This feature allows adding flairs to studies. The first two options add the flairs from the author and/or members of the study. The third one allows adding your own flairs to the study, using the study topics.
Flairs will appear in this order:
- study flair - as chosen by the native study flair (only if the topic flairs is on)
- study topics - as chosen in the study topics (only if the topic flairs is on)
- study owner (only if the author flair is on)
- study members (only if the member flairs is on)
Example: you want to add an alien flair to your study. The flair name is smileys.alien, so your topic needs to be flair.smileys.alien. Don't worry, all you have to do is go to your study, PGN tags, select Manage topics then type alien and the smiley will appear in the dropdown ready to select.
An even simpler solution is to press the Flairs button on the left of the popup which gives you a normal flair picker to select with.
The result is that, in the studies list, instead of the four chess squares icon for all studies you will get the first study flair icon, and the rest of the flairs will be listed on the bottom of the study. The flairs of the study come first, then the one of the author, then the one of the invited members (if the options are set to show them).
The list of all possible flairs can be found at https://lichess1.org/assets/flair/index.html
Notes:
- user flairs will show the user powertip on mouse over
- topic flairs will go to the topic search on right click. This is to avoid confusion for people who just want to open the study. On mobile this works with long click.
- for people not having LiChess Tools installed, there will be no flairs in the study lists and when opening the study they will see the flair as text (ex: flair.smileys.alien)
Mirror button in Board Editor
category: Board Editor - Advanced
values: yes / no - defaults to yes
This will add a new button to the Board Editor () which will mirror the position you have currently. Unlike Flip board, it will create the exact same position for the other side, with the exact same valuation and move opportunities.
Custom mini-game size
category: General - Advanced
values: a number - defaults to unset
This feature sets a custom size to mini games, which are the boards that appear when you hover over a playing player link or in the Current Game or Broadcasts section, etc. The default is unset, which keeps the native lichess style. An equivalent numerical value for the default would be around 20. Change the number to increase or decrease the size of mini boards.
Notes:
- the minimum value that will be taken into account for mini-games is 17. Lower values will only affect the popup board in the computer eval window. That's because we have to take into account the ratings and username text in the user info popups.
Remove chat link warning
category: Chat, forums, blogs - Advanced
values: yes / no - defaults to yes
Needs log in
An annoying "feature" in lichess is asking (randomly and inconsistently) if you want to leave the Lichess web site when clicking on a link in the inbox chat. This tool removes that warning.
Lobby page elements
category: Apperance - Advanced
values: Side / Side:streams / Side:spotlights / Side:timeline / Play grid / Play buttons / Play:bullet / Play:blitz / Play:rapid / Play:classical / TV / Blog / Daily puzzle / Support / Feed / Tournaments / Leaderboard / Winners / About / Extra counters / Recent games - defaults to all except Recent games
Needs log in for the Recent games section
This feature selectively hides/shows elements in the lobby. Customize the main Lichess page to your heart's desire.
There is an Extra counters feature that shows in the counters section an estimate of the total games played on Lichess, how many games have been played this year, this month and today.
Another extra feature is the Recent games section, which will be added in the Play buttons section (if visible!). The buttons will be placed on top and minimized and in the remaining space the most recent 8 games will be displayed and a More button. If you click on More you will be sent to the Advanced Search page of your games.
If the Play grid is hidden, then the link to Play in the main menu will go to a page that shows just the play grid and buttons - this only happens in desktop mode, because on mobile there is just one link to the main page, not two.
Notes:
- At the moment the elements will just be hidden, the space they take remains there, unless an entire row of elements is hidden. Making every possible combination of elements arrange correctly is not trivial.
- I have tried to partially fix issues in various configurations with common sense ideas. Let me know if you feel a specific configuration of elements looks better rearranged somehow. At this moment if you hide the side timeline, but you keep the feed, the feed will be moved instead of the timeline.
- If you disable some subcomponent, like Side:streams, while showing its parent (Side), only it will be hidden. If you hide a component, all of its subcomponents will be hidden, regardless of how you set them.
Lobby rating difference
category: Appearance - Advanced
values: yes / no - defaults to yes
Needs log in
This will show next to the rating of players in the lobby the difference from your current rating. Red means they are lower than you, green that they are higher.
Daily quote
category: General - Advanced
values: no / On top / On the side - defaults to On the side
This feature will show a daily chess quote in your lobby on large enough screens. You can close it, which means you will not see it again that day.
If you choose On the side, it will appear in the side section, which is on the left on large screens and you can see it even on smaller screens, on mobile phones for example. Another advantage is that it doesn't move the lobby layout down when the tool loads.
The daily quote author can be clicked to get the list of all the quotes in the extension for that author.
Timeline in Profile
category: Appearance - Advanced
values: yes / no - defaults to yes
Needs log in
This feature will add a new tab to your profile page with the timeline items. The same can be achieved by clicking on the "more" link at the end of the lobby timeline or if you enabled timeline notifications and you click on the notification. However, since the lobby feature can remove that part of the page and you may not want to enable notifications, here is a simple way to get to that page without any issues.
Fix board coordinate position
category: Appearance - Advanced
values: Fix outside coordinates / Larger coordinate font / On each square - defaults to Fix outside coordinates
This feature has two purposes. The first is to fix a Lichess bug that doesn't apply the preference for board coordinates on the outside in Analysis/Study. The second is to fix the CSS a little bit and also to enlarge the coordinates font.
Since most people found the larger coordinate font ugly, you have to enable the larger font manually and is disabled by default.
Also, a third option that doesn't exist natively on Lichess will put the coordinates On each square of the board. (Lichess also implemented this, so you get a choice on what to use)
Profile slider options
category: Appearance - Advanced
values: Show dates / Add 1W filter / Fix small intervals - defaults to all
On the profile of a user there are buttons to select the range of the chart on top of the page. There is also a slider that can select custom ranges and one can also drag the selection on the chart itself. This feature improves the way these elements work:
- Show dates - will show the start/end date text in a label
- Add 1W filter - will add a one week filter button
- Fix small intervals - will update the slider minimum and maximum values in order to be able to be able to control small time intervals. When the start and/or end of the slider is unbounded (no left/right border) it means that there is more on that side which can become accessible if you increase the size of the interval or if you pan the slider in that direction. Having extra information to the left or right of the slider will change the text of the label to orange accordingly (start date, end date or both).
Game list options
category: General - Advanced
values: Filter aborted / Filter analysed / Filter titled opponents / Color by players / Go direct to analysis / Selection / More info button / Remove games / Text filter - defaults to all except Text filter
Needs log in for imported games
This feature handles options for list of chess games, like in Profile or Advanced Search. The options will be stored locally so they persist on page reloads
Options:
- Filter aborted - a filter to show/hide aborted games. Aborted games are considered games where at least one side has not moved.
- Unfortunately that also includes currently playing games where no one has moved yet.
- Filter analysed - a filter to show/hide games with a computer analysis
- Warning: if you have a lot of games and very few with computer analysis, this will hide all of the games without analysis, leading to loading many pages of the game list really fast. Lichess might report a server overload.
- Filter titled opponents - a filter to show/hide games against a titled opponent.
- an opponent is considered a player that is not the one on who's profile you are on. If the page is not a profile page, like Advanced Search, then an opponent is a player that is not you.
- Warning: if you have a lot of games and very few with titled opponents, this will hide all of the games without titled opponents, leading to loading many pages of the game list really fast. Lichess might report a server overload.
- Color by players - will change the background color of each game based on the player names. The same two players, regardless of the side they play, should generate the same background color. This helps highlight matches.
- Go direct to analysis - will make clicking on a game row take you directly to its analysis page, bypassing the game page.
- if you do want the game page, right-click to get there
- Selection - this will add a checkbox to every game. Once at least one is selected, two copy buttons will appear at the top of the list which will copy all the selected games to the clipboard and download them in a file. The first button will copy them as PGN, the second as CSV. If you are in your own list of imported games, you also get a delete button, so you can delete in bulk the games you imported.
- More info button - this will add a button that will add more information to displayed games. This doesn't require selecting any of the games. In the current implementation it adds accuracy to the games with a computer analysis.
- Remove games - this will add a button that will remove selected games from various sections. For imported games, it will delete them. For bookmarks, it will remove the bookmark from the game.
- Text filter - this will filter games by text. Write some words and press Enter or move focus away from the filter box
- this will search game articles containing any of the words in the filter, case insensitive
- this supports quotes, so:
- Sicilian TotalNoob69 will only show games that contain "Sicilian" and "TotalNoob69"
- "Sicilian TotalNoob69" will only show games containing the string "Sicilian TotalNoob69"
- Warning: if you have a lot of games, this will hide all of the games that don't contain the words in the filter, leading to loading many pages of the game list really fast. Lichess might report a server overload.
More decimals for computer evaluation
category: Analysis (minor)/Study - Advanced
values: yes / no - defaults to no
If you enable this feature, the computer evaluation will show two decimals instead of one for computer evaluation values. This applies to the main evaluation value, the evaluation of each point of view as well as the evaluations of individual moves in the move list (if available).
Active title icon
category: Appearance - Advanced
values: no / Pawn / Knight / King / Circle - defaults to no
This feature will replace the default lichess tab icon in your browser with the lichess flair icon by default - which I believe is much nicer - and then change it depending on various conditions.
If the tab contains a game (whether watching TV, a broadcast, a study or a game, playing or running puzzles) and the game is not ended, then the icon will change to a black or white icon, depending on whose turn it is.
I added this tool is to easily see if someone moved in the game I was watching or if the game has ended or a new one started.
Note: the pieces are mouse cursors, so maybe not the clearest image. White/Black circle are flairs, so they look better.
Blog editing options
category: Chat, Forums, Blogs - Advanced
values: Auto save / Save button - defaults to Save button
Needs log in
Options:
- Auto save will automatically save the blog you are editing every 30 seconds. This will only happen if the content of the blog has changed from last save and it is still in draft.
- Save button will add a Save button 😁. This will allow you save the blog you are editing and continue working on it.
Blog visit history
category: Chat, Forums, Blogs - Advanced
values: Show visited / Persistent blog view - defaults to Show visited,Persistent blog view
This feature will make it easier to understand which blog posts you have read and liked. At this point all it does is record what you visited and then indicate that in blog post lists.
Options:
- Show visited - will show an eye icon on blog post cards if that blog post has been visited in the past. If you liked the post, it will show as a red heart instead.
- this also will add a tooltip over the number of views in a blog showing the percentage of likes over views for blogs with over 100 views. As a principle, everything over 2% is good.
- Persistent blog view - this will remember last blog view (community, friends, topic, sort) and set that as the Community/Blog link in the Lichess menu.
Note: you must visit a blog post after this feature has been added for it to show as visited. Also, this is stored locally, so changing devices will show a different view.
Computer evaluation line options
category: Analysis (minor)/Study - Advanced
values: Highlight same moves / ...only current orientation / More lines / Color evaluation / Depth chart / Download engine analysis / Plot PVs - defaults to More lines
Options:
- Highlight same moves - this will colorize the moves if found several times in the computer eval lines. Each specific move will have a different color, so you can easily determine the difference between moves.
- ...only current orientation - this will only colorize the moves of the side on the bottom of the table, provided Highlight same moves is enabled.
- More lines - this will add a little button next to the slider for how many computer lines you want to see in the computer evaluation. Clicking it will toggle the maximum value of the slider from 5 to 10. So you can go to the computer engine settings, toggle to 10 maximum lines, then drag the slider to 9.
- Note: Lichess API limitations make this feature unavailable for external engines
- Color evaluation - this will add colors (best, good, mistake, blunder) to the evaluation values in the computer engine lines
- Depth chart - this will overlay a small chart on the value of the computer evaluation, showing how it changed on different engine depths. Good for finding out positions difficult to evaluate. This will also add a "level" at which the evaluation deviates maximally. If the level is green, then it's good for the orientation side, else it's bad.
- example: if you see a small superscript 5 that is green, that means at ply 5 the evaluation jumps in your favor.
- Download engine analysis - this will add a button on the computer evaluation header that allows you to download the data of the analysis. The downloaded file will have the FEN (position) in the title and will be in JSON format. If you press the button when the analysis is on-going, the human readable lines from the computer evaluation window will also be added in a comment at the beginning of the file.
- Plot PVs - this will show a bunch of circles on the bottom of the computer eval header if there is a local computer evaluation in the previous move and the current one. The circles represent the best computer move and the rest of the PVs (multiple computer lines) from the previous move (if any) plus your current position evaluation down to 300 centipawns from best computer move. This shows you the clustering of computer best moves compared to last move.
Go to Analysis on game end
category: Play - advanced
values: loss / draw / win / Request analysis button - defaults to none
Needs log in
This feature will automatically open the Analysis page when your game ends with the selected outcome. Note that draw means anything that is not a win or a loss, so even aborted games.
If Request analysis button is enabled, then a button to automatically request a server analysis and then go to the game analysis page will be displayed when one of your games ends.
Extra piece sets
category: Appearance - Advanced
values: various sources - defaults to Siderite,chess.com,HollowLeaf
This feature will add extra chess pieces to Lichess. The options are chess.com, which adds the sets of 2D pieces from chess.com to the list, and some GitHub repositories that host piece sets.
You too can have a custom piece set here. All you have to do is create a GitHub repository for them, just like this: https://github.com/lichess-org/lila/tree/master/public/piece/alpha. Then let me know so I can add them to the extension.
Notes:
- the piece sets are loaded from chess.com or GitHub, they are not bundled in the extension, so if you have any network issues with these sites, this feature will not work as expected.
- there will be duplicates, as many people usually just take existing piece sets and alter them a little, if that. Since I don't know when people will update or remove their public repositories, I will not filter the duplicates. Use the piece set that best suits you.
Custom board image
category: Appearance - Advanced
value: a public image URL - default to none
This feature will add a "Custom board" button in the board choice which will prompt you for a public image URL to replace your 2D board. You can also save the URL directly in the Preferences.
From v2.4.136, there is a list of custom board URLs you can pick from. If you want your own board there, just host it somewhere (like GitHub) and then contact me to add it.
Board styling
category: Appearance - Advanced
values: yes / no - defaults to no
Once enabled, this will add a lot of extra CSS classes and attributes to chess boards, so that people can style them with custom CSS. Here are the changes made:
- a styled board will have the CSS class lichessTools-boardStyle
- an arrow will be added with the CSS class lichessTools-lastMoveArrow from the origin to the destination square of the last move, which is by default hidden.
- use --lt-start-color, --lt-end-color, --lt-glow-color and --lt-width to style the arrow.
- attributes will be added to the cg-container element of each board:
- sideToPlay - black or white
- lastMovedPiece - piece name, lowercase
- lastMoveSquare - board coordinate of the last destination square
- lastPieceCaptured - piece name, lowercase
- if a piece is selected, it will have the selected class
- after a piece was moved:
- the piece will have the moved class
- the origin square will have the orig class
- the destination square will have the dest class
Themes
category: Appearance - Advanced
values: whatever themes are available - defaults to Fix third parties
This feature will enable/disable various CSS themes. If an external theme (made by someone other than me) it will show attribution in the Preferences page. It will also be the creator's responsibility to maintain it.
Available themes:
- Performance - performance CSS changes
- mainly attempting to remove all animations, which cause slow rendering
- Just Explorer - will hide the computer eval moves (but not the arrows, if enabled) and the move list when the Explorer is open.
- This will only be applied for mobile devices
- Mobile - a lot of style improvements for mobile, especially aimed at studies and interactive lessons
- it rearranges and repositions elements of analysis and study pages
- it fixes various issues with the default Lichess mobile layout
- it transforms the navigation button area in analysis pages to have two rows, allowing larger buttons and minimizing mis-tapping
- improves the way interactive lessons look
- Slim arrows - will make arrows less thick: color arrows, variation arrows and computer evaluation arrows.
- Slimmer arrows - only with Slim arrows enabled, makes the arrows even slimmer
- Fewer icons - will hide the header lichess and logged user icons
- No sticky header - will make the page header scroll with the page
- Toggle study chat - hide the chat from studies and expand the chapter list for large screen layouts.
- this replaces the now removed No study chat theme
- the toggle to open the chat again will be located on the bottom-left corner and will glow if new messages came in
- note that the Lichess chat hiding setting applies to:
- study chat
- game chat
- team chat
- Nicer piece drag - adds some shadows, sizing and borders to piece dragging, enhancing the experience
- No Practice button - especially useful on mobile devices, it hides the Practice with computer button under the analysis tools, thus preventing you from starting analysis for no good reason by mistake
- also check out the Quick Actions Toggle Practice option, which can move the Practice button in the quick actions menu
- Flexible game move list - the move list in games (so when playing or watching games on Lichess TV) is pretty limited in space. This theme fixes that
- Thick analysis gauge - the analysis gauge will be 50px thick
- Larger analysis move font - the font size in the analysis move list will increase by 125%
- Grid board squares - this will add dark lines around the board squares for 2D boards
- No game result popup - this will hide the popup with the result at the end of games on mobile
- the game result popup was removed by Lichess
- Fix third parties - various fixes for issues in other extensions or third parties that won't fix the issues themselves
- this is for Prettier Lichess for now
- Hover time controls - this will show the time control over the popup of a game when you mouse over a game link or user link who is currently playing.
- Mobile hide start/end buttons - hides the "jump to first move" and "jump to last move" buttons on mobile. Many people complain about pressing them accidentally.
- those buttons have been already hidden by Lichess, opting for a slide left/right interface for the same functionality, so this was removed
- No fish button on mobile - reverts to the original Lichess computer evaluation behavior: no "fish" button to show and start computer analysis and always show computer evaluation header
- Lichess made some changes and the eval bar doesn't exist anymore if the computer evaluation is not running, so CSS solutions cannot work. I will probably handle this in the Mobile device features tool.
- First interaction - if this is enabled, the page will be slightly grayscale when user has not interacted with it. This helps in some scenarios where sounds are not heard or other features are unavailable until the user interacts with the page.
- No chess variants - with this enabled, no chess variants other than Chess960 should be visible in Lichess. Let me know if I missed some spots.
- Other themes - no need to detail what each of these themes do. If you see a theme, you can try it out and see what it does. (see Themes menu)
Notes:
- Multiple themes can be applied at the same time, but beware of conflicts.
Themes menu
category: Appearance - Advanced
values: yes / no - defaults to yes
This feature will add a Theme item to the top-right user menu where you can toggle themes on/off.
Wiki pages based on FEN
category: Analysis (minor) - Advanced
values: yes / no - defaults to yes
This feature will show Wiki pages on openings even if the order of the moves changes. Basically, it looks for the Wikibooks Chess Opening page associated with the current position. It applies both to Analysis Board and to the text in the Openings page.
For studies, which do not have a wiki section, if wiki content exists, it will use it as a tooltip of the opening link in Explorer.
OBS Integration
category: Integration - Advanced
values: yes / no - defaults to no
This feature will add an OBS button to broadcasts. There you can set up mappings between broadcast boards/chapters and OBS scenes, so that changing the board selection will change the scene as well. Each broadcast has its own setup and mappings.
Don't forget to enable the WebSocket server in OBS' WebSocket Server Settings
The default OBS connection settings are localhost, port 4455, no password. If you want to use passwords or some other URL, you will have to open the OBS setup popup by pressing the button (you will get no scenes to map), then update the password and/or URL, save the settings, then reopen the OBS setup. Now, with the correct password, the OBS scenes should be available. But the simplest thing is to not use a password and run the server locally on the default port.
By default, broadcasts will have OBS disabled and the OBS button for them will appear dimmed. Click on it to set up the mappings and connection properties and save to enable it. You can also enable/disable the OBS integration for the broadcast by right-clicking on the OBS button or by pressing O.
There is a default scene mapping that, when set, will change the scene for all boards that don't have a specific mapping. This scene will also be used for the board list view of a broadcast (no big board displayed, just the list). If you don't want this functionality, set the default scene to empty.
Unselect piece after specified seconds
category: Play - Advanced
values: numeric- defaults to empty
If you select a piece while playing (games or puzzles) and wait for the number of seconds specified by this setting, the piece will get automatically unselected. This only works for the last move in the list, so for example this will stop working after you make a mistake in a puzzle and there is a wrong move after the current position.
Easy access full screen button
category: General - Advanced
values: yes / no - defaults to no
If enabled, this will hide the Lichess header in full screen mode and will add a top header button () that will enable a full screen mode when pressed. To return to normal press Esc, F11 or move the mouse to the top of the screen and click the hovering X button.
Notes:
- this only works in Desktop mode, not for mobile.
- in Zen mode the full screen button will be visible. If the option is on, full screen in Zen mode will not show the Lichess logo and the button to exit Zen mode, therefore if you want to exit Zen mode you either use the Z key shortcut or exit full screen mode, then use the exit Zen mode button.
One click move
category: Analysis (minor)/Study - Advanced
values: Analysis/Study / Only orientation side / Move from PGN - defaults to none
This feature enables one click moves, when clicking on a square where only one piece can legally move will perform that move.
Options:
- Analysis/Study - this enables one click move in Analysis or Studies
- Only orientation side - this forces the feature to only work for the side that the board is oriented for. So if you see the board from the White orientation, it will only work for when it's White's turn to move.
- Move from PGN - this is only for the situation where the square you clicked on can accept multiple pieces moving there. In that situation, it will only work if you are not in Interactive mode or you can write to the study (owner or write access contributor). Then if the PGN (analysis or study) contains only one move that reaches the destination square, it will make that one.
- this is mostly an accessibility feature to help easily do training without clicking and moving the mouse a lot.
- when it's ambiguous what the player meant with a click, the pieces that can move to that square will flash briefly. This also will happen when there is only one move in the study you own and that move will be made.
Notes:
- this only works in Analysis/Study for now. Altering the way the game is played is against the Lichess Terms of Service, but I am working on convincing them to implement it natively.
- to clarify the Move from PGN option, it will not apply in the following situations:
- you are in interactive mode and you are not an owner or writing contributor - the idea here is that if you can always exit interactive/preview mode you can find out what the next move is, but if you cannot, you don't know what the next move should be
- there are moves in the PGN that reach the clicked square, but there are multiple ones - LiChess Tools doesn't know which one to pick
- obviously, if you have access to the PGN you can just look what the move is, so there is no conflict in non interactive mode or in the Analysis board
- running correspondence games
Mouse wheel during game play
category: Play
values: yes / no - defaults to no
This feature will enable mouse wheel during play. Just like in Analysis, it will move to the previous/next move in the move list. This behavior is disabled by default in Lichess as to not interfere with game play, so that's why it's also not enabled by default in LiChess Tools.
Expand all variations
category: Analysis/Study - Advanced
values: Show button / Auto expand - defaults to false
Options:
- Show button - adds a button looking like a magnifying glass with a plus sign in in () in front of the first move in the move list tree in case any of the variations in the tree are collapsed. Clicking on the button will expand all variations recursively and then hide the button. Any operation that will result in collapsed variation will show the button again.
- Auto expand - auto expands all collapsed variations in a study chapter or analysis tree the first time they are loaded. This basically disables the native Lichess functionality of hiding variations. It also hides the +/- buttons in the move list. Best used with bookmarks (see Bookmarks option of the Move List Options)
- From version 2.4.81, this tool lost its meaning as Lichess implemented their own toggle to disable the native collapse/expand functionality (also called disclosure)
Commands
The commands feature is actually a combination of tools that register themselves with the cliCommands tool. This enables you to type / and then a command or click the magnifying glass button on the top of the page and then type a command to execute various functions, besides the standard ones. Since commands are executed manually, they have no visible Preference to disable them.
Here is the list of available commands:
- board - it will show/hide the board in Analysis mode (Analysis board and Studies). Use this with the Expanded move list and Hide left side options of the Move list options feature to have a move list filling the whole screen (good for presenting, for example).
- trapvalue - provided the current move is in the Explorer database, this command will calculate the trap value of the current position. For more details on what that means, check out How To Calculate The Trappiest Chess Openings Using The Lichess API.
- piecevalue [depth] ["c"] - this will spin a local Stockfish engine and give every piece a value, as calculated from the current evaluation compared to the evaluation of the position where that piece is missing.
- depth determines the depth at which the position is evaluated. If not specified it will default to 20.
- if the depth is larger than 25, there will be a short depth 14 run right before, then the higher slower depth one will run
- specifying "c" will run the command continuously. To stop it use the /stop command or refresh the page.
- copypgn ["fen"] ["separate"] ["tohere"] ["unicode"] - this will copy the moves in the analysis move list (Analysis board and Studies) to the clipboard as the moves reaching the current position and any branching moves from it.
- if fen is specified, the PGNs will start from the current position with the FEN tag specified
- same as Shift-click on the Copy PGN menu item
- if separate is specified, each variation will be saved as a separate linear PGN
- same as Ctrl-click on the Copy PGN menu item
- if tohere is specified, the PGN only copies moves to the current position
- same as Alt-click on the Copy PGN menu item
- if unicode is specified, the PGN will have unicode pieces instead of letters
- note that results in a text that is meant for human readers, no longer a valid PGN
- readgame [speed] [voice] [instrument] - this will read the game moves from the current position. It will follow only the first variation of every node, ignoring the others.
- speed is an optional integer number, defaults to 100. Larger values makes the speech faster, lower makes it slower.
- voice is an optional integer index number, defaults to 0. Changing it will change the voice which reads the moves, depending on your own browser setup.
- instrument is an optional integer index number, defaults to 0. Changing it will enable a sound to be played in the background, based on the computer evaluation, if the game has been analyzed.
- example: /readgame 80 2 1
- this command also adds a feature to read a game in analysis if you add #readgame at the end of the URL (i.e. https://lichess.org/<game id>#readgame or https://lichess.org/<game id>/black#readgame or https://lichess.org/study/<study id>/<chapter id>#readgame etc.)
- readposition [speed] [voice] - this will read the the current position for the purposes of setting up a board.
- speed is an optional integer number, defaults to 100. Larger values makes the speech faster, lower makes it slower.
- voice is an optional integer index number, defaults to 0. Changing it will change the voice which reads the moves, depending on your own browser setup.
- example: /readposition 80 2
- skipmove - this will generate 5 moves (if possible) to reach the same position, but with the other side to play.
- s - it will search in the move list of Analysis Board / Game Analysis / Study / Broadcasts. You can search for any part of the PGN, FEN or even individual moves:
- /s Nd5 - finds the Nd5 moves or containing Nd5 in the comments
- /s r2qkb1r/ppp1pppp/2n5/2npP2b/5P2/3P3P/PPP1N1P1/R1BQKBNR - finds the positions with the specified FEN
- /s 1.e4 e5 2. Nf3 - finds the Nf3 move preceded by e4 and e5 at ply 3
- /s e4 e5 Nf3 - finds the Nf3 move preceded by e4 and e5
- partial strings are valid as well as wildcards: * for "anything" and ? for "any single character" can be used.
- /s 3P3P will find positions where there is a rank with only two pawns, one on the d-file and one on the h file.
- /s 3?4 will find positions where there is a rank with only one piece on the d-file. Also comments containing a 3, followed by something, then a 4.
- this functionality also be available by pressing Ctrl-F in an analysis context.
Commands options
category: Commands - Advanced
values: Disable mouse over - defaults to none
This feature is about various options related to CLI commands functionality.
Options:
- Disable mouse over - this option will eliminate a behavior that annoyed some players, mainly that moving the mouse over the magnifying glass icon on top of the screen would work just like clicking on it, taking focus from other things.
Also save options for browser private/incognito mode
category: General - Advanced
values: yes/no - defaults to no
This was a user request to find a way to save the options outside the local browser cache, as he was playing the game from incognito/private browser mode. Since no other solution was better, this saves the options as notes in the first chess game you ever played on lichess. So be careful that this will alter those notes, although I am not aware of many people using the private notes feature.
Notes:
- be aware that it will alter the private notes of the very first game you played on lichess
- the extension will use whatever options you have in the browser local cache. Only if they are not there it will take them from the notes. That means that you can do weird stuff like enabling the feature, saving options, disabling it, changing the options and now you will have different settings in normal and incognito mode. So use with care.
Hide score tally crosstable
category: Play - Advanced
values: yes/no - defaults to no
Another user request was to not see the crosstable, the thing that shows how many games you played with the same opponent and what the results and games were. It was intimidating. This feature will blur it out, but allow you to click on it to unblur it. It's a silly feature that may not survive long because there is also the Zen mode lichess option which overlaps this behavior, but it's here for the moment.