ASP.Net Core Web API with Visual Studio Code
This is part of the .NET Core and VS Code series, which contains:
Since the release of .NET Core 1.1, a lot has changed, so I am trying to keep this up to date as much as possible, but there still might be some leftover obsolete info from earlier versions.
 I am continuing my series about .NET Core, using Visual Studio Code only, on Windows, with as little command line work as possible. Read about writing a console application and then a very simple web application before you read this part.
In this post I will attempt to write a very simple Web API using .NET Core. I intend to have some sort of authentication and then be able to read and write stuff using REST API calls. As with the projects before, I will use Visual Studio Code to create a folder, open it, then do stuff in it after running the command 'dotnet new' and preferably changing the namespace so that it is not always ConsoleApplication. This time the steps will be a little bit different, more inline with what you would do in real life:
Right now you should have a web project that compiles. In order to turn this into an API project, we need to understand a few things. So go down to the tutorial for ASP.Net Core API that uses Visual Studio to read about what Microsoft suggests, download the zip file of all the docs and tutorials and look in /Docs-master/aspnet/tutorials/first-web-api/sample/src/TodoApi to see what they did in code (or just browse them on GitHub). You also need to understand that while in normal .NET (how do we call it now?) MVC and Web API are two branches that often have similar functionality in similarly named classes, in .NET Core the API is just part of MVC. So no WebApi namespaces, just MVC.
That is why, to turn our app into an API project we need to addto the dependencies of project.json the MVC packages:
At this point we should have something like this:
project.json
API.csproj
Program.cs
Startup.cs
Clean and name the launch settings as well:
.vscode/launch.json
Let's add functionality to our API. Create a folder called Controllers and in it add a NoteController.cs file. Just copy paste the code for now, we will understand it later.
In this new class we have a lot of interesting things to behold. First of all there is the Route attribute that uses a [controller] token (well explained here). Then there are the Http attributes: HttpGet, HttpPost, HttpPut, HttpDelete which as their name implies define methods on the API controller that are accessed via the respective HTTP methods so beloved by the REST crowd.
An important thing to grasp from this is what happens with the HttpGet attribute (note it has a Name defined) and the later used CreatedAtRoute, which are actually Web API v2 concepts. In our case, whenever we create a new item we return the item as a result, but also set the Location header to the route that would "get" it, so that the client knows how to get to it.
Let's test what we did. While the GET methods are easy to test from the browser (http://localhost:5000/api/note should show an empty array result []), the POST and DELETE are trickier. The Microsoft documentation recommends using Fiddler, but I would go with the easy to install as a Chrome application Postman.
In Postman, don't forget to set the Content-Type header to application/json:
Then POST to /api/note/ a content like
The result of the call should be as explained previously
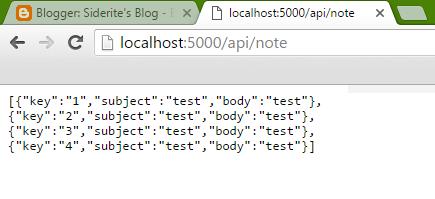
Go with the browser at /api/note/ or /api/note/1 and you should get results
What happened there exactly? We just added a class and it magically worked. How did .Net Core to do that? Core comes with Dependency Injection and Inversion of Control by default. In our case, just because we have a Controller class with a Route attribute made the difference. The line
To avoid polluting the post with a lot of code, here is the improved source code of the API. Note is now a more complex object, the controller is initialized with a INoteRepository instance which is bound to a NoteRepository implementation. The API works just as before, only now Note has Key, Subject and Body properties instead of Id and Content.
The thing to learn from this version is how in the Startup class, in ConfigureServices the line
Now, we don't want any peasant to come and mess with our important notes. We require some way of authenticating our operations. There is a very detailed section about Security in the Core documentation, but I only wanted a simple example. I worked on it for hours just to notice that line instructing the application builder to use authentication was after the one telling it to use MVC. Also some naming bugs that made me waste a lot of time.
Bottom line: here is the sample code with authentication. You cannot use any API calls unless you are a User. You login as a user calling /api/note/login/12345. The Create/Delete APIs are also unavailable to the Users, you need to be an Admin. There is a commented line in the code that also adds the Claim to the Admin role when logging in. I also added logging, so you can see what goes wrong in the Debug Console.
More information about how to implement authentication without Identity (as most Microsoft samples want) can be found at Using Cookie Middleware without ASP.NET Core Identity and my example is based on that.
Update: some of the complaints underneath are not correct anymore, but I am keeping my original reaction unchanged, since it reflects my feelings at the time.
The more complex the project becomes, the less Visual Studio Code can handle it. Intellisense is bloody awful, the exceptions can sometimes be caught only by adding logging to the console, the basic editing features are lacking - like a serious Undo queue or auto formatting when typing or closing brackets or even syntax highlighting at times and there are some features that plainly don't work, for example when you are writing a new class and an option for "Generate Type" appears, but it does nothing. Same for "Generate Variable". While I plan to test VS Code with a large project created in Visual Studio proper, I don't have high hopes. Remember when Microsoft created Silverlight with Javascript and it sucked and they immediately switched to WPF based Silverlight? It feels like that. However, for nostalgic reasons mostly, I also enjoy working in this spartan environment, especially when working with recently released features. It reminds me of the days when I was trying to connect various Linux software with basically duct tape and paper clips.
- Trying out .NET Core and VS Code - Console Hello World
- ASP.Net Core with Visual Studio Code
- ASP.Net Core Web API with Visual Studio Code
- The default Core website with Visual Studio Code
Since the release of .NET Core 1.1, a lot has changed, so I am trying to keep this up to date as much as possible, but there still might be some leftover obsolete info from earlier versions.
 I am continuing my series about .NET Core, using Visual Studio Code only, on Windows, with as little command line work as possible. Read about writing a console application and then a very simple web application before you read this part.
Setup
In this post I will attempt to write a very simple Web API using .NET Core. I intend to have some sort of authentication and then be able to read and write stuff using REST API calls. As with the projects before, I will use Visual Studio Code to create a folder, open it, then do stuff in it after running the command 'dotnet new' and preferably changing the namespace so that it is not always ConsoleApplication. This time the steps will be a little bit different, more inline with what you would do in real life:
- Create a folder for our project called WebCore
- In it create an API folder
- Open a command prompt in the API folder and type 'dotnet new web' (in .NET Core 1.0 you could omit the template, but from 1.1 you need to use it explicitly)
- Open Visual Studio Code by typing 'code' or by any other means
- Close the command prompt window
- In Code select the API folder and open Program.cs
- To the warning "Required assets to build and debug are missing from your project. Add them?" click Yes
- To the info "There are unresolved dependencies from '<your project>.csproj'. Please execute the restore command to continue." click Restore
- Change the namespace to WebCore.API
- Press Ctrl-Shift-B to build the project.
Right now you should have a web project that compiles. In order to turn this into an API project, we need to understand a few things. So go down to the tutorial for ASP.Net Core API that uses Visual Studio to read about what Microsoft suggests, download the zip file of all the docs and tutorials and look in /Docs-master/aspnet/tutorials/first-web-api/sample/src/TodoApi to see what they did in code (or just browse them on GitHub). You also need to understand that while in normal .NET (how do we call it now?) MVC and Web API are two branches that often have similar functionality in similarly named classes, in .NET Core the API is just part of MVC. So no WebApi namespaces, just MVC.
That is why, to turn our app into an API project we need to add
,"Microsoft.AspNetCore.Mvc": "1.0.0"
,"Microsoft.AspNetCore.Mvc.Core": "1.0.0"
<PackageReference Include="Microsoft.AspNetCore.Mvc" Version="1.1.1" />to ItemGroup in API.csproj and tell the project to use MVC in code. This is done by adding services.AddMvc(); in ConfigureServices and replacing the app.Run line in Configure with app.UseMvcWithDefaultRoute(); in Program.cs.
At this point we should have something like this:
{
  "version": "1.0.0-*",
  "buildOptions": {
    "debugType": "portable",
    "emitEntryPoint": true
  },
  "dependencies": {},
  "frameworks": {
    "netcoreapp1.0": {
      "dependencies": {
        "Microsoft.NETCore.App": {
          "type": "platform",
          "version": "1.0.0"
        },
        "Microsoft.AspNetCore.Server.Kestrel": "1.0.0",
        "Microsoft.AspNetCore.Mvc": "1.0.0",
        "Microsoft.AspNetCore.Mvc.Core": "1.0.0"
      },
      "imports": "dnxcore50"
    }
  }
}
API.csproj
<Project Sdk="Microsoft.NET.Sdk.Web">

  <PropertyGroup>
    <TargetFramework>netcoreapp1.1</TargetFramework>
  </PropertyGroup>

  <ItemGroup>
    <Folder Include="wwwroot\" />
  </ItemGroup>

  <ItemGroup>
    <PackageReference Include="Microsoft.AspNetCore" Version="1.1.1" />
    <PackageReference Include="Microsoft.AspNetCore.Mvc" Version="1.1.1" />
  </ItemGroup>

</Project>
Program.cs
using System;
using System.Collections.Generic;
using System.IO;
using System.Linq;
using System.Threading.Tasks;
using Microsoft.AspNetCore.Hosting;

namespace WebCore.API
{
    public class Program
    {
        public static void Main(string[] args)
        {
            var host = new WebHostBuilder()
                .UseKestrel()
                .UseContentRoot(Directory.GetCurrentDirectory())
                .UseIISIntegration()
                .UseStartup<Startup>()
                .Build();

            host.Run();
        }
    }
}
Startup.cs
using System;
using System.Collections.Generic;
using System.Linq;
using System.Threading.Tasks;
using Microsoft.AspNetCore.Builder;
using Microsoft.AspNetCore.Hosting;
using Microsoft.AspNetCore.Http;
using Microsoft.Extensions.DependencyInjection;
using Microsoft.Extensions.Logging;

namespace WebCore.API
{
    public class Startup
    {
        // This method gets called by the runtime. Use this method to add services to the container.
        // For more information on how to configure your application, visit https://go.microsoft.com/fwlink/?LinkID=398940
        public void ConfigureServices(IServiceCollection services)
        {
            services.AddMvc();
        }

        // This method gets called by the runtime. Use this method to configure the HTTP request pipeline.
        public void Configure(IApplicationBuilder app, IHostingEnvironment env, ILoggerFactory loggerFactory)
        {
            loggerFactory.AddConsole();

            if (env.IsDevelopment())
            {
                app.UseDeveloperExceptionPage();
            }

            app.UseMvcWithDefaultRoute();

            /*app.Run(async (context) =>
            {
                await context.Response.WriteAsync("Hello World!");
            });*/
        }
    }
}
.vscode/launch.json
{
    "version": "0.2.0",
    "configurations": [
        {
            "name": ".NET Core Launch (web API)",
            "type": "coreclr",
            "request": "launch",
            "preLaunchTask": "build",
            "program": "${workspaceRoot}/bin/Debug/netcoreapp1.0/API.dll",
            "args": [],
            "cwd": "${workspaceRoot}",
            "externalConsole": false,
            "stopAtEntry": false
        }
    ]
}
The Controller
Let's add functionality to our API. Create a folder called Controllers and in it add a NoteController.cs file. Just copy paste the code for now, we will understand it later.
using System.Collections.Generic;
using Microsoft.AspNetCore.Mvc;

namespace WebCore.API.Controllers
{
    [Route("api/[controller]")]
    public class NoteController : Controller
    {
        private static List<Note> _notes;
        static NoteController()
        {
            _notes = new List<Note>();
        }


        [HttpGet]
        public IEnumerable<Note> GetAll()
        {
            return _notes.AsReadOnly();
        }

        [HttpGet("{id}", Name = "GetNote")]
        public IActionResult GetById(string id)
        {
            var item = _notes.Find(n => n.Id == id);
            if (item == null)
            {
                return NotFound();
            }
            return new ObjectResult(item);
        }

        [HttpPost]
        public IActionResult Create([FromBody] Note item)
        {
            if (item == null)
            {
                return BadRequest();
            }
            item.Id = (_notes.Count + 1).ToString();
            _notes.Add(item);
            return CreatedAtRoute("GetNote", new { controller = "Note", id = item.Id }, item);
        }

        [HttpDelete("{id}")]
        public void Delete(string id)
        {
            _notes.RemoveAll(n => n.Id == id);
        }

        public class Note
        {
            public string Id { get; set; }
            public string Content { get; set; }
        }
    }
}
In this new class we have a lot of interesting things to behold. First of all there is the Route attribute that uses a [controller] token (well explained here). Then there are the Http attributes: HttpGet, HttpPost, HttpPut, HttpDelete which as their name implies define methods on the API controller that are accessed via the respective HTTP methods so beloved by the REST crowd.
An important thing to grasp from this is what happens with the HttpGet attribute (note it has a Name defined) and the later used CreatedAtRoute, which are actually Web API v2 concepts. In our case, whenever we create a new item we return the item as a result, but also set the Location header to the route that would "get" it, so that the client knows how to get to it.
Testing the result
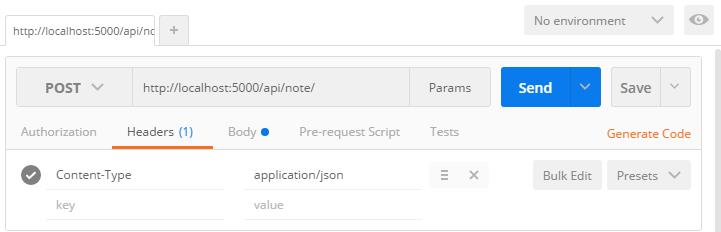
Let's test what we did. While the GET methods are easy to test from the browser (http://localhost:5000/api/note should show an empty array result []), the POST and DELETE are trickier. The Microsoft documentation recommends using Fiddler, but I would go with the easy to install as a Chrome application Postman.
In Postman, don't forget to set the Content-Type header to application/json:
Then POST to /api/note/ a content like
{
    Content:'test'
}
: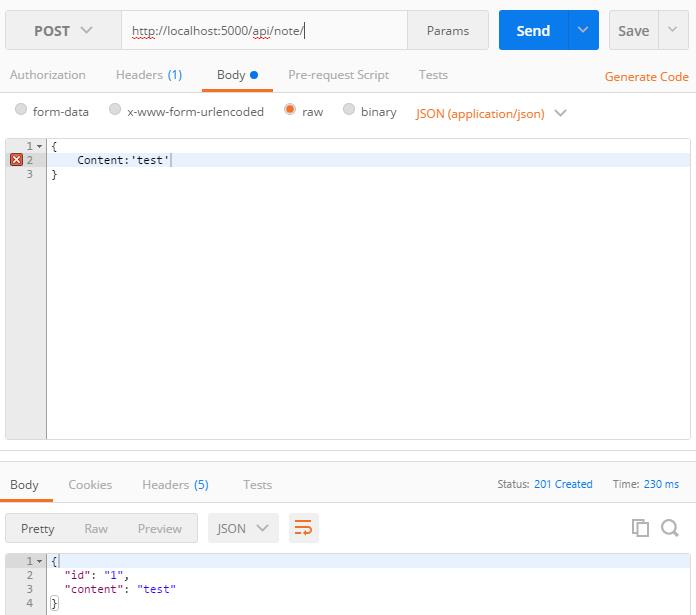
The result of the call should be as explained previously
{
  "id": "1",
  "content": "test"
}
Go with the browser at /api/note/ or /api/note/1 and you should get results
More complexity
What happened there exactly? We just added a class and it magically worked. How did .Net Core to do that? Core comes with Dependency Injection and Inversion of Control by default. In our case, just because we have a Controller class with a Route attribute made the difference. The line
app.UseMvcWithDefaultRoute();is the code that enables that behavior. Let me demonstrate more of this "magic". In our example so far I've hardcoded the Note class inside the Controller class, but usually the class would be part of the functionality of the API and there would be a repository handling saving stuff in the database.
To avoid polluting the post with a lot of code, here is the improved source code of the API. Note is now a more complex object, the controller is initialized with a INoteRepository instance which is bound to a NoteRepository implementation. The API works just as before, only now Note has Key, Subject and Body properties instead of Id and Content.
The thing to learn from this version is how in the Startup class, in ConfigureServices the line
services.AddSingletonwe tell Core that for a request of the implementation for INoteRepository, return the singleton instance of NoteRepository. From this line alone Core knows to initialize the NoteController constructor with the correct repository instance.();
Security
Now, we don't want any peasant to come and mess with our important notes. We require some way of authenticating our operations. There is a very detailed section about Security in the Core documentation, but I only wanted a simple example. I worked on it for hours just to notice that line instructing the application builder to use authentication was after the one telling it to use MVC. Also some naming bugs that made me waste a lot of time.
Bottom line: here is the sample code with authentication. You cannot use any API calls unless you are a User. You login as a user calling /api/note/login/12345. The Create/Delete APIs are also unavailable to the Users, you need to be an Admin. There is a commented line in the code that also adds the Claim to the Admin role when logging in. I also added logging, so you can see what goes wrong in the Debug Console.
More information about how to implement authentication without Identity (as most Microsoft samples want) can be found at Using Cookie Middleware without ASP.NET Core Identity and my example is based on that.
Impressions on Visual Studio Code
Update: some of the complaints underneath are not correct anymore, but I am keeping my original reaction unchanged, since it reflects my feelings at the time.
The more complex the project becomes, the less Visual Studio Code can handle it. Intellisense is bloody awful, the exceptions can sometimes be caught only by adding logging to the console, the basic editing features are lacking - like a serious Undo queue or auto formatting when typing or closing brackets or even syntax highlighting at times and there are some features that plainly don't work, for example when you are writing a new class and an option for "Generate Type" appears, but it does nothing. Same for "Generate Variable". While I plan to test VS Code with a large project created in Visual Studio proper, I don't have high hopes. Remember when Microsoft created Silverlight with Javascript and it sucked and they immediately switched to WPF based Silverlight? It feels like that. However, for nostalgic reasons mostly, I also enjoy working in this spartan environment, especially when working with recently released features. It reminds me of the days when I was trying to connect various Linux software with basically duct tape and paper clips.
Comments
Could not get any response There was an error connecting to http://localhost:5000/api/. Why this might have happened: The server couldn't send a response: Ensure that the backend is working properly Self-signed SSL certificates are being blocked: Fix this by turning off 'SSL certificate verification' in Settings > General Proxy configured incorrectly Ensure that proxy is configured correctly in Settings > Proxy Request timeout: Change request timeout in Settings > General
pawan dhamiYou are welcome. It's silly, you have to do a dotnet restore on the project.
SideriteI'm very appreciated for your answer. I have spent several hours yesterday to find any solution of this issue!
Anton AnpilogovHere is the solution: https://siderite.dev/2017/04/using-multiple-projects-in-visual.html. Thank you for asking an interesting question I've learned something from.
SideriteExcellent and clear article! Thank you! But i stuck with adding other projects as references. The build is done, but at runtime it's throws the exception "FileNotFoundException: Could not load file or assembly 'Database, Version=1.0.0.0, Culture=neutral, PublicKeyToken=null'. The system cannot find the file specified." Is anyone know how to resolve it?
Anton AnpilogovThanks for sharing this with us.
Tony Romoexcellent post will be very useful in custom application development and asp.net web development services
anuvj